Search Results for: dinosaur

Upcycled Toys Idea: DIY Dinosaur Toothbrush

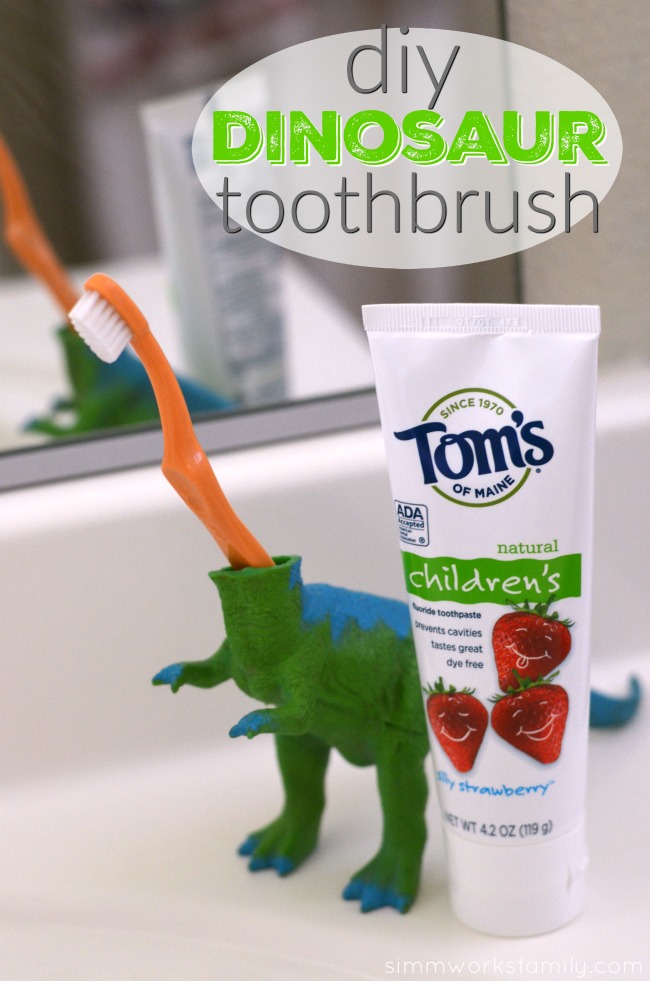
Earth day is right around the corner and, like every day, we love finding new ways to repurpose and reuse old things around the house in an effort to reduce the waste we send to the landfills. This DIY Dinosaur Toothbrush, brought to you by our sponsor Toms of Maine, is the perfect way to upcycle old toys AND get the kids excited about brushing their teeth. Win-win!

*No real dinosaurs were harmed in the making of this project*

DIY Dinosaur Toothbrush - an easy way to make brushing teeth fun

I’m pretty lucky. After dinner is over my husband completely takes over with the older kids while I put the baby to bed. He makes sure the homework is done, takes care of the bedtime routine, and then lays with them for a bit before they go to sleep. But I was noticing a little more struggle over the past few weeks with getting the kids to do one thing… brush their teeth!

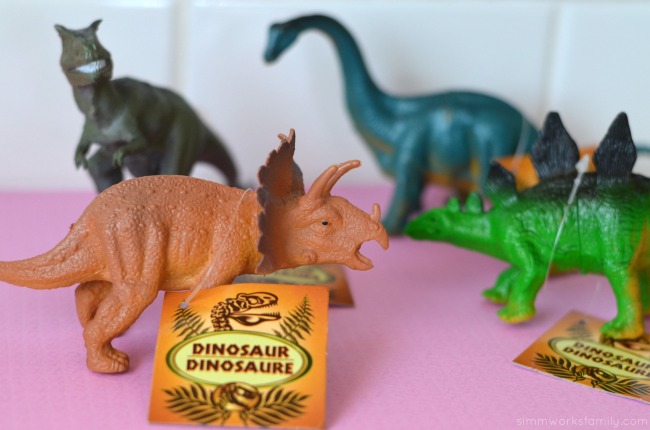
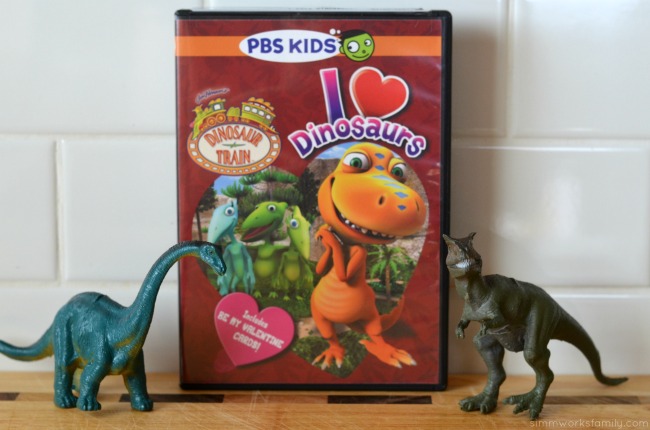
So when I was purging the kids toys, I saved a few for an idea I had to spark some excitement back in their routine. And since it’s so close to Earth Day I figured it’d be the perfect time to recycle and reuse some of the items I was getting rid of. I grabbed some of the dinos from the giveaway pile (don’t worry… my son still has PLENTY of dinosaurs in his collection) and here’s what I came up with! Now the kids love playing while they make their dinos brush their teeth and we’ve helped create less waste. 

DIY Dinosaur Toothbrush supplies

DIY Dinosaur Toothbrush

What you’ll need: 

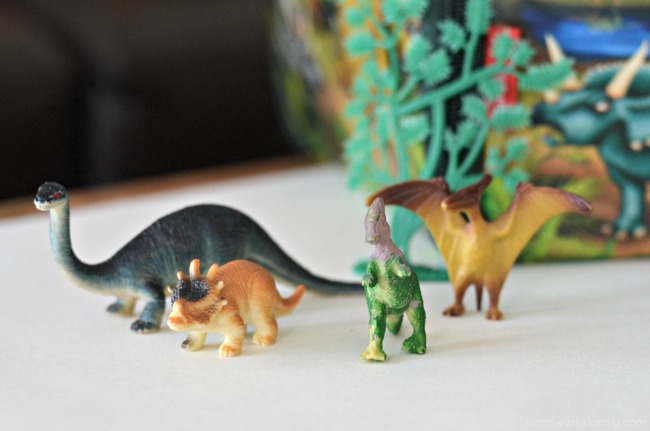
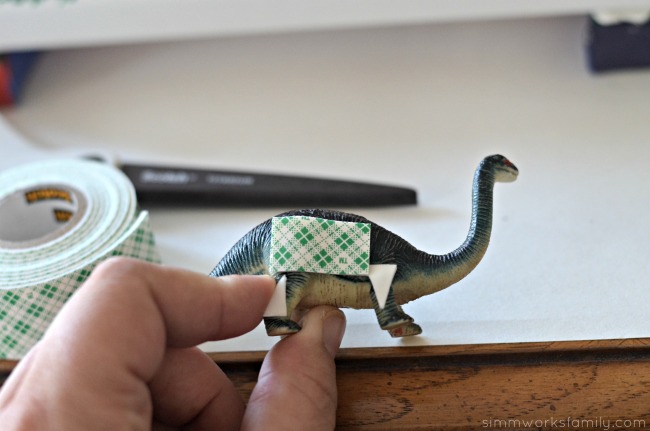
  • Plastic T-Rex or Brachiosaurus dinosaurs
  • x-acto knife or other craft knife
  • Tom’s of Maine kids toothbrush

What you do: 

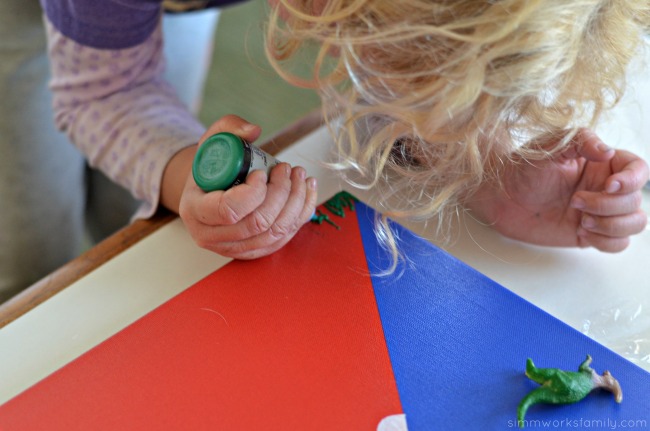
1. Make sure the dinosaur you choose has a body that’s around the same size of the toothbrush handle.

DIY Dinosaur Toothbrush - cut off dinosaur's head

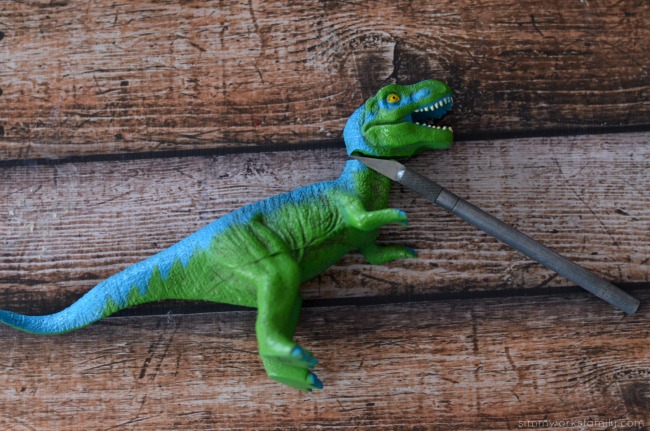
2. Then grab the x-acto knife and cut off the dinosaur’s head. Try and trim/even up the cut on the top of the body.

DIY Dinosaur Toothbrush - even out cut

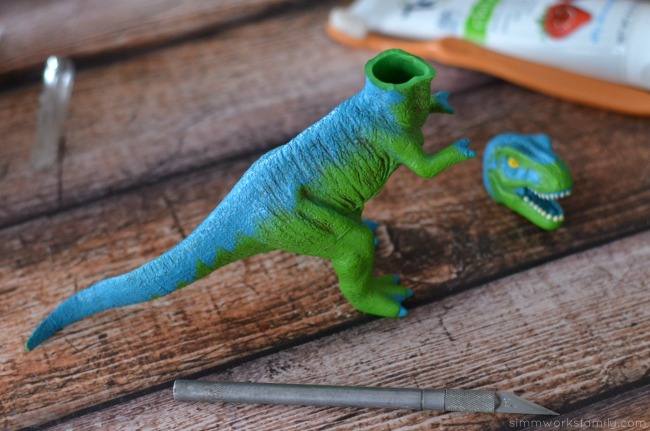
3. Stick the toothbrush into the hole and angle it to fit into the body cavity.

DIY Dinosaur Toothbrush - a simple upcycled project to make teeth brushing fun

There are so many ways you can repurpose the toys in your home! Find some other great ideas of toy repurposing on my Upcycled Toys pinterest board.

With more than 250 million tons of waste generated every year in the United States,1 Tom’s of Maine, is teaming up with recycling leader, TerraCycle, to decrease the amount of trash ending up in landfills by launching the #LessWasteChallenge pledge. The pledge is meant to inspire families to reduce their household waste by one pound per week. You can join Tom’s of Maine by taking the simple pledge with just one click at www.tomsofmaine.com/lesswaste.

In Maine, the company is working to get to zero waste by 2020. Learn more in the Goodness Report here. Find ways you can help out by following the #LessWasteChallenge and taking the pledge! Then share how you’re making less waste by sharing on social media and using the hashtag!

Looking for more ways to product less waste? Check out these awesome videos:

How have you upcycled toys?

1 Environmental Protection Agency. (2016). Municipal Solid Waste. Retrieved from http://www3.epa.gov/epawaste/nonhaz/municipal.

Find more great upcycled projects right here!

Upcycled Container Gardens Housing Your Herbs

Upcycled Herb Garden

How To Make A Glass Vase Out Of A Coke Bottle - the perfect way to display garden roses

Upcycled Coke Bottle Vase

DIY Baymax Upcycled Sock Rice Pack

Upcycled Sock Rice Pack

DIY Milk Carton Bird Feeder

Upcycled Milk Carton Bird Feeder

DIY Dinosaur Hoodie

DIY Dinosaur Hoodie

Last Halloween when I was busy figuring out costumes for the kids to wear I got a request from my son for a dinosaur costume. Since I know he doesn’t like big, full body costumes I thought that trying my hand at a DIY dinosaur hoodie would be easier for him to wear. Well a few months later and the hoodie is getting great use… as a fabulous addition to our dress up closet! And it’ll be the perfect thing to wear to The Good Dinosaur movie when it comes out on November 25th! 

Not only is this hoodie easy to make, it’s almost no-sew! With only a small bit of sewing needed (thanks to the wonderful product that is No Sew), even the amateur crafter can pull off this simple costume. All you need are some matching pants and some socks to cover your shoes and you have the perfect DIY costume for Halloween.

DIY Dinosaur Hoodie side profile

DIY Dinosaur Hoodie

What you need:

  • zip up hoodie jacket
  • adhesive felt in different colors (for spikes, eyes, and belly)
  • 1 piece regular felt (for tail) + more for stuffing tail
  • No Sew adhesive for fabric
  • needle and thread

What you do:

  1. Cut out 8 triangle shapes for spikes.
  2. Cut out a circle in one color felt. Cut that circle in half and adhere to either side of zipper on belly of jacket. Cut out zig zag pattern for decoration for belly in different colors and adhere to half circles.
  3. Cut out eyes using one color for the eye lid, one color for the eyeball, and one color for the pupil.
  4. Take felt for tail and create a cone. Using No Sew adhesive, glue cone in shape so that it stays. Trim away any additional felt.
  5. Stuff tail cone with additional felt and use No Sew to close cone opening.
  6. Using needle and thread, adhere cone tail to bottom back of jacket to secure in place.
  7. Add spikes to the hoodie of the jacket by taking two triangles, removing the adhesive backing, and placing together on the seam of the hoodie.
  8. Make sure about 1/2 an inch is attached to the jacket hoodie with the rest adhering to the other triangle. Use No Sew if additional adhesion is needed. Repeat with other three spikes.
  9. Adhere eyes to side of hood to give the illusion of dino eyes when the jacket is on.
  10. Let No Sew dry completely before letting your child wear the jacket.

Diy Dinosaur Hoodie 2

What themed hoodie would you love to create for Halloween?

THE GOOD DINOSAUR opens in theatres everywhere on November 25th!

Like THE GOOD DINOSAUR on Facebook | Follow @THEGOODDINOSAUR on Twitter | Visit the official THE GOOD DINOSAUR website

A little sneak peek at the movie:

DIY 3-D Dinosaur Wall Art

This shop featuring a DIY 3-D Dinosaur Wall Art tutorial has been compensated by Collective Bias, Inc. and its advertiser. All opinions are mine alone. #ProjectAmazing #CollectiveBias

DIY 3-D Dinosaur Wall Art

A few weeks ago we were perusing IKEA in search of… honestly I completely forget what. But I’m sure it was something we needed. While we were there we also found a nice duvet, a rug for right by our sliding glass door, and a set of 3 geometric canvases that my son desperately wanted. Turns out the canvases were on clearance so all we had to do was figure out what we wanted to do with them.

My son didn’t want to paint over them. He loved the triangles and the colors. So we had to think of some way to incorporate the triangles into our idea. I went with him into his room and looked at what we already had going on. Some large canvas pieces from Pottery Barn Kids (clearance, of course) with a rocket on one and a t-rex on the other, his 1 year cake smash photo, and the cross stitch his great aunt made him with his birth date and stats on it.

Then I looked down and saw what he had on the floor. Dinos spread out everywhere…

DIY 3-D Dinosaur Wall Art - dinosaur toys

And the idea popped in my head! Those triangles were going to turn into volcanoes and a few extra dinos from the dinosaur box would add to the scenery. But how to attach everything together? Do I cut open the dinos? Use glue?

I really didn’t want to make a mess everywhere. Especially since the kids wanted to help out. So I kept it simple. I grabbed some Command™ picture hanging strips and Command™ Clear Hooks as well as some Scotch® Permanent Double Sided Tape to adhere the dinos onto the canvas.

The Command™ picture hanging strips would be the perfect way to layer the canvases on top of one another to create a 3-D effect. Plus, if we ever wanted to display the 3 canvases seperate, there’s no worry about ruining the canvas underneath.

Here’s how I did the rest:  

DIY 3-D Dinosaur Wall Art - supplies needed

DIY 3-D Dinosaur Wall Art

What you’ll need:

  • 3 square canvases with sawtooth mounting
  • a handful of small dinos and greenery
  • paint or paint markers
  • green puffy paint
  • Scotch® Permanent Double Sided Tape
  • Command™ picture hanging strips
  • Command™ saw tooth picture hangers

DIY 3-D Dinosaur Wall Art - painting canvasesDIY 3-D Dinosaur Wall Art - paint grass

What you do:

  1. On the canvas, paint out the scenery you want for your dinos. As I mentioned before, we turned our triangles into volcanoes by adding tops to each volcano and some lava spurting out with an orange paint pen. I outlined one of the triangles I painted in with puffy paint to make it stand out.
  2. Once the mountain scenery is dry, add grass by using the puffy paint. You could also use regular green paint to do this but since everything else is 3-D I think the puffy paint gives it a nice touch.
  3. After the grass is dry, figure out where you want to mount the dinos. Then add pieces of the Scotch® Permanent Double Sided Tape to each dino and mount onto the canvas. 
  4. Next up, grab 4 sets of Command™ picture hanging strips (8 strips total) and put each set together. You’ll hear them connect together with a satisfying click. Once each set has been clicked together, remove the backing on one side and add two to the left edge of one canvas (the one you want to be on the right hand side), and add the other two to the right edge of one of the other canvases (the one you wnt to be on the left side). 
  5. Now remove the backing from all 4 sets and set the third canvas on top of the other two overlapping the edges by the width of the Command™ picture hanging strips.
  6. Using the Command™ saw tooth picture hangers, mount the canvases to the wall where you’d like to hang them. 

Tada! Now you have fantastic 3-D Dinosaur Wall Art to display for all to see. 

DIY 3-D Dinosaur Wall Art - command stripsDIY 3-D Dinosaur Wall Art - add tapeDIY 3-D Dinosaur Wall Art - attach dinos to canvas

Command™ Brand provides damage-free hanging solutions for a wide variety of uses for your craft projects. Their products hold on strongly, remove cleanly. That way I don’t worry about damage to my walls, holes left in random places, or a mess left in it’s place. Find more inspiration for amazing summer project ideas here.

Now shoppers no longer have to search Walmart for these 3M products, as they are now available in the crafting aisle. Both Scotch® Brand and Command™ products are available in this aisle at Walmart. I found mine near the adhesives!

Command and Scotch products at Walmart

DIY 3-D Dinosaur Wall Art - simple and easy to make

Where do you find inspiration when crafting?

Easy DIY Dinosaur Valentine Printables for Kids

These easy DIY dinosaur valentine printables are the perfect non-edible valentine to pass out in the classroom this Valentine’s Day! They also make great dinosaur party favors.

dinosaur valentine printable

Ever since my son was little, maybe 15 months or so, he’s been obsessed with dinosaurs. And that all started when he watched his first episode of Dinosaur Train on PBS. So it was no surprise when I asked him what he wanted to pass out on Valentine’s Day and he said dinos.

So I headed to the dollar store (his favorite place to pick up dinos other than Target) and grabbed 10 dinos. Then I whipped up a dinosaur valentine printable using picmonkey. Want to make your own printable? Follow my instructions here!

After that, assembling the valentines was simple and took all of 10 minutes from start to finish. And now I don’t have to worry about either kid for Valentine’s Day (since I finished my daughter’s last week).

dinosaur valentine printable dollar store dinos

DIY Dinosaur Valentines

What you’ll need:

What you do:

1. Place dinosaurs in the plastic bags. If your child is worried about the dinos suffocating, don’t completely zip the tops.

dinosaur valentine printable dinos in bags

2. Cut out the printables and fold in half. Have your child write their name and the names of the recipients on the printables.

dinosaur valentine printable dino tag

3. Taking the bag in your hand, bring the top sides of the bag together and fold down.

dinosaur valentine printable fold top of bag

4. Staple the folded printable over the folded bag to secure tag.

dinosaur valentine printable staple tag to bag

5. Gift to friends and have a roaring good Valentine’s Day!

dinosaur valentine printable finished valentine

If your child is a dino lover like mine then you’ll have to check out the latest DVD from Dinosaur Train! It pairs perfectly with these printables.

Dinosaur Train: I Love Dinosaurs” is out on store shelves and is the perfect Valentine’s Day treat! This DVD includes two episodes and Be My Valentine Cards. Grab your copy today!

Dinosaur Train I Love Dinosaurs

What is your favorite Valentine’s Day treat?

Disclaimer: I received a copy of Dinosaur Train: I Love Dinosaurs in exchange for this post. This post contains affiliate links.

Love this post? Check out these other great Valentine’s Day ideas! 

Pin this article for later! 

Click the Pin button on the image below to save for later. 

How to Make Dinosaur Party Hats

Find out how easy it is to make a dinosaur party hat with this template and some paper.

When planning my son’s Dinosaur Train birthday party I stumbled upon an Etsy store with printables for everything Dinosaur (you can check them out in detail on her blog). One of the things included in the kit was a dinosaur party hat. 

Since I wanted to make my party unique I opted out of purchasing the kit but I did find a way to make those adorable party hats! I used a template I found from Oh Happy Day for the base of the hat, picked up some cute cardstock from Michaels and got cutting and piecing together. 

Here’s what I came up with! 

This post contains affiliate links. 

Dinosaur Party Hats

What you’ll need:

What you do:

1. Print template onto cardstock (save 1-2 colors for the spikes).

2. Cut out the template by following the solid black lines.

3. Cut out the slit on the template.

4. Roll hat together and place tab into the slit. You may have to bend the top tab a bit to get it to fit. Once the tab is in, lift the top tab again so it doesn’t slide out. 

5. Cut out spikes leaving a 1/4″ space at the bottom of each spike row. 

6. Bend spike row on the bottom at the 1/4″ mark and cut the middle of the spikes to slide into the slot.

7. Tape spikes down from the outside and inside of the hat.

8. Using the X-Acto knife, make a small X on either side of the hat.

9. Place the ribbon or string in each hole and knot on the inside.

10. Decorate the hat more from here or leave as is for the perfect Dinosaur Party hat.

Do you have more ideas to make a party hat perfect?

Love this idea? Here’s some more dino party inspiration: 

Pin this article for later! 

Click the Pin button on the image below to save for later. 


Make DIY Dinosaur Fossils for Your Dinosaur Party

Find out how easy it is to make DIY dinosaur fossils for your next dinosaur birthday party or activity!

When I started planning activities to do at my son’s dinosaur themed 3rd birthday party I knew I had to have something fun that both the boys and girls would like. Since his party was a dinosaur train theme I started scouring the internet for great ideas on crafts my son and I could create together for the party.

After searching around a bit we found a great recipe for do-it-yourself dinosaur fossils! As soon as I showed my son the fossils he was all aboard. And then when I told him he’d have to help make them he quickly ran to grab the measuring cups and flour.

The fossils were a big hit at the party and the kids took turns finding them all over the indoor play place we were at. Then they took all of the fossils to two buckets we had set out and started opening their fossils to reveal tiny plastic dinos inside.

DIY Dinosaur Fossils

What You’ll Need:

  • 1 cup flour
  • 1 cup dirt
  • 1/2 cup sand (play sand works the best)
  • 1 cup water
  • 12 tiny plastic dinosaurs
  • Plastic wrap-lined cookie tray

What you do:

1. Dump the flour, dirt, and sand into a bowl.

2. Pour the water over the dirt mixture.

3. Stir the mixture together until it’s a thick muddy batter-like consistency.

4. Add more dirt, sand, and flour as needed if too liquidy.

5. Let your kids dip in the dinos and coat them well.

5. Place on plastic wrap-lined cookie tray and cover with a little more of the mixture to make sure it’s coated very well. Cover up any parts that may be sticking out.

6. Let the mixture sit out in the sun for a few hours to dry. Once the top side is dry flip each fossil over and let the other side dry completely.

7. Let the kids have fun breaking the fossils apart!

Have you made DIY dinosaur fossils you can break open before? 

Love this idea? Here are some more dino-fun crafts: 

Pin this article for later! 

Click the Pin button on the image below to save for later. 

A Dinosaur Train Celebration {Birthday Party Ideas}

When my son mentioned having a Dinosaur Train themed party a few months back I was happy to start planning out all of the details. I searched through Google and Pinterest and even created a board of inspiration to go off of.

But I was surprised to find very little in the form of ideas and details. Most of the posts I came across linked back to the same two designs and I didn’t quite love them. So I decided to pick and choose design elements from various sources and pieced them together to form my son’s Dinosaur Train birthday.

The Cake

Any dinosaur themed birthday has to have a volcano cake. It’s a must. And my kid is kind of obsessed with any thing that explodes. We recently purchased a mini volcano set from Lakeshore Learning Center that allows you to add baking soda and vinegar to watch the volcano erupt over and over again. It’s one of the only toys that he asks repeatedly for every night when daddy gets home!

I had great visions of multi-tiered, fondant covered cakes with tunnels and trains but just couldn’t come up with the money and lacked the talent to make one myself.

So this easy-to-do volcano cake was my go-to. And boy did it give me trouble! The bundt cake stuck in the pan not once, but twice, the day before the party. But I just went with the flow and pieced the second failed cake together to create my final product.

To read more about the volcano cake check out my post here with recipe and design details.

The Cupcakes

In addition to the volcano cake, I also made cupckaes for the kids. They’re much easier to deal with when feeding 3 year olds and the kids love them for the frosting.

When I searched for ideas for cake toppers I knew my friend, Jeanna, over at the Sweets Fairy Bakeshop would know just what to do. She created these darling toothpick cupcake toppers with dinosaur train images on them and even created some decorative dinos and train fondant pieces to go along with the theme.

We placed the dinos and trains around the cupcakes and sprinkled the tray with the first bundt cake crumbs (way to reuse, right!?) to give the illusion of the cupcakes laying on dirt. Half of the cupcakes had the cute toothpick tags on them and half had whopper eggs on them to make dinosaur nests.

The recipe I used for the cupcakes is from Glorious Treats.

The Place Settings

Yes, I know it seems silly to have place settings for a kids birthday but I thought this added a special touch.

My husband’s aunt surprised my son on the morning of his birthday by dropping off some dinosaur cookies. These cookies were absolutely adorable so I asked if she wouldn’t mind making a few for his party too.

She packaged a few of them up for each kid and put them in a plastic bag with ribbon to make cute favors for the table. I also made some dinosaur and train paper hats for each of the kids as well and set them next to each plate, napkin and cookie.

To read more about how to make your own dinosaur party hats check out my post here.

The Food

In staying with the Dinosaur theme we created fun food names for each of the snacks we offered. Since the party started at 10am we stuck with a brunch menu. Here’s what our menu looked like:


Sweetivore Grub
Rip Apart Raptor Bread – Cinnamon Pull Apart Bread
Ceratops Cookies – sugar cookies
Cephalosaurus Cupcakes – vanilla cupcakes
Chocolate Lava Volcano Cake – devils food cake with chocolate frosting


Herbivore Grub
Brontosaurus Burritos – potato, egg & cheese, and bean, egg & cheese
Herbivore Delight – fresh fruit with fruit dip
Dinosaur Bones – pretzel sticks


Carnivore Grub
Brontosaurus Burritos – ham, egg & cheese, and bacon, egg & cheese

I was amazed at how much the kids (and adults) loved the breakfast burritos. They were seriously the easiest thing I’ve ever done besides ordering pizzas and pleased everyone. And since we live in So Cal everyone loves Mexican food! We also served some hot carrots and had salsa on hand. We also had Jurrasic Juice for the kids and coffee & tea for hte adults. Since the party was held at a place with a cafe there was no lack of caffeine.


Here are some photos of the grub: 

Herbivore Grub
Carnivore Grub

Paper Goods
For the food and drink labels I simply designed a template in Word that included the name of the food and the dinosaur train image. I played around with the fonts and downloaded a Jurrasic Park font from FontSpace.After playing around with the fonts, sizes and picture I decided to add a thick orange line around the wording and picture. After I printed the pages out I cut them to size and layered them with blue cardstock.

I did the same with the favor bag tags but used a different layout and orange and blue cardstock (without the orange line). I absolutely loved how the signs turned out. They were perfect for the party.
 Snacks
Jurassic Juice to drink
My son blowing out his number 3 candle

The Party Favors

We tried to include some fun goodies for the kids to take home in their favor bags. It all started with the wooden train whistles I found in the dollar section of Target. My son and I painted and personalized the whistles for each of his guests.

He had so much fun in the process and was so excited to give each bag to his friends (later at the party when he found out he didn’t get to hand them out he was a little upset but we remedied that by showing him all of the presents he received!).

Here’s what else we included in the favor bag:

All in all I’d consider this party a big success. I loved talking with my son about what he wanted to include and how he wanted to celebrate.

And seeing the joy in his face every time he talked about his “Dinosaur Train party at Kid Ventures” was more than enough reward for us. I’ll be posting more about my experience with KidVentures and their party packages soon!

I hope the guests had as much fun attending the party as we did throwing it!

Disclaimer: This post may contain affiliate links. By using these links you are supporting the Simmworks Family Blog.

Rawr Dinosaurs! {DIY Dinosaur Costume}

DIY Dinosaur costume

My son is obsessed with dinosaurs. He’s loved them ever since he was introduced to Dinosaur Train on PBS Kids shortly before his second birthday. I thought it’d be fun to try and design a simple dinosaur costume for him to wear whenever he wanted around the house. I didn’t want to spend too much money so I used simple materials I already had and some sponges I picked up on a recent shopping trip. I got the idea from Rookie Mom by doing a simple search for DIY Dino costumes and just adjusted it to fit a two year old. For his 3rd birthday I might attempt to make this Buddy the Dinosaur costume (the no-sew option)… maybe.

If you want to make your own DIY Dinosaur costume just follow these simple steps below.

How to make a DIY Dinosaur Costume [Read more…]

Back to School Lunch Ideas and Tips

Back to School Lunch Ideas and Tips

Ever start thinking of school lunches and wonder what the heck you’re going to pack? Well here are some great back to school lunch ideas and a few tips that might help you out!

My son isn’t quite ready for kindergarten yet but will be there next year and we’ve already exhausted a few great ideas for toddler lunches at home. So I’m trying to gather a bunch of ideas and tips so that when I am packing his lunch I can pack something that he’ll enjoy and actually eat. Good thing I have a whole year to figure this stuff out, right?

Ok, I’m not going to spend the whole year working on this. But I did start practicing by packing lunches for us to take with us on his days off preschool. When we’re heading out to the zoo, playing at the park, or heading to the beach, I’ve been able to pack lunches for him and his sister that they both enjoy. And here’s what I found… (some of the links included are affiliate links to Amazon) [Read more…]

Minecraft Valentine’s Day Miner Printable

Have a Minecraft fan at home? Print off these Minecraft Valentine’s Day Miner Printables for your kid to personalize and pass out in class!

Minecraft Miner Valentine Printable, Minecraft Valentine's Day Miner Printable, Minecraft Printable, Minecraft Valentine

You know how I’ve mentioned a few times before how obsessed my son is with Minecraft? Well in an effort to continue the tradition and make handmade valentines for the kids, I wracked my brain to try and think of ideas to make Minecraft valentines. I couldn’t figure out what to use as the treat, edible or non-edible.

And then as my son was building another world and digging through the ground, it hit me. A Minecraft miner valentine! And I could use Hershey’s nuggets as the treat. I thought the gold would be perfect. And then my son reminded me that you can also mine for silver. So I grabbed some milk chocolate Hershey’s nuggets to go along with the chocolate with almond for the kids who don’t eat nuts. Luckily there are no allergies in his classroom.

This post contains affiliate links

These valentines were super easy to make. I used the same process I have in the past and made them in PicMonkey. And while it took a little more work adding each additional square to make the background look pixelated, it was totally worth it! I love how much fun these valentines are to make every year. I sure hope my kids continue to want me to make their valentines (or take over completely themselves!).

Minecraft Miner Valentine Printable - I Dig You Valentine, Minecraft Miner Valentine Printable, Minecraft Valentine's Day Miner Printable, Minecraft Printable, Minecraft Valentine

Minecraft Valentine’s Day Miner Valentine

What you’ll need: 

Minecraft Miner Valentine Printable supplies, Minecraft Miner Valentine Printable, Minecraft Valentine's Day Miner Printable, Minecraft Printable, Minecraft Valentine

What you do:

1. Print Minecraft Valentine’s Day miner printable and cut them out.

2. Place a few Hershey’s nuggets in a bag.

3. Fold the valentine in half and measure where on the bag the valentine goes to.

4. Fold over the bag onto itself so there is no overlap when you place the valentine on top of the bag.

5. Using the stapler, secure the valentine onto the bag.

TO PRINT MINECRAFT PRINTABLE CLICK HERE

Minecraft Miner Valentine Printable with chocolate, Minecraft Miner Valentine Printable, Minecraft Valentine's Day Miner Printable, Minecraft Printable, Minecraft Valentine

What is your little gamer giving out for Valentine’s Day this year?

Looking to customize your own Valentines? Check out this post below:

How to Make Valentines with PicMonkey
How to Make Valentines In PicMonkey

Looking for more Valentine’s Day ideas? Read on!

Pin this article for later! 

Click the Pin button on the image below to save for later. 

Minecraft Miner Valentine Printable, Minecraft Valentine's Day Miner Printable, Minecraft Printable, Minecraft Valentine

This post was originally published on Jan 21, 2018


© A Crafty Spoonful - All Rights Reserved
It is OK to use one of my photos provided a link back and/or proper credit is given. It is NOT ok to copy and paste a whole post including instructions. Please do not remove watermarks or alter images in any way. Please contact me with any questions at danielle@acraftyspoonful.com

.