DIY Baymax Upcycled Sock Rice Pack

review affiliate link disclaimer

DIY Baymax Upcycled Sock Rice Pack

Our family has a slight obsession right now. With Baymax. Do you know Baymax?

Have you seen Big Hero 6 yet? Since seeing it on the big screen when it first came out my kids have been asking when it would arrive on BluRay every week or so. And the time has finally come! Big Hero 6 is now on store shelves and available for purchase. As soon as we received our review copy in the mail the kids had it in the BluRay player and haven’t stopped watching it since!

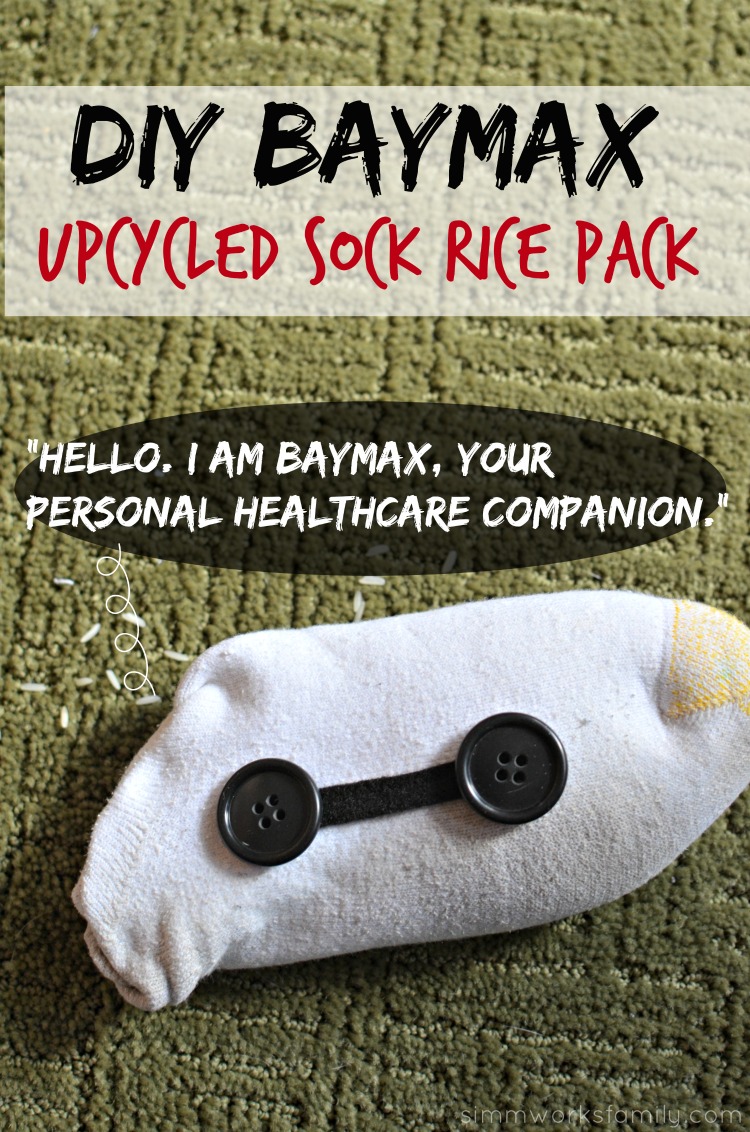
In celebration of our little obsession I made some upcycled sock rice packs to look like Baymax. Now my kids have their own personal healthcare companions to soothe them when they bump their heads or scrape their knees and need a cold pack. Added bonus? I had everything on hand to make this craft at home in 10 minutes!

Want to make your own DIY Baymax Upcycled Sock Rice Pack? Here’s how!  [Read more…]

Peppermint Holiday Ornaments

Peppermint Holiday Ornaments - easy to make and fun to display!

Are you looking for a festive and frugal ornament idea? Then why not give these melted peppermint holiday ornaments a try?

Using just a few crafting supplies, you can make your own, perfect for decorating your tree or for gift giving. Here is how you can get started crafting a set for yourself! [Read more…]

Fall Harvest Table Centerpieces

review affiliate link disclaimer

Fall Harvest Table Centerpieces

It is Thanksgiving weekend and in just a few days we’ll be sitting around the table at my brother-in-laws house enjoying a wonderful meal with family. But that doesn’t mean I don’t create fall harvest table centerpieces at home as well.

I love creating a festive feel in the home and enjoy coming up with fun ideas to share the holidays with my family. I always look to the table centerpiece and mantel as my creative outlet to explore fun ideas during the change in seasons.  [Read more…]

DIY Birdhouses – Turning Inspiration into Reality

Easy DIY Birdhouses for Kids

About a year ago we started our house search by heading out to a few model home tours. We were trying to gauge how much we’d be able to get with our budget but we were also looking for home decor ideas as well once we did move into another home.

While at one of the model homes we saw some adorable birdhouses on posts that I knew I wanted to replicate once we found our home. So I grabbed a photo, showed to my husband, and he got to work using our new Arrow Fastener staple gun we received for review to finish everything off.

DIY Birdhouses inspiration

While our birdhouses aren’t on posts, my husband just added some platforms on our fence for our pumpkins for Halloween. After building the birdhouses with the kids (my son loves helping out in any way he can) we perched them on top of a few of the platforms.

This was a great project that we got the kids involved with and we can’t wait to figure out what the next project will be.

Our master plan? To make various birdhouses in different designs to go on the rest of the platforms once Halloween has passed. What do you think?

Easy DIY Birdhouses for Kids - birdhouses on the fence

DIY Birdhouses

What you’ll need: 

  • 3 boards of 6′ x 8″ cedar fence board (dog eared top is ok)
  • 1 – 1/2″  wooden dowel
  • 1 roll 10″ aluminum flashing
  • Snips for cutting metal
  • wood glue
  • 1″ or bigger brad nails/or an Arrow electric brad nailer
  • table saw (makes it easier for some cuts, but only required for making shingles)
  • A couple of packages of wooden shims (for shingles if no table saw)
  • jig saw
  • 2 1/4″ hole saw and a drill
  • Arrow T50 stapler
  • T50 9/16″ Arrow staples
  • T50 3/8″ Arrow staples
  • Behr paint stain samples (in colors of your choice)
  • foam brushes
  • chip brushes

What you do: 

Easy DIY Birdhouses for Kids - measuring and cutting

1. FRONT/BACK: Use the provided templates below as a guide. Take one of the fence boards and lay it down flat on a table. Start at the bottom of the board, use a ruler and pencil and sketch out the shape of the front of the bird house on the board.

At the top of the sketch, cut the board straight across so you have a piece that only needs the angles cut out to complete. Take this cut piece and lay it on top of the remaining longer piece.

Clamp or temporarily screw the pieces together so that you can cut out the front and back pieces in one shot. Use the jig saw and follow the lines. You should now have the profile of your bird house cut.

Easy DIY Birdhouses for Kids - tip cutting wood

SIDES: Now cut two simple rectangles to form the sides and connect the front and back pieces. The profile of the bird house will determine the height of the side. The width should be about 4″. This width will allow your roof to overhang the sides later.

ROOF: Take a fence board and measure 8″ from the end. It generally will look better if you make this cut with an angle on it so you get a nice tight peak. It does not have to be exact. Take your jig saw and set it to about 30 degrees for template 1 and 25 degrees for template 2. Make the cut. Set aside the piece you just cut and return to the left over board. From the cut end with the angle on it, measure 9 1/4″. Return the saw back to 0 degrees and make the cut.

DETAIL: Template 2 has a simple cut out affixed to the front for some extra dimension. Just trace out the design on another piece and cut it out with the jig saw. To make the small roof detail on this piece, use the same technique for making the roof. The width on these pieces is only 1″. Adjust the length to what you feel looks best. Template 1 has some trim applied. It is approximately 1/2″ X 1/4″ wide. A table saw was used to make these, but you could use the jig saw to carefully rip a 1/4″ (x 24″) off the edge of a fence board to end up with 1/4″ x 3/4″ pieces.

SHINGLES: Optionally you can go the extra mile and cut out approximately 60 shingles.

  • Option 1- If you don’t have a table saw you might consider using a pack of wooden leveling shims and cutting them down.
  • Option 2- Using the table saw rip three pieces the full length of the board to 1 1/2″ wide. Next, take the three pieces you ripped and turn them on their side (the short edge should be down on the table). Adjust the blade so that it is about 1/4″ away from the fence. Run the pieces through so that you are splitting them in half. You then have 6 – 1/4″ x 1 1/2″ strips. Stack then together and start cutting them into 2 1/2″ x 1 1/2″ “tiles.” If you don’t have a table saw you might consider using a pack of wooden leveling shims and cutting them down.

Birdhouse Template #1

Birdhouse Template #2

Easy DIY Birdhouses for Kids - measuring

2. Assemble birdhouse pieces with wood glue and brad nailer

Easy DIY Birdhouses for Kids - assemble and sand

3. Sand birdhouse smooth

Easy DIY Birdhouses for Kids - drill circle opening

4. Using hole saw, drill hole for opening

Easy DIY Birdhouses for Kids - stain tipEasy DIY Birdhouses for Kids - stain birdhouses

5. Using Behr paint stain samples, let kids stain the houses. Use different stains for the trim to allow it to pop.

TIP: To save a little money and play with multiple colors check out the Behr paint stain samples at the Home Depot (this is the only place we’ve found them so far). You can have them tinted to any Behr paint stain color. And you don’t have to pay $15+ for a quart of stain! We do the same thing with small paint samples for other wood craft projects.

Easy DIY Birdhouses for Kids - measuring shingles

6. Gauge the length of the shingles and trim you want to use and cut to size. (shingles and trim are whatever you prefer – our shingles were 1 1/2″ x 2 1/2″)

Easy DIY Birdhouses for Kids - staple shinglesEasy DIY Birdhouses for Kids - hammering staples

7. Using Arrow Fastener stapler, staple shingles to roof of birdhouse from the bottom up. Use a hammer to assure staples are flush with wood.

Easy DIY Birdhouses for Kids - painting shingles

8. Paint shingles in a contrasting color stain.

Easy DIY Birdhouses for Kids - add metal peakEasy DIY Birdhouses for Kids - hammer metal straight

9. Measure and cut aluminum flashing to size to cover peak of houses. Secure with Arrow stapler and hammer into shape.

Easy DIY Birdhouses for Kids on the fence

10. Drill a 1/2″ hole under the large hole for dowel perch. Add wood glue to one end of the dowel and put into hole. Once dry and secure, place birdhouses onto platforms and wait for birds!

Do your kids love building with wood?

DIY Pencil Holder

DIY Pencil Holder

Summer is right around the corner! And what does that mean? School is coming to an end for another year. Why not do something special for your child’s teacher this year and let your child create an awesome gift to give to them on the last day of school?

This pencil holder is not only easy to make but versatile as well. You can easily exchange the craft sticks for pencils, crayons, etc. Whatever you have extras of at home. And the holder doesn’t have to just be for pencils! You can even include a little treat or a gift card for your child’s special teacher.

While we were making this craft together my son worked on his colors, letters, and sorting! So not only was it fun to make, it was educational too! What teacher wouldn’t love to hear that? [Read more…]

How to Make A DIY Football Pennant Banner

affiliate link disclaimer
DIY Football Pennant Banner

Last weekend we hosted a playoffs party for our family and friends and in the excitement of the game I went all out with the decor. That includes this awesome diy football pennant banner. It was so easy to make and, in my opinion, much cuter than the stuff they had at the store!

Plus if you have most of the supplies lying around it costs next to nothing to make!

I enjoyed working with this cute sparkly corrugated paper from Jo-Ann’s and thought it gave a slightly feminine touch to this masculine party.
[Read more…]

DIY Burlap Christmas Wreath Tutorial featured on Formula Mom

DIY burlap Christmas wreath tutorial

DIY Burlap Christmas Wreath Tutorial

A few weeks ago I shared on instagram a little glimpse on how naptime is spent for me. I’m usually either baking up something tasty, creating crafts, working on projects around the house or catching up on work. My office is a disaster just about every day of the year but that’s ok. Because I can do what I love and am in my element!

When my best blogging friend, Mariah of Formula Mom, got to the end of her pregnancy I knew I wanted to do something special for her. So instead of actually making and sending her something, I made her a DIY Burlap Christmas Wreath Tutorial for her blog instead. [Read more…]

Grand Re-opening of The Home Depot Genesee

Tracking Pixel

This is a sponsored post by me on behalf of The Home Depot.

The Home Depot Genessee Grand Re-Opening

As self-proclaimed weekend warriors, my husband and I find ourselves at The Home Depot quite a bit.

So much so that our kids know the layout of the store about as well as they do Target (yeah… we’re bad about that one too!).

The Home Depot garden center

[Read more…]

Creating a Fun DIY Chalkboard Herb Planter

This DIY chalkboard herb planter turns regular clay pots into beautiful and fun places to grow your herbs! Use smaller pots for an indoor garden and larger for outside! Don’t forget to get the kids involved! 

I love to garden. I love being outdoors, enjoying the weather, and getting my hands dirty. I also love the sense of accomplishment I feel when I see the results of my hard work.

But sometimes gardening and landscaping doesn’t have to be difficult or hard. With this fun DIY Chalkboard Herb Planter I’m able to plant the herbs I love in cute decorative pots and don’t really have to worry much about them.

Plus, you can make this project with simple materials that you might already have in your home!

DIY Chalkboard Herb Planter
[Read more…]

DIY No Mess Finger Paint

DIY No Mess Finger Paint

Sometimes having a nice, mess-free craft is fun. And a lot easier on mama! One of the best ways to keep painting mess free is to simply cover up the paint in plastic wrap and let the kids go at it. This no mess finger paint is simple, easy, and, best of all, FUN!

We love that this craft can be done indoors and outdoors so if the weather is bad we have an activity to do that won’t get too crazy. This can also be a great way to teach children about primary colors and what two colors mixed together will make. [Read more…]


© A Crafty Spoonful - All Rights Reserved
It is OK to use one of my photos provided a link back and/or proper credit is given. It is NOT ok to copy and paste a whole post including instructions. Please do not remove watermarks or alter images in any way. Please contact me with any questions at danielle@acraftyspoonful.com

.