Nursery Ideas {Alice in Wonderland}

One of my favorite stories is Alice in Wonderland. The imagination, the journey, and the creativity behind the story has always intrigued me and I’ve always loved the Disney interpretation as well. So when I found out I was having a girl I knew I wanted to create a simple and classic Alice in Wonderland nursery.

The nursery is NOT finished but here’s what we have so far:


Simple Decor
Our theme is Alice in Wonderland so there are 3 silhouettes of the rabbit, a tea cup and Alice herself. We wanted to keep the colors simple so most of the room is red, black and white with bits of blue and pink thrown in.

This wall is complete but we’ll have the changing pad and a lamp on the dresser and the bow holder will be hung behind the door (bow holder tutorial to come!). 

Repurposing Furniture
My husband stained the crib we had for my son in a darker color (black/brown) to match the dresser we got at Ikea. I think he did an AWESOME job and I’m glad I went with the darker colors as opposed to my original idea of white furniture.

Now re-painting furniture can be a tedious task but when done correctly can turn out beautifully! We used a paint sprayer to spray the crib since there were so many nooks and crannies. And even though it used up a lot more paint than the traditional route, we ended up having a cleaner finish. 

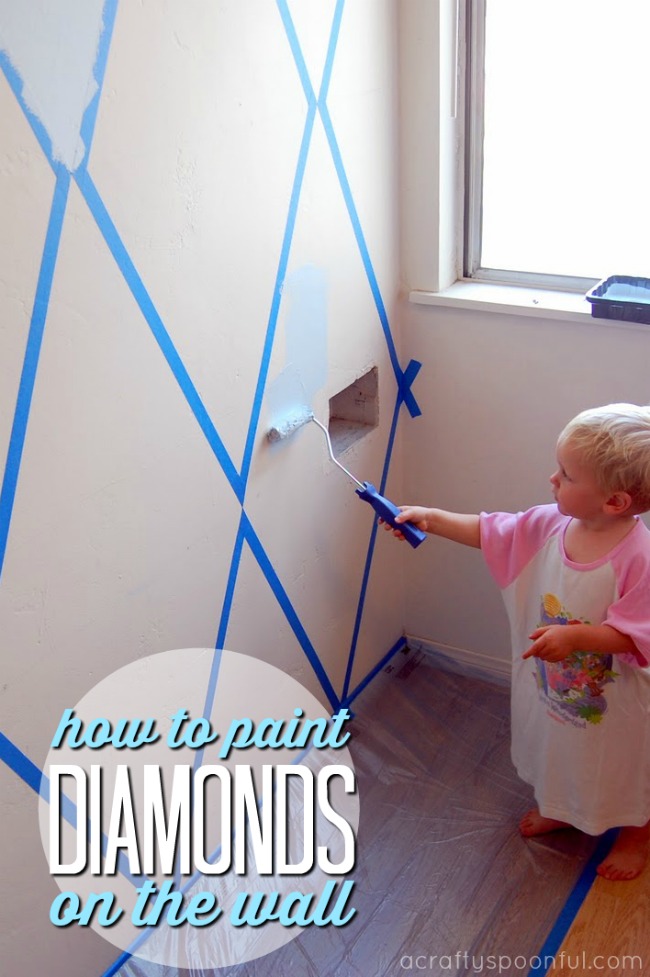
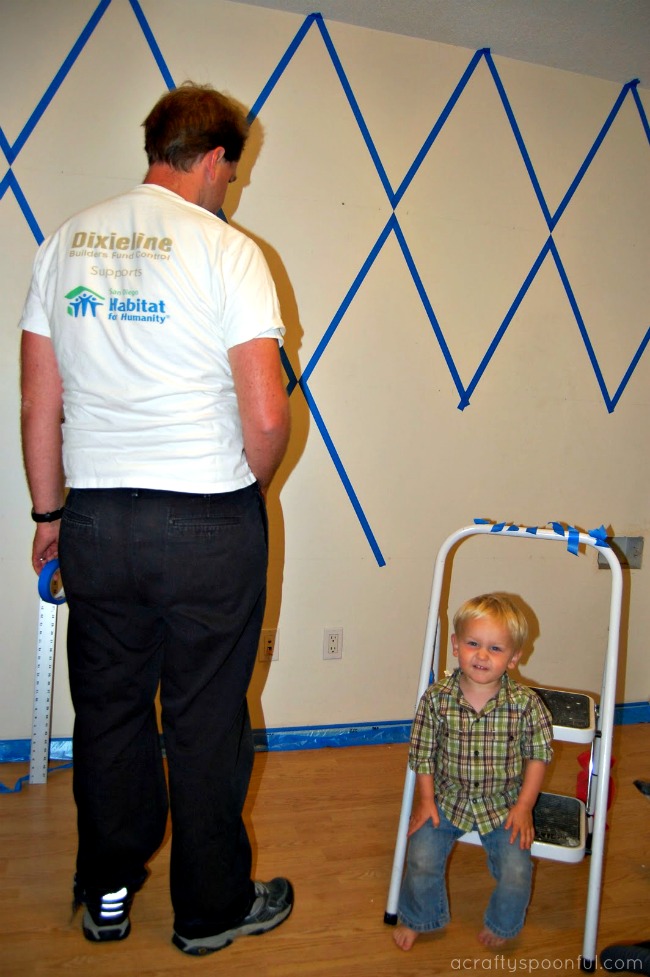
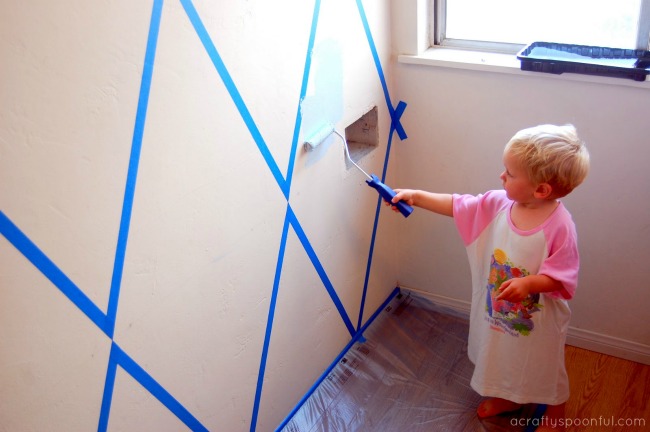
Change It Up With Paint
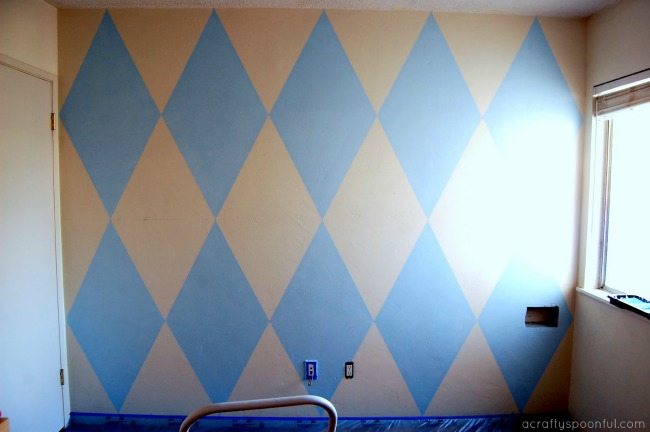
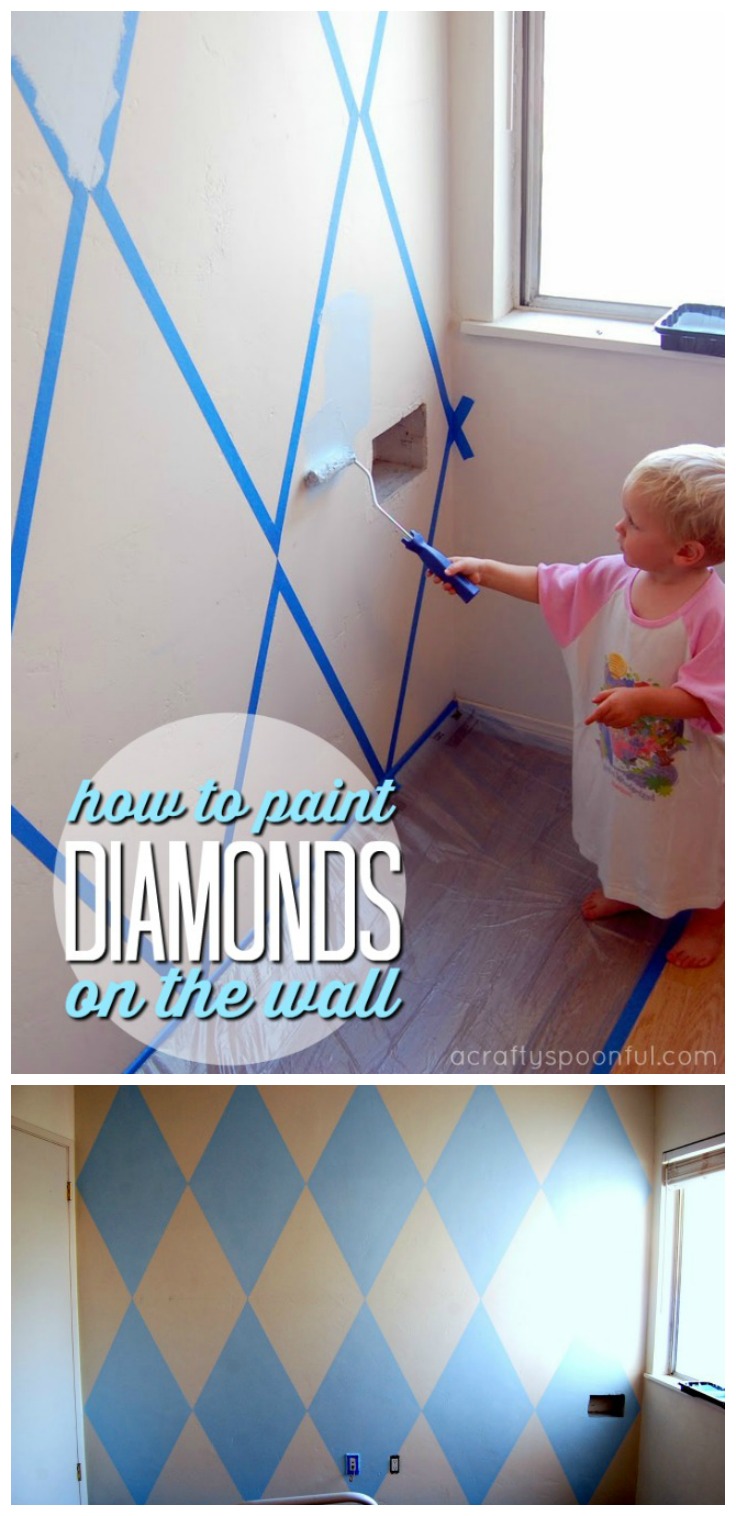
My husband also painstakingly measured out the dimensions and taped off the diamonds so my son and I could paint them light blue (like Alice’s dress). We made sure to use a great painters tape and used a credit card to smooth the edges down to assure that we got clean lines when we removed the paint.

I found a red curtain panel w/ black embroidery at Home Goods on clearance for $5! It fits the window perfectly when open. I’m going to buy a tie back for it soon. We got the curtain rod at Big Lots for $10. Simple and black is hard to find when you want to buy a curtain rod!

Personalized Touches
I received these adorable stuffed animals at my baby shower this weekend (sorry… I forgot my camera so no photos). The Alice doll is from my mother-in-law and is actually a story doll. The cheshire cat and rabbit are attached with velcro. You can also flip Alice’s dress over her head and another character appears.

Since this room was originally our office and we have no place to put our computer, the nursery will also house our desk. I love this simple desk (only $50 at the Salvation Army) because compared to the huge desk/bed structure we had below it’s so small and makes the room so much more open.

Although I have to say if we had the room for it we would have kept the bed/desk combo we used to have since he and his father built it together and he’s had it forever. Luckily the desk will stay in the family as my brother-in-law has taken it in for our nephew to use.

I am going to be putting up some candle sconces above the desk as well as a print from Disneyland that we’ll pick up on Friday when we go up for the last time as a family of 3.

What do you think? What did you use for nursery inspiration?

Nursery Ideas: How to Paint Diamonds on a Wall

 We’re sharing one of our nursery ideas with this tutorial on how to paint diamonds on a wall. It’s the perfect backdrop for our daughter’s crib and really completes the new nursery.

My husband asked me as we were moving out the large desk/bunk bed what I wanted to do with the wall in our future daughter’s nursery… how I wanted to paint it. I said I just wanted to paint it blue like I told him before. 

He then asked if there was any certain design or style I wanted to do like in my son’s nursery (he has yellow and green stripes on one wall). Then he suggested diamonds.

He quickly realized how much work it would be to paint on diamonds and decided he was going to look for wallpaper instead. We really didn’t have time to special order anything so we took a trip to Lowes, Ikea & Home Depot to see if they had anything in stock. 

Lowes had about 5-6 styles in stock but nothing that screamed our theme so we moved on to Home Depot. Home Depot carries no wallpaper whatsoever. I even called Ace Hardware and they don’t carry any either. But we did find a dresser at Ikea for the nursery so it wasn’t a complete failure of an outing.

So…

I told Joseph that I just wanted something done this weekend and I really, really, liked the diamond idea. So we bought some blue masking tape and were out of Home Depot. And I have to tell you… diamonds were definitely the best choice! I LOVE how the wall turned out. It’s the perfect backdrop for our daughter’s crib. 

How to Paint Diamonds on a Wall

What you’ll need: 

  • painter’s tape
  • box cutter or razor
  • pencil
  • drop cloth
  • paint
  • 12″ roller brush
  • 6″ roller brush
  • paint brush
  • 2 paint colors – 1 neutral, 1 accent

What you do: 

1. Prep your workspace by covering any furniture and wall fittings. Remove faceplates for outlet plugs and light switches and use tape to cover outlets and switches. Tape off the baseboard and put drop cloth down to protect the floor. 

2. Using the 12″ roller brush, paint the wall with your base color. We used a neutral ecru shade. Let dry for 24 hours. 

3. Measure the wall and find the very center. Mark with a pencil.  Measure out the size of the wall from the middle point and find out how many diamonds will fit. This may take a little finagling but is important in making sure the diamonds all look uniform and fit nicely. 

4. Once you’ve measured out the wall, use those measurements to start marking where the tips of each diamond will go. Then use the tape to connect the marks. Make sure that the wall is clean and first coat is completely dry before taping. Use a credit card to make sure there are no bubbles or gaps in the tape on the edges. 

5. Using a pencil, mark where you should paint the accent color so there’s no confusion with what diamond needs to be painted and what stays the neutral color. 

6. Using a 6″ roller brush, brush on the accent color on all of the marked diamonds. Let dry for 2-4 hours, until paint is dry to the touch, then remove tape from the walls. 

7. Let dry completely before adding any artwork to the walls.  

What is your nursery’s theme? Have you had to paint diamonds on a wall? 

Like this post? Read more! 

Pin this article for later! 

Click the Pin button on the image below to save for later. 

Nursery is Complete: Jungle Animal Themed Nursery Ideas

 These Jungle Animal Themed Nursery Ideas are great for a gender neutral room for baby.

Our son has a finished room! But it’s not like he’s sleeping in it anytime soon 🙂 I quite like him right by me when we sleep. At least for these first few months… maybe longer. Let me know what you think.

We went with a jungle animal theme and didn’t go too crazy with furniture or design. My husband painted the stripes on the walls using a low VOC paint and alternated solid colors on the other walls. 

I found a cute line of nursery items at Babies R Us to complete the room with a few personal touches throughout. 

Furniture: Upcycling and Repurposing

We were given a crib from my husband’s brother to use for the nursery. The colors fit perfectly in with the jungle themed crib set. We fixed the drop side with a kit we received from the manufacturer. 

In an effort to save room, we purchased a full sized dresser and simply added a changing pad to the top of the dresser. The top of the dresser will be used as a book shelf after he outgrows the changing pad. We added a non-slip under mat to the underneath of the pad and strapped it to the dresser so there’d be no accidents. 

The only new item in the room is my new glider. We scored at Costco and found it as soon as we walked into the store. I had never seen gliders at Costco so it had to be fate. After our jaws dropped at the cost of the ones at Babies R Us, it was a great relief to find a budget friendly option. 

The Little Details: Utilizing Gifts and Memorabilia 

To decorate the room, we used items we had either received as baby shower gifts or memorabilia we had already. We had purchased a few prints from Disneyland that went perfectly with the jungle and kid theme so we framed them and added them ot the walls. There is still enough space on the walls to add some other fun items as he grows. 

With the crib set, we also got a matching mobile and diaper holder. Since we’re using cloth diapers, we’ve been using the diaper holder as a laundry hamper but I’m sure it won’t be able to hold all of his dirty clothes as he grows! 

We also got an adorable little chair at our shower that fits the theme perfectly. I just know he’s going to grow to love that chair. 

We were so grateful to receive such amazing hand-me-downs, gifts, and other items to complete this room. And I know that it will be the perfect place for our son to grow and learn. 

What’s in your nursery that you can’t live without? 

Like what you’ve read? Here’s more great suggestions! 

Pin this article for later! 

Click the Pin button on the image below to save for later. 


© A Crafty Spoonful - All Rights Reserved
It is OK to use one of my photos provided a link back and/or proper credit is given. It is NOT ok to copy and paste a whole post including instructions. Please do not remove watermarks or alter images in any way. Please contact me with any questions at danielle@acraftyspoonful.com

.