Growing Up Is Hard To Do

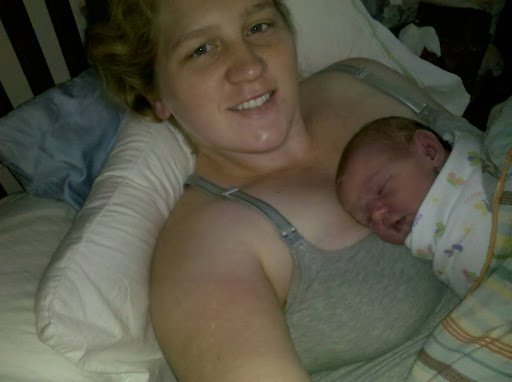
My beautiful baby girl no longer gives open mouth kisses. She puckers up.

And forget holding my hand when she steps down from our front porch… she can do it all by herself with no help. 

I knew that watching the kids grow would be hard, especially with no plans of a third child in the works. I’ve been trying to let each moment, each milestone soak in as much as possible. Being home with the kids during the week has helped give me the opportunity to watch how much they grown and change each day.

I watch how much these little ones change and am in awe of how quickly they adjust to these new skills and techniques. I definitely don’t react as fast!

I feel as if I need time to process it all. Make my mind realize how quickly things are changing and try and be “in the moment” as much as possible while I watch them grow and become these amazing little people.

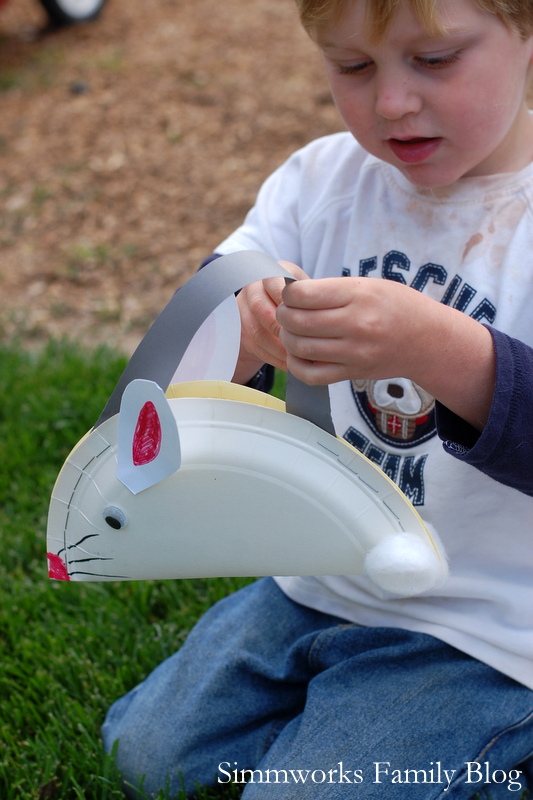
In just a few months my oldest will be going to preschool and while it’s just a few days a week (and right around the corner from our home) I don’t know what I’m going to do without my little buddy during the day. I’m sure we will stay plenty busy, but after being with him day in and day out for this past year I know it’ll feel a bit weird to not have him with us on our daily adventures.

Just this morning my daughter and I dropped him off with his great aunt and m ydaughter was beside herself with sadness because she couldn’t go too. I just know the reaction will be similar as she watches her brother go off to school.

Donuts might have worked as a great distraction this morning but they can’t be a daily thing.

And what will I do when both are in school? I’m sure I’ll be able to find volunteer work, continue working at home part time, and keeping myself busy with activities, etc but the thought of them growing so quickly and heading off to school so soon is such  a weird thing to think about.

Maybe we should think of having another… Nah! That’s be crazy.

DIY Paper Bag Puppet

One of my kids’ favorite toys to chose for imaginary play are their puppets. We have a few stuffed animal puppets and a few wooden puppets that they play with on a regular basis. My son makes his sister take whichever puppet he isn’t interested in and has her play whatever part he doesn’t want. And she plays her part with no complaining because she loves to play with her brother.

So when I asked my son if he wanted to make his own puppet and he turned me down, my daughter quickly jumped in and started to make her own. She helped cut out the stripes, glued down all of the parts, and even added a few stripes of her own with her favorite black marker.

Paper Bag Animal Puppet

What You’ll Need: 

  • paper bag
  • construction paper
  • glue
  • scissors
  • plastic eyes
  • black washable marker
  • pipe cleaners (optional)

What you do: 

1. Cut out the shapes for your animal. We made a tiger/cat so we cut out stripes and three triangles for the ears and nose. 

2. Glue on stripes

3. Place dots for eyes and place eyes on top portion of paper bag.

4. Add ears, nose, and whiskers. Use pipe cleaners for whiskers if you prefer a more three dimensional puppet.

5. Let your child put their finishing touches on the puppet (in our case, more stripes) and start playing!

There are many different types of puppets you can make and many other tools you can use to enhance your puppets. We love to use yarn for hair (or manes), glitter for sparkle, and buttons for eyes and noses when we don’t have googly eyes.

Characters in books are the favorites for puppet ideas. We’ve done full productions of Goldilocks and the Three Bears in the front yard as well as our own version of a few Mother Goose tales. The ideas are endless! Just grab your favorite book or create your favorite animal and get crafting.

 
Every week Danielle brings great kids crafts to Formula Mom!
Danielle is a work-at-home-mom of two beautiful kids and writes at the Simmworks Family Blog. She loves to blog about her family, healthy living, going green and crafting. Danielle would love for you to come visit! You can reach her on facebook and twitter as well. If you have any questions feel free to email her at  simmworksfamily@gmail.com

DIY Recycled Kite

There’s been a change in the weather over the past few days and our beautiful sun has receded back behind the clouds. The wind has started to pick up and leaves have been swirling around our front yard. It’s the perfect weather for kite flying!

Only problem was we didn’t have a kite.

So after a few different attempts using a few different patterns we made our own kite out of recycled products we had lying around the house. And boy was it fun! While I did most of the construction, my son and daughter did help tape up the kite measured the string. Even without the sun we got to enjoy the outdoors and my kids had a blast running around with their kite.

DIY Recycled Kite

What You’ll Need: 

  • Plastic bag (trash bag, store bag, etc)
  • Thin wooden dowel, cut in 1/2 or other similar item (I used 2 wire hangers)
  • Tape, masking or electrical
  • String or yarn
  • Scissors
  • Craft stick

What you do:

1. Create a lowercase T with the dowels and use tape to secure the two sticks together.

2. Cut bag open along one side and the bottom. Do not cut the other side. Stretch bag open to measure to fit the dowels in a diamond shape.

3. Attach string to the craft stick and wrap a few yards around it.

4. Cut out bag and adhere to the dowels by taping each corner.

5. Make two tabs on the right and left side of the kite with tape.

6.  Measure out some string or yarn to about 1″ over each side of the kite. Tie string to the tabs you just created and double knot. The string should be tight enough to slightly bend the kite inward.

7. Now this is where it gets a bit tricky. Turn the kite over to the print side (front of kite).

About 3 inches from the top and bottom of the kite make two small holes on either side of the dowel. Use string to secure the dowel to the front of the kite. Run the string down to the bottom of the kite and tie the other side. 

8. Tie a piece of string to the dowel below the knot you just created on the backside of the kite. This should create an X on the back of the kite and will be where you attach your lead. Attach the lead to the middle of the X and secure with a slip knot.
 

9. Cut a few long strips of plastic from the remaining parts of the plastic bag and adhere to the bottom of the kite.

10. Now it’s time to go out and fly!

Help your child out by releasing a bit of string, holding the kite up above your head, and telling them to run in the opposite direction. When you start to feel a pull on the kite let it go and watch it take off!

Every week Danielle brings great kids crafts to Formula Mom! Danielle is a work-at-home-mom of two beautiful kids and writes over at the Simmworks Family Blog. She loves to blog about her family, healthy living, going green and crafting. Danielle would love for you to come visit! You can reach her on facebook and twitter as well. If you have any questions feel free to email her at  simmworksfamily@gmail.com.

Engage Your Toddler and Care for Your Infant Outside of the Home

Engage Your Toddler and Care for Your Infant Outside of the Home

Throughout my pregnancy with my daughter, one of my main concerns was how I would juggle two kids. I absolutely loved taking my son out and about with me to playdates, activities, and social events and I just couldn’t imagine adding a baby, let alone a newborn, to the mix. How could I continue to engage my toddler son while caring for my infant daughter?

I was also nervous about being cooped up in the house alone with both kids after my husband returned to work. I thought I’d go stir crazy trying to entertain my son and breastfeed my daughter simultaneously. So I quickly resolved to get out of the home as much as possible and stay active in my mom’s group. I mean I was the organizer of the group, I had to keep it active!

Here’s how I did it:

Create a Game Plan
Figure out where you’re going, who’s going with you, and how long you want to stay. Then explain to your toddler (if they’re old enough to understand) exactly what you’re doing and what you expect of them.

Depending on where you’re going, decide if you want to bring a double stroller or just stick to a baby carrier. I found that when my daughter was very young it was easier to carry her and push my son in our single stroller. I was still able to use the stroller to change my daughter on the go when we needed it and my son had the comfort of “his” stroller when he got tired.

Plus, I highly recommend testing out double strollers when you have both kids. That way you can find out what works best for your two, and not what looks good on the website. Many stores now allow you to test out strollers before purchasing them so take advantage of this!

Be Prepared
Pack in advance and bring lots of snacks! I always keep two diapers in my diaper bag for the baby and two pull ups for my toddler (or diapers, underwear, etc) and I keep an extra stash of back up diapers in my car in case there’s an emergency explosion or accident. That way my diaper bag isn’t overpacked but I’m still prepared.

Packing snacks that both my son and I love helps ensure that I won’t have to make any stops at the snack bar or have a starving toddler on my hands. Snacks also make for great incentives when you want to get your child to listen. 

Get your Toddler Involved
My son was especially helpful when I explained that Mommy wanted him to act like a Big Brother and show his little sister how to do things while we were out.

When we visited the zoo he got to choose what animals we saw and pointed each out to his sister. When we braved the grocery store he got to hold the list and look up and down the aisles for the items we needed. And I always had a fruit leather or other favorite snack to reward him for his hard work.

This also helped us work on skills he was trying to master including learning his shapes, finding different colors, and starting to count. 

Ask for Help
When out with friends and/or family please do not hesitate to ask for help when you need it! Even if your friends don’t have much experience with kids or it’s been a while since your aunt has held a baby, make sure to get them involved when you start to feel overwhelmed. And if you’re out alone don’t dismiss the other moms around you. Even if you don’t know them, they might have no problem helping another mama out.

This is also a great way for friends and family members to get baby time with your infant while you enjoy a little one-on-one time with your toddler. I know that my mommy friends were a big help when it came to this. I was able to give my daughter to one of the other moms while I played with my son and their kids.

The great part about it? They usually ended up thanking me for giving them a little baby time! Win-win.

So if you’re considering adding to your family or are already expecting, don’t worry. Everything will work out. And you will get out of the house again. Just remember to create a game plan, be prepared, get your toddler involved, and ask for help! 

Nursing my newborn while hanging with my toddler at a playdate

Every week Danielle brings great kids crafts to Formula Mom! Danielle is a work-at-home-mom of two beautiful kids and writes over at the Simmworks Family Blog. She loves to blog about her family, healthy living, going green and crafting. Danielle would love for you to come visit! You can reach her on facebook and twitter as well. If you have any questions feel free to email her at  simmworksfamily@gmail.com.

DIY Easter Bunny Basket {Guest Post}

Easter is right around the corner. To get the kids excited about this holiday I thought it’d be great to start doing Easter crafts. And the first thing that popped to mind was this bunny basket I saw on About.com.

My son loved putting it together with me and even decided to do one on his own after I helped him with this one. He loved being able to use the stapler and the scissors. And he surprised me by how well he did with the pen while drawing on whiskers. He’s getting quite skilled!


DIY Easter Bunny Basket

What you’ll need:

  • paper plates
  • googly eyes
  • glue dots
  • 2 cotton balls
  • 1 piece white construction paper (for ears)
  • 1″ strip of construction paper (for handle)
  • Black & pink marker
  • scissors
  • stapler

What you do:

1. Fold the white construction paper in half. Cut out two bunny ears and set aside.

2. Fold the paper plate in half.

3. Staple up each side of the paper plate 4 times.

4. Use glue dot to add googly eyes to either side of the paper plate. Add a nose to the bunny with the pink marker.

5. Add handle to the top of the paper plate with a staple.

6. Use pink pen to color the inside of the ears. Attach ears to the paper plate with glue dots.

7. Add whiskers to the bunny with the black marker on each side.

8. Place 2 glue dots at the opposite end of the bunny and add a cotton ball for a tail. Repeat on the other side.

9. Stuff with your favorite Easter goodies and have fun!

Every week Danielle brings great kids crafts to Formula Mom! Danielle is a work-at-home-mom of two beautiful kids and writes over at the Simmworks Family Blog. She loves to blog about her family, healthy living, going green and crafting. Danielle would love for you to come visit! You can reach her on facebook and twitter as well. If you have any questions feel free to email her at simmworksfamily@gmail.com

Top 10 Gifts for a Three Year Old

Welcome Molly Claire

Molly was born on Tuesday December 7th @ 9:45am. She weighed 8lbs and is 21in long. Birth story to come soon!

Published with Blogger-droid v1.6.5


© A Crafty Spoonful - All Rights Reserved
It is OK to use one of my photos provided a link back and/or proper credit is given. It is NOT ok to copy and paste a whole post including instructions. Please do not remove watermarks or alter images in any way. Please contact me with any questions at danielle@acraftyspoonful.com

.