2 Ingredient Chocolate Cake with Spiced Honey Roasted Hazelnuts

review affiliate link disclaimer
2 Ingredient Chocolate Cake with Hazelnuts

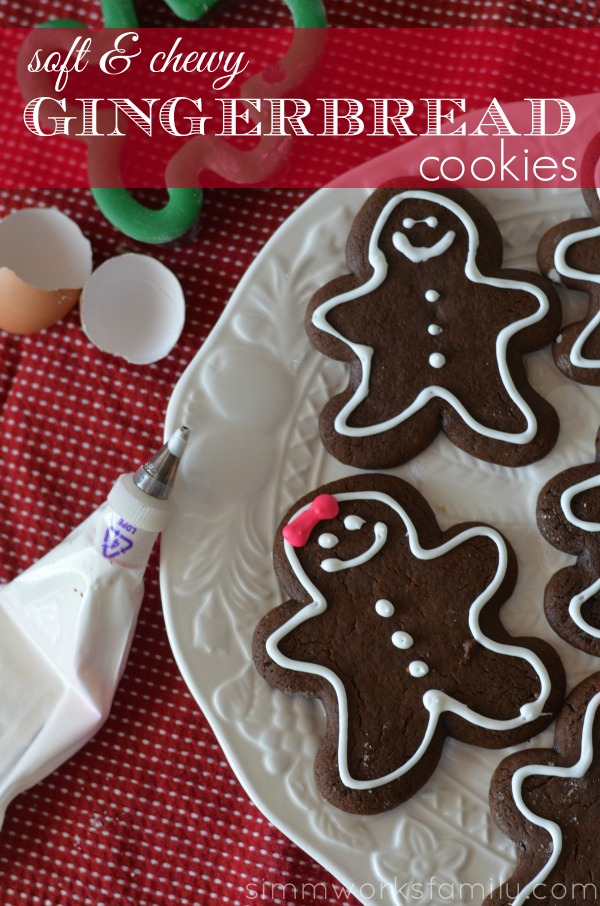
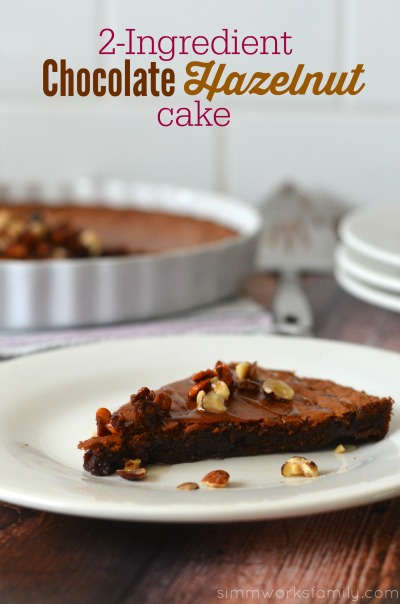
There were some flavor combos that were just meant to be together. And most of my favorite combos always revolve around chocolate. So weird, right? So when I heard I could make a 2 ingredient chocolate cake I was kind of skeptical. But totally on board!

So I picked up some Nocciolata (you can purchase it here on Amazon) that was sent over to me for review and decided to jump in and try this 2 ingredient chocolate cake. All you need is Nocciolata hazelnut spread with cocoa and milk and eggs!

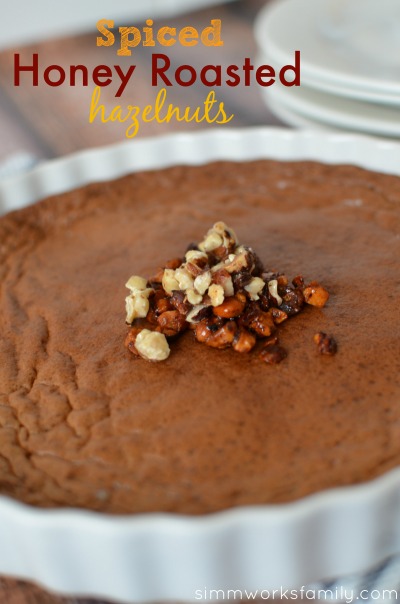
The outcome was delicious. I waited for this cake to completely cool, topped it with some delicious spiced honey roasted hazelnuts and a drizzle of Golden Blossom Honey. It definitely hit the spot. [Read more…]

Spiced Honey Roasted Hazelnuts

review affiliate link disclaimer
Spiced Honey Roasted Hazelnuts

I’ve come to love stepping outside of the box in the kitchen. Spicing things up figuratively and literally. So when I started to plan how I’d spice up a 2 ingredient chocolate cake I immediately thought to turn to nuts and honey as my inspiration.

Because what’s better than chocolate, hazelnuts, and honey? Well… maybe peanut butter but peanut butter is everywhere!

I have never roasted nuts on my own before from scratch (besides one time when I purchased an almond roasting kit from Target a few years back on clearance for Christmas gifts… but that doesn’t count because it was a kit!). I’ve heard it’s easy and figured I’d give it a go. Luckily it was easy! If you remember to watch the nuts closely so they don’t burn.

And these Spiced Honey Roasted Hazelnuts really did hit the spot when topped onto the cake.  [Read more…]

Someday I’ll Learn: 4 Ingredient Beer Bread

4 Ingredient Beer Bread

When my daughter came up to me last week and asked for a peanut butter sandwich – and we were out of bread – I had to get a bit creative. And that’s where this 4 Ingredient Beer Bread came from.

I’m amazed at how simple it is to make bread with 4 ingredients. But it’s totally doable. And this bread? Yeah… it’s good.

You can find the full recipe featured on Someday I’ll Learn today!

Pinterest Inspiration

Hawaiian Host Milk Chocolate AlohaMac Bread Pudding With Caramel Sauce

This post is part of a social shopper marketing insight campaign with Pollinate Media Group™ and Hawaiian Host, but all my opinions are my own. #pmedia #HawaiianHoliday http://cmp.ly/3/8vNxcO

AlohaMac Bread Pudding With Caramel Sauce

Ever since I had my kids Christmas morning has been a time I dedicate to spending with them. No more driving from one relatives home to another. Instead we give an open invitation to any family members wanting to come over in the morning and then host Christmas dinner.

Since a few family members show up outside of our immediate family I love trying new brunch recipes and ideas. And since my dad and step-mom just got back from Hawaii over Thanksgiving I thought it might be nice to treat them to a little taste of the islands with this Hawaiian Host AlohaMac Bread Pudding with Caramel Sauce for Christmastime. [Read more…]

White Party Cake with Strawberries Recipe + Baking Tips

Tracking Pixel

This is a sponsored post written by me on behalf of PAM Cooking Spray.

white party cake with strawberries

My baby is turning 3 tomorrow. 3 years old! How did that happen? In celebration of her birthday we baked together and made her a delicious white party cake with pink strawberry frosting. It’s a trial run for the cake I’m making for her party on Sunday and I think it’s a winner!

Every year I bake my kids a cake or cupcakes for their birthday party. We end up having both cake and cupcakes but I try and make one of them. And without fail I’m baking the night before the party and always have to re-do everything because my cakes stuck to the pan. Well not this year. I busted out my secret weapon: Baking PAM Cooking Spray. Not only is it the perfect non-stick spray, it also has flour in it so my baked goods come out perfectly every time.

The kids are slightly disappointed because they don’t get to eat up all of the cake crumbles from the broken cakes that I’ve just about ruined. But I’m happy because a cake that slides right out of the pan means less work and stress for me!

[Read more…]

Savory Pie Crust for Pot Pies

Savory Pie Crust for Pot Pies

Pie crust is one of those things I get lazy with. And I so don’t know why. I mean, making a pie crust takes minutes. Sure you have to wait for the dough to chill but really… it isn’t that hard if you have a food processor.

So when I decided to make pot pies from leftovers and found myself without any refrigerated or frozen pie crust (it is the week after Thanksgiving) I decided to just whip up some savory pie crust to use to save time and money.

And don’t worry… I’ll be sharing my pot pie recipe with you tomorrow! [Read more…]

Soft and Chewy Gingerbread Men Cookies

Soft and Chewy Gingerbread Cookies

While everyone was slaving away on Thanksgiving making beautiful turkeys, preparing casseroles, and baking bread, my family was baking something else… gingerbread men and women! My husband is slightly obsessed with the holidays and asked the kids if they wanted to make some soft and chewy gingerbread men to take with us to Thanksgiving dinner. You know, to get in the holiday spirit!

After they baked them up they turned the reigns over to me and had me make the royal icing and decorate the men and women. We threw in some turkeys and fall leaves (not pictured) to round out the merging of the holidays but most purists around the dinner table grabbed for the gingerbread men and women.

Now that we’ve found an awesome recipe for the cookies it’s time to start planning what recipe we’ll be using for the houses we construct!
Soft and Chewy Gingerbread cookies platter

Soft and Chewy Gingerbread Men Cookies

  • 3/4 cup unsalted butter
  • 3/4 cup brown sugar (packed)
  • 3/4 cup molasses
  • 1 teaspoon salt
  • 2 teaspoons cinnamon
  • 2 teaspoons ground roasted ginger
  • 1/4 teaspoon allspice
  • 1 large egg
  • 1 teaspoon baking powder
  • 1/2 teaspoon baking soda
  • 1 cup white whole wheat flour
  • 2 1/2 cups Unbleached All-Purpose Flour

Royal Icing

  • 1/4 cup meringue powder or egg white powder
  • 1/4 teaspoon salt
  • 3 1/2 cups powdered sugar (sifted)
  • 3/4 cup cool water
  1. In a saucepan set over low heat, or in the microwave, melt butter, then stir in the brown sugar, molasses, salt, and spices.
  2. Transfer the mixture to a medium-sized mixing bowl, let it cool to lukewarm, and beat in the egg.
  3. Whisk the baking powder and soda into the flour, and then stir these dry ingredients into the molasses mixture.
  4. Divide the dough in half, and wrap well. Refrigerate for 1 hour or longer.
  5. Preheat your oven to 350 degrees. Get out several baking sheets and line with parchment.
  6. Once the dough has chilled, take one piece of dough out of the refrigerator, and flour a clean work surface, and the dough. Roll it out as thin or thick as you like; for slightly less crisp cookies, roll it out more thickly. We go for 1/4 inch for a soft and chewy gingerbread man.
  7. Place the dough on parchment, and put a sheet of plastic wrap over it as you roll, pulling the plastic to eliminate wrinkles as necessary when rolling; this will keep dough from sticking without the need for additional flour.
  8. Cut out shapes with a cookie cutter, cutting them as close to one another as possible to minimize waste.
  9. Transfer the cookies to un-greased cookie sheets (or, if you’ve rolled right onto the parchment, remove the dough scraps between the cookies). Bake the cookies just until they’re slightly brown around the edges 8 to 12 minutes, or until they feel firm.
  10. Let the cookies cool on the baking sheets for several minutes, or until they’re set. Transfer them to a rack to cool completely. Repeat with the remaining dough.
  11. Decorate the cookies with Royal Icing.

For the Royal Icing:

  1. In a stand mixer or large bowl with electric mixer, add dry ingredients. Start the mixer and slowly pour in the cool water.
  2. Mix on low speed at first, increasing to high speed over several minutes. Beat until the icing is fluffy.
  3. Keep the frosting covered with a damp towel and some plastic wrap until you are ready to use it.
  4. Divide the frosting into smaller containers and mix with food coloring for several colors.

Soft and Chewy Gingerbread Men Cookies

What’s your favorite holiday cookie?

This recipe originally appeared on this site on December 1st, 2013

Apple Cheddar Quick Bread

Apple Cheddar Quick Bread

I absolutely love a good, hearty bread with a bowl of soup when it’s cold outside. And this week it’s gotten pretty chilly! So when I stumbled upon this delicious Apple Cheddar Quick Bread recipe over at Simply Stacie I knew I needed to try it.

From it’s deliciously soft inside to the crunchy crust on the outside, this is the perfect comfort food to go alongside your favorite warm dish. And it’s so easy to throw together!

In true Danielle fashion, though, I did make a few changes to the recipe to tweak it a bit to our liking. Our version is below but I highly suggest checking out Stacie’s too! [Read more…]

How to Make a Chocolate Lava Volcano Cake

This easy tutorial on how to make a chocolate lava volcano cake will help you create the perfect dino-themed cake.


As you know, my son is OBSESSED with Dinosaur Train. It’s pretty much the best TV show ever according to him. So when we were planning his Dinosaur Train party, we knew we had to have a volcano cake. 

Not only does this incorporate some of his favorite things (chocolate and volcanoes), it was the perfect centerpiece for our dessert table! Plus it was so easy to make. Just use our delicious devil’s food cake and bake up in a bundt pan then follow the instructions below. 

You’re a few steps away from your own chocolate lava volcano cake! 

Chocolate Lava Volcano Cake

Devil’s Food Cake

  • 2 1/3 cups all-purpose flour
  • 1 cup unsweetened cocoa powder, sifted
  • 1 1/2 tsp. baking powder
  • 1/2 tsp. baking soda
  • 1/2 tsp. salt
  • 12 tablespoons (1 1/2 sticks) unsalted butter, at room temperature
  • 2 cups firmly packed light brown sugar
  • 2 tsp. vanilla extract
  • 4 eggs, at room temperature 
  • 1 1/2 cups buttermilk, at room temperature

Preheat an oven to 350°F. Butter and sprinkle the pan with cocoa powder (make sure you get every nook and cranny).

In a large bowl, sift together the flour, cocoa powder, baking powder, baking soda, and salt; set aside.

In another large bowl, using an electric mixer beat the butter on medium speed until smooth. Gradually add the brown sugar and continue beating until fluffy. Beat in the vanilla. Add the eggs one at a time, beating well after each addition.

Reduce the speed to low and add the flour mixture in three additions, alternating with the buttermilk and beginning and ending with the flour, beating after each addition.

Divide the batter between the prepared liners. Bake until a toothpick inserted into the center of a cake comes out clean, 55 to 60 minutes. Transfer the cake and let cool for 15 minutes. Turn the cake out onto a wire rack and let cool completely before frosting and decorating.

Chocolate Glaze

  • 1/4 cup chocolate pieces, semisweet
  • 1 tablespoon butter or margarine
  • 1/2 cup powdered sugar
  • 1 1/2 tablespoons milk

In a small saucepan, melt chocolate with butter. Remove from heat and beat in powdered sugar adding milk gradually until mixture is a pourable consistency. Immediately pour onto cake once it’s done.

To Assemble the Cake

  • 1 cup large marshmallows
  • 1 bag red chocolate candy melts
  • 1 bag orange chocolate candy melts 
  • red and/or orange glitter sprinkles
  • 3 round lollipop sticks
  • piping bags or plastic bag

 Move the bundt cake onto a cake plate and fill the center with marshmallows. Top the marshmallows with chocolate glaze and allow glaze to drizzle over the sides of the cake.

Melt 1/2 of the red chocolates and pour over the chocolate glaze to create the lava. Allow to drizzle over the sides of the cake and make sure to coat the middle where the marshmallows are. Let set.

While the chocolate is setting melt remaining red chocolates. Line your counter with wax paper and tape it down. Set the three lollipop sticks down spaced apart. These will be the flames of your cake. You can either free-hand the flames or print out a template and put the template under your wax paper.

When the chocolate is melted pour or scoop it into a piping bag and cut off the tip. Draw your flames around the lollipop sticks and make sure to coat the stick well. Leave about an inch at the end to stick into your cake. Top chocolate with some sprinkles to make them pop while the chocolate is still melted. Repeat with the orange candy melts until you get the desired look you want for your flames.

Once the chocolate has set (I waited about 1/2 an hour) you can stick the flames into the middle of your cake. Ta-Da! A chocolate lava volcano cake worthy of any prehistoric party.   

Have you hosted a dino themed party? What was your favorite part? 

Love what you read? Find more great dino-themed ideas below: 

Pin this article for later! 

Click the Pin button on the image below to save for later. 


The Perfect Birthday Pancakes {How-To}

The Perfect Birthday Pancakes

Our family loves pancakes and waffles. But we hardly ever get to making them on weekdays. So when my son asked for pancakes on the morning of his birthday I had to give in. But I couldn’t just make any normal pancake. They needed to be special birthday pancakes! So I grabbed a box of multigrain pancake mix from Trader Joe’s and got to work.

Here’s how to make the perfect birthday pancakes:

Perfect Birthday Pancakes ingredients

1. If you aren’t making your pancakes from scratch (they’re super easy to do!) pick out a multigrain mix. Grab the sprinkles while you’re in the pantry.

2. Mix ingredients together and let the batter sit and thicken. This will allow the batter to thicken and make fluffier pancakes. You can add in sprinkles now or wait till later.

3. Preheat your skillet on medium. You’ll know it’s ready when you place a  few drops of water on it and they sizzle and evaporate quickly.

4. Grease skillet with butter. Then wipe away any excess with a towel.

Perfect Birthday Pancakes adding sprinkles

5. Place no more than 1/4 cup of batter for each pancake (unless you’re a pancake master). Sprinkle each pancake with sprinkles and set timer for 1.5 minutes.

Perfect Birthday Pancakes baking

6. Turn pancakes when the edges start to bubble or when timer goes off, whichever comes first. The pancakes should be golden brown.

7. Let the other side cook for 1-1.5 minutes or until golden brown.

8. Place pancakes aside and cover loosely to keep warm. You can also put them in a 200 degree oven if you have a lot of pancakes to make.

9. Make a special icing instead of using syrup and butter. Take 1/2 a cup of powdered sugar and add in 1-2 tablespoons of milk. Stir vigorously to combine and remove lumps. Add more milk if too thick. Add 1-2 teaspoons of maple syrup to the icing.

10. Top with icing, sprinkle more sprinkles on top and include a candle or fun cupcake topper to make this special stack of pancakes perfect.

Enjoy!

Perfect Birthday Pancakes stacked

What do you do to make your child’s birthday special? 


© A Crafty Spoonful - All Rights Reserved
It is OK to use one of my photos provided a link back and/or proper credit is given. It is NOT ok to copy and paste a whole post including instructions. Please do not remove watermarks or alter images in any way. Please contact me with any questions at danielle@acraftyspoonful.com

.