This shop featuring Thanksgiving napkin ring placeholders has been compensated by Collective Bias, Inc. and its advertiser. All opinions are mine alone. #HandsOnCrafty #CollectiveBias

While spring may be my favorite season, I love the fall for the way it brings friends and family together in thanksgiving. We celebrate the month of November by sharing what we’re thankful for and spending time around the table together. And every year for Thanksgiving, we head over to my mother in law’s house to share a meal.
My mother in law loves creating a beautiful table scape and, after making these napkin rings a few years back, I’m in charge of the napkin rings and place holders. And my daughter loves helping out so I always try and find something a. that she can do and b. that’s easy and quick since we usually have to make at least 20 of them.

Well this year my mother in law will be heading out to Boston to celebrate with my husband’s brother so we’re still trying to figure out what our plans are. But no matter where we go, we’ll be prepared with these awesome thanksgiving napkin ring placeholders that my daughter and I put together this past weekend.
She was dying to get started and make them so we got a head start and prepped about 10 of these bad boys (no names yet on half of them). We’ll be ready for whatever house we end up at on Turkey Day.
Thanksgiving Napkin Ring Placeholders
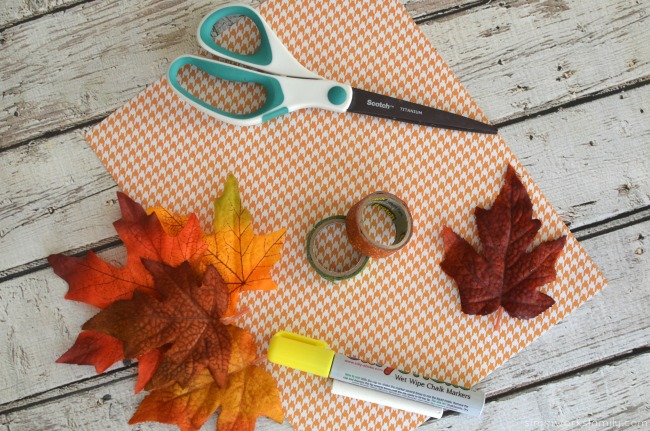
What you’ll need:
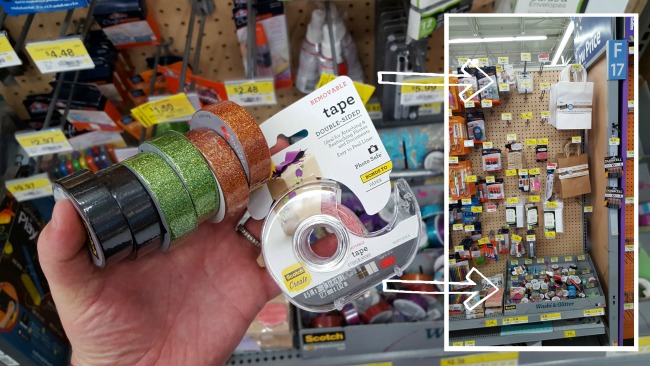
- Scotch® Expressions Brown Glitter Tape
- Scotch® Expressions Green Glitter Tape
- Scotch® Create Double-sided Tape
- 1 piece 8.5 x 11″ card stock (solid or patterned color)
- scissors
- chalk marker in fall colors
- fake fall leaves
- cloth or disposable napkin
What you do:
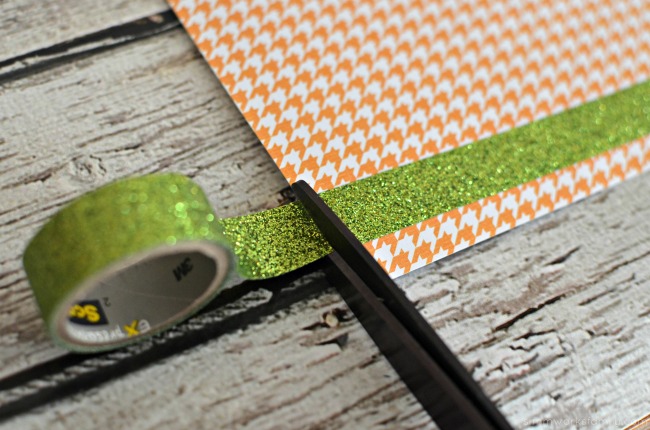
1. Grab the Scotch® Expressions Green Glitter Tape and, with your paper in the portrait position, place a row of green tape about 1/2 inch up from the bottom of the paper. Repeat once more with a second row of green glitter tape directly above the first.
2. Cut a straight line about 1/2 inch from the top of the second row of green glitter tape. This will be your napkin ring base. Repeat as many times as you need to in order to get the desired amount of napkin rings.
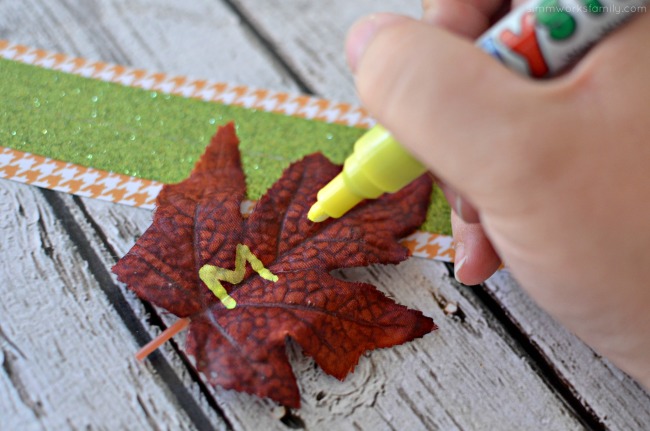
3. Grab the leaf and write the name of the person this napkin ring placeholder is for.
4. Position the Scotch® Expressions Brown Glitter Tape in the middle of the two green tape lines. Place the leaf in the center of the paper and use the brown glitter tape to secure it. Leave a small tail at the end of the brown tape to secure the placeholder around the napkin.
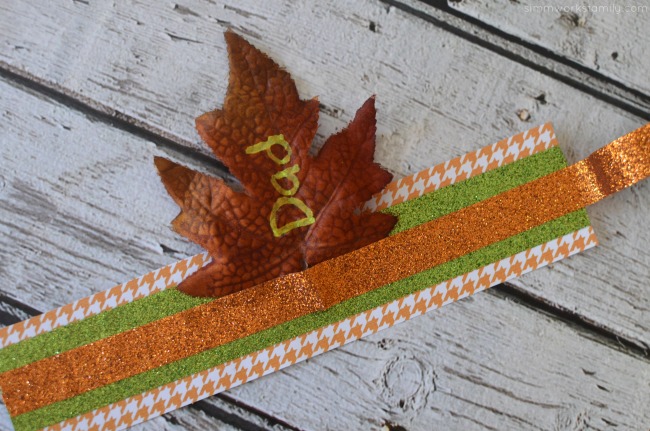
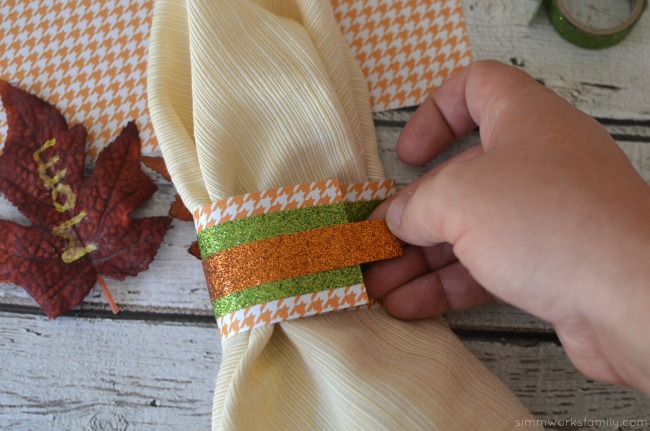
5. Wrap the napkin ring around the napkin and secure in place with tail of the brown glitter tape and reinforce with some Scotch® Create Double-sided Tape underneath the overlapping paper.
Tada! You’re all set!

How do you celebrate Thanksgiving in your home?
I was able to find all of the crafting goodies I needed, including the Scotch® Expressions Glitter Tape, in the craft aisle in Walmart. So easy to find everything in one place! With a perfect combination of versatility, function & fun, Scotch® Expressions Tapes turn everyday projects into simply inspired creations. I love how simple and easy it was to make these Thanksgiving napkin ring placeholders with my daughter and how fun and sparkly they ended up! How awesome is that?


That is the right weblog for anyone who desires to search out out about this topic. You understand a lot its virtually exhausting to argue with you (not that I really would need…HaHa). You definitely put a new spin on a subject thats been written about for years. Nice stuff, simply nice!
Some times its a pain in the ass to read what website owners wrote but this web site is real user genial! .
As a Newbie, I am constantly searching online for articles that can aid me. Thank you
My partner and I stumbled over here from a different web address and thought I might as well check things out. I like what I see so now i am following you. Look forward to checking out your web page repeatedly.
Hello! I could have sworn I’ve been to this blog before but after browsing through some of the post I realized it’s new to me. Anyways, I’m definitely happy I found it and I’ll be book-marking and checking back frequently!
There is evidently a bunch to realize about this. I assume you made various good points in features also.
F*ckin¦ tremendous issues here. I am very happy to look your article. Thank you so much and i am having a look ahead to touch you. Will you please drop me a e-mail?
Wow, incredible blog layout! How long have you been blogging for? you make blogging look easy. The overall look of your website is excellent, as well as the content!
Hi my loved one! I want to say that this article is amazing, great written and come with approximately all significant infos. I would like to peer extra posts like this.
I have learn a few good stuff here. Definitely worth bookmarking for revisiting. I wonder how much effort you set to make one of these wonderful informative website.
What i don’t realize is in reality how you are not actually a lot more smartly-favored than you might be right now. You’re so intelligent. You realize therefore considerably when it comes to this topic, made me personally believe it from a lot of numerous angles. Its like men and women are not interested until it is one thing to do with Lady gaga! Your own stuffs great. At all times deal with it up!
I was just seeking this info for some time. After six hours of continuous Googleing, at last I got it in your site. I wonder what’s the lack of Google strategy that don’t rank this kind of informative websites in top of the list. Normally the top websites are full of garbage.
Really enjoyed this blog post, how can I make is so that I get an email every time you make a fresh update?
Excellent beat ! I wish to apprentice while you amend your website, how could i subscribe for a blog site? The account aided me a acceptable deal. I had been a little bit acquainted of this your broadcast provided bright clear idea
Hello! I just would like to give a huge thumbs up for the great info you have here on this post. I will be coming back to your blog for more soon.
As I website possessor I think the articles here is real superb, regards for your efforts.
This blog is definitely rather handy since I’m at the moment creating an internet floral website – although I am only starting out therefore it’s really fairly small, nothing like this site. Can link to a few of the posts here as they are quite. Thanks much. Zoey Olsen
Excellent web site. Plenty of useful info here. I’m sending it to a few pals ans additionally sharing in delicious. And naturally, thanks for your effort!
I’d have to test with you here. Which is not something I usually do! I enjoy studying a submit that can make people think. Also, thanks for allowing me to remark!
Right now it seems like Drupal is the top blogging platform available right now. (from what I’ve read) Is that what you’re using on your blog?
I haven¦t checked in here for some time because I thought it was getting boring, but the last several posts are good quality so I guess I¦ll add you back to my daily bloglist. You deserve it my friend 🙂
Hello. impressive job. I did not imagine this. This is a splendid story. Thanks!
The acting in the film Agak Laen is incredibly realistic, captivating millions of viewers. Audiences have showered it with praise, feeling a rush of endorphins, serotonin, and dopamine as they laugh heartily at the antics of the four well-known comedians. They truly understand how to manipulate the audience’s emotions to trigger laughter. Even though there are moments of horror, drama, and crime, these elements often take a backseat to the comedic aspects of the film.
It is in point of fact a nice and useful piece of information. I?¦m satisfied that you simply shared this helpful information with us. Please stay us up to date like this. Thank you for sharing.
Very wonderful information can be found on weblog. “I don’t know what will be used in the next world war, but the 4th will be fought with stones.” by Albert Einstein.
I love the efforts you have put in this, appreciate it for all the great content.
Great ?V I should definitely pronounce, impressed with your site. I had no trouble navigating through all tabs as well as related info ended up being truly easy to do to access. I recently found what I hoped for before you know it in the least. Reasonably unusual. Is likely to appreciate it for those who add forums or anything, site theme . a tones way for your client to communicate. Nice task..
A powerful share, I simply given this onto a colleague who was doing a little bit analysis on this. And he actually purchased me breakfast as a result of I discovered it for him.. smile. So let me reword that: Thnx for the deal with! But yeah Thnkx for spending the time to debate this, I feel strongly about it and love studying extra on this topic. If doable, as you develop into experience, would you mind updating your weblog with more details? It is extremely helpful for me. Big thumb up for this blog submit!
Merely a smiling visitant here to share the love (:, btw outstanding layout. “Make the most of your regrets… . To regret deeply is to live afresh.” by Henry David Thoreau.
Your place is valueble for me. Thanks!…
As soon as I observed this web site I went on reddit to share some of the love with them.
My brother suggested I would possibly like this blog. He was once entirely right. This publish actually made my day. You cann’t imagine just how so much time I had spent for this info! Thank you!
Thank you, I have just been looking for information about this subject for a while and yours is the best I’ve found out till now. But, what concerning the bottom line? Are you sure concerning the source?
You are my breathing in, I possess few web logs and very sporadically run out from to brand.
Very nice post. I just stumbled upon your blog and wished to mention that I’ve truly enjoyed browsing your weblog posts. After all I will be subscribing for your rss feed and I’m hoping you write again very soon!
Pretty nice post. I simply stumbled upon your blog and wanted to say that I’ve truly enjoyed surfing around your blog posts. In any case I will be subscribing for your rss feed and I am hoping you write once more very soon!
Hello There. I discovered your blog using msn. That is a very well written article. I will make sure to bookmark it and return to read extra of your useful info. Thanks for the post. I will definitely return.
Neat blog! Is your theme custom made or did you download it from somewhere? A theme like yours with a few simple tweeks would really make my blog stand out. Please let me know where you got your theme. Kudos
Simply wish to say your article is as astonishing. The clarity in your post is simply spectacular and i can assume you are an expert on this subject. Fine with your permission allow me to grab your feed to keep updated with forthcoming post. Thanks a million and please continue the gratifying work.
Hi, Neat post. There is a problem with your site in internet explorer, would check this… IE still is the market leader and a large portion of people will miss your great writing because of this problem.
Hey There. I discovered your weblog using msn. That is an extremely neatly written article. I will be sure to bookmark it and come back to learn extra of your useful information. Thank you for the post. I’ll definitely comeback.
Thanks for another fantastic post. Where else could anyone get that kind of info in such an ideal way of writing? I have a presentation next week, and I’m on the look for such information.
I like what you guys are up too. Such smart work and reporting! Carry on the superb works guys I have incorporated you guys to my blogroll. I think it’ll improve the value of my website 🙂
Excellent blog here! Additionally your web site lots up fast! What host are you the use of? Can I get your affiliate hyperlink to your host? I want my web site loaded up as quickly as yours lol
Hey there! Do you use Twitter? I’d like to follow you if that would be okay. I’m undoubtedly enjoying your blog and look forward to new updates.
Saved as a favorite, I really like your blog!
I do not even know how I ended up here, but I thought this post was great. I do not know who you are but certainly you are going to a famous blogger if you are not already 😉 Cheers!
require effort to reach. The journey becomes much easier when you let go of your past. Walk instead of run, because life is about the journey, not a race. Don’t worry; all your e
An attention-grabbing discussion is price comment. I think that it’s best to write extra on this matter, it won’t be a taboo topic but usually persons are not sufficient to speak on such topics. To the next. Cheers
I cherished as much as you will obtain carried out proper here. The comic strip is tasteful, your authored material stylish. nonetheless, you command get bought an edginess over that you want be handing over the following. ill indubitably come further in the past once more as precisely the same nearly a lot regularly inside of case you defend this increase.
Thanks a lot for sharing this with all of us you actually know what you are talking about! Bookmarked. Kindly also visit my web site =). We could have a link exchange arrangement between us!
Regards for this marvellous post, I am glad I noticed this website on yahoo.
Having read this I thought it was very informative. I appreciate you taking the time and effort to put this article together. I once again find myself spending way to much time both reading and commenting. But so what, it was still worth it!
Great – I should certainly pronounce, impressed with your website. I had no trouble navigating through all the tabs as well as related information ended up being truly easy to do to access. I recently found what I hoped for before you know it in the least. Quite unusual. Is likely to appreciate it for those who add forums or something, website theme . a tones way for your customer to communicate. Nice task..
Very interesting subject, regards for posting. “Nothing is more wretched than the mind of a man conscious of guilt.” by Titus Maccius Plautus.
I adore reading through and I conceive this website got some genuinely useful stuff on it! .
I got what you intend, thankyou for posting.Woh I am delighted to find this website through google. “Don’t be afraid of opposition. Remember, a kite rises against not with the wind.” by Hamilton Mabie.
Great website. Lots of useful information here. I am sending it to some pals ans also sharing in delicious. And obviously, thank you on your effort!
hello there and thank you for your info – I’ve certainly picked up anything new from right here. I did however expertise some technical points using this website, since I experienced to reload the site a lot of times previous to I could get it to load correctly. I had been wondering if your web hosting is OK? Not that I am complaining, but sluggish loading instances times will often affect your placement in google and can damage your quality score if ads and marketing with Adwords. Well I am adding this RSS to my e-mail and can look out for a lot more of your respective exciting content. Make sure you update this again very soon..
Wow! Thank you! I always wanted to write on my website something like that. Can I include a part of your post to my site?
I am not sure where you’re getting your information, but good topic. I must spend a while studying more or working out more. Thanks for great info I used to be in search of this info for my mission.
I really appreciate this post. I have been looking everywhere for this! Thank goodness I found it on Bing. You’ve made my day! Thanks again!
Fantastic blog you have here but I was wanting to know if you knew of any user discussion forums that cover the same topics talked about here? I’d really like to be a part of online community where I can get advice from other experienced people that share the same interest. If you have any recommendations, please let me know. Thank you!
I dugg some of you post as I cogitated they were invaluable very beneficial
Enjoyed examining this, very good stuff, thanks. “Talk sense to a fool and he calls you foolish.” by Euripides.
This is a topic close to my heart cheers, where are your contact details though?
There are some attention-grabbing time limits in this article but I don’t know if I see all of them middle to heart. There may be some validity however I will take maintain opinion until I look into it further. Good article , thanks and we would like more! Added to FeedBurner as nicely
I am impressed with this internet site, rattling I am a big fan .
I absolutely love your blog and find a lot of your post’s to be just what I’m looking for. can you offer guest writers to write content in your case? I wouldn’t mind publishing a post or elaborating on most of the subjects you write related to here. Again, awesome weblog!
I just could not depart your website prior to suggesting that I actually enjoyed the standard info a person provide for your visitors? Is going to be back often to check up on new posts
You have noted very interesting points! ps decent site.
I was recommended this website by my cousin. I am not sure whether this post is written by him as no one else know such detailed about my problem. You are incredible! Thanks!
I like this website because so much useful material on here : D.
Great – I should definitely pronounce, impressed with your web site. I had no trouble navigating through all tabs as well as related information ended up being truly simple to do to access. I recently found what I hoped for before you know it at all. Quite unusual. Is likely to appreciate it for those who add forums or something, site theme . a tones way for your customer to communicate. Nice task..
Wonderful blog! I found it while surfing around on Yahoo News. Do you have any suggestions on how to get listed in Yahoo News? I’ve been trying for a while but I never seem to get there! Thank you
I view something truly special in this website.
Some really interesting details you have written.Helped me a lot, just what I was looking for : D.
Hi , I do believe this is an excellent blog. I stumbled upon it on Yahoo , i will come back once again. Money and freedom is the best way to change, may you be rich and help other people.
Really instructive and great body structure of content, now that’s user pleasant (:.
Hello very cool site!! Man .. Excellent .. Wonderful .. I will bookmark your website and take the feeds additionallyKI am glad to search out numerous useful information here within the publish, we’d like work out extra techniques in this regard, thanks for sharing. . . . . .
F*ckin’ awesome issues here. I’m very satisfied to peer your article. Thanks so much and i am having a look ahead to touch you. Will you kindly drop me a mail?
Wow! Thank you! I permanently needed to write on my site something like that. Can I take a portion of your post to my site?
You have noted very interesting details! ps decent internet site. “Mediocrity knows nothing higher than itself, but talent instantly recognizes genius.” by Conan Doyle.
I’ve read some excellent stuff here. Certainly price bookmarking for revisiting. I wonder how a lot attempt you set to create this kind of excellent informative site.
It is in reality a nice and helpful piece of info. I am glad that you just shared this helpful information with us. Please keep us up to date like this. Thanks for sharing.
I carry on listening to the reports talk about getting boundless online grant applications so I have been looking around for the most excellent site to get one. Could you advise me please, where could i find some?
Some genuinely excellent articles on this web site, regards for contribution.
Nice post. I learn something more challenging on different blogs everyday. It will always be stimulating to read content from other writers and practice a little something from their store. I’d prefer to use some with the content on my blog whether you don’t mind. Natually I’ll give you a link on your web blog. Thanks for sharing.
Yesterday, while I was at work, my sister stole my apple ipad and tested to see if it can survive a thirty foot drop, just so she can be a youtube sensation. My iPad is now broken and she has 83 views. I know this is completely off topic but I had to share it with someone!
Everything is very open and very clear explanation of issues. was truly information. Your website is very useful. Thanks for sharing.
Thank you, I’ve just been searching for information about this subject for ages and yours is the greatest I have discovered till now. But, what about the bottom line? Are you sure about the source?
Thank you for every other magnificent article. Where else could anyone get that kind of information in such a perfect manner of writing? I have a presentation subsequent week, and I’m at the look for such information.
I also believe so , perfectly indited post! .
I’m really impressed along with your writing skills and also with the format to your weblog. Is this a paid subject or did you customize it yourself? Anyway stay up the nice quality writing, it is rare to see a nice blog like this one today..
You made some clear points there. I looked on the internet for the issue and found most guys will agree with your blog.
Someone essentially help to make seriously articles I would state. This is the very first time I frequented your web page and thus far? I amazed with the research you made to create this particular publish amazing. Magnificent job!
You made some clear points there. I did a search on the issue and found most guys will approve with your blog.
This is very interesting, You are a very skilled blogger. I have joined your rss feed and look forward to seeking more of your magnificent post. Also, I have shared your site in my social networks!
Thanks for the update, how can I make is so that I receive an update sent in an email when you write a fresh update?
I love your blog.. very nice colors & theme. Did you create this website yourself? Plz reply back as I’m looking to create my own blog and would like to know wheere u got this from. thanks
hi!,I like your writing so so much! proportion we communicate more approximately your post on AOL? I need an expert in this house to resolve my problem. May be that’s you! Looking ahead to see you.
I discovered your blog site on google and check a few of your early posts. Continue to keep up the very good operate. I just additional up your RSS feed to my MSN News Reader. Seeking forward to reading more from you later on!…
Thank you for every other informative blog. Where else may just I am getting that type of information written in such an ideal approach? I have a undertaking that I’m simply now working on, and I have been on the glance out for such info.
Those are yours alright! . We at least need to get these people stealing images to start blogging! They probably just did a image search and grabbed them. They look good though!
Hi my loved one! I wish to say that this post is awesome, nice written and include almost all vital infos. I’d like to see extra posts like this .
It’s hard to find knowledgeable people on this topic, but you sound like you know what you’re talking about! Thanks
Hello. splendid job. I did not expect this. This is a excellent story. Thanks!
It’s actually a nice and helpful piece of info. I’m happy that you simply shared this helpful information with us. Please keep us up to date like this. Thank you for sharing.
Hi there I am so happy I found your webpage, I really found you by accident, while I was researching on Yahoo for something else, Anyhow I am here now and would just like to say thank you for a tremendous post and a all round thrilling blog (I also love the theme/design), I don’t have time to go through it all at the moment but I have bookmarked it and also added in your RSS feeds, so when I have time I will be back to read a lot more, Please do keep up the excellent job.
An fascinating dialogue is value comment. I feel that you need to write extra on this matter, it might not be a taboo topic however usually persons are not sufficient to talk on such topics. To the next. Cheers
Some truly nice and utilitarian info on this web site, besides I conceive the style contains excellent features.
I don’t normally comment but I gotta say thankyou for the post on this amazing one : D.
I was curious if you ever thought of changing the layout of your blog? Its very well written; I love what youve got to say. But maybe you could a little more in the way of content so people could connect with it better. Youve got an awful lot of text for only having 1 or 2 pictures. Maybe you could space it out better?
of course like your web site but you have to take a look at the spelling on quite a few of your posts. Many of them are rife with spelling problems and I in finding it very bothersome to tell the reality on the other hand I will surely come again again.
Hi! This post could not be written any better! Reading through this post reminds me of my old room mate! He always kept chatting about this. I will forward this post to him. Fairly certain he will have a good read. Many thanks for sharing!
Hi my family member! I want to say that this post is awesome, nice written and come with almost all significant infos. I’d like to look more posts like this.
I couldn’t resist commenting
The subsequent time I learn a blog, I hope that it doesnt disappoint me as much as this one. I imply, I know it was my option to read, but I really thought youd have something fascinating to say. All I hear is a bunch of whining about one thing that you can repair when you werent too busy on the lookout for attention.
Hi my friend! I wish to say that this article is awesome, nice written and include approximately all vital infos. I would like to see more posts like this.
Howdy! Do you use Twitter? I’d like to follow you if that would be ok. I’m undoubtedly enjoying your blog and look forward to new posts.
I was studying some of your blog posts on this site and I believe this internet site is very instructive! Retain posting.
certainly like your website but you have to check the spelling on several of your posts. A number of them are rife with spelling issues and I to find it very troublesome to inform the reality then again I¦ll certainly come again again.
Great blog here! Also your site loads up very fast! What web host are you using? Can I get your affiliate link to your host? I wish my site loaded up as quickly as yours lol
Hello.This post was really interesting, especially because I was searching for thoughts on this subject last Tuesday.
Hello there! Would you mind if I share your blog with my zynga group? There’s a lot of people that I think would really enjoy your content. Please let me know. Thank you
I was looking through some of your blog posts on this website and I believe this internet site is very informative! Keep posting.
Great website. A lot of useful info here. I?¦m sending it to several pals ans additionally sharing in delicious. And obviously, thanks on your effort!
Can I simply say what a aid to seek out someone who truly knows what theyre speaking about on the internet. You definitely know the best way to carry an issue to light and make it important. Extra folks must read this and perceive this aspect of the story. I cant consider youre no more widespread since you undoubtedly have the gift.
송티비에서 고화질 실시간 스포츠중계를 즐기세요. 해외축구중계, 야구무료중계, NBA농구중계, 스포츠무료중계 등 국내외 다양한 스포츠 경기를 무료로 시청할 수 있습니다. 24시간 안정적인 서비스로 스포츠 중계의 진수를 경험하세요!
I¦ll right away grab your rss feed as I can not to find your e-mail subscription link or newsletter service. Do you have any? Kindly let me know in order that I could subscribe. Thanks.
Hello! Do you know if they make any plugins to assist with Search Engine Optimization? I’m trying to get my blog to rank for some targeted keywords but I’m not seeing very good results. If you know of any please share. Many thanks!
I really wanted to send a remark in order to appreciate you for all the lovely suggestions you are giving here. My incredibly long internet look up has now been compensated with excellent know-how to talk about with my colleagues. I ‘d believe that we readers are very much blessed to be in a fine place with very many awesome professionals with great pointers. I feel very much privileged to have come across the webpages and look forward to many more cool moments reading here. Thanks once more for everything.
Hey there, You have done a fantastic job. I will definitely digg it and personally suggest to my friends. I’m sure they’ll be benefited from this website.
of course like your web-site but you have to test the spelling on quite a few of your posts. A number of them are rife with spelling issues and I find it very troublesome to tell the truth nevertheless I will definitely come again again.
Appreciating the time and energy you put into your website and detailed information you provide. It’s awesome to come across a blog every once in a while that isn’t the same outdated rehashed material. Great read! I’ve saved your site and I’m including your RSS feeds to my Google account.
Thanks for all your efforts that you have put in this. very interesting info .
You are my inspiration , I have few blogs and sometimes run out from to brand : (.
Just wish to say your article is as surprising. The clearness in your post is simply nice and i could assume you’re an expert on this subject. Well with your permission let me to grab your RSS feed to keep up to date with forthcoming post. Thanks a million and please continue the gratifying work.
As a Newbie, I am permanently exploring online for articles that can benefit me. Thank you
Keep working ,remarkable job!
you are really a good webmaster. The site loading speed is amazing. It seems that you are doing any unique trick. In addition, The contents are masterpiece. you’ve done a wonderful job on this topic!
It is really a nice and useful piece of information. I am glad that you simply shared this useful information with us. Please stay us informed like this. Thank you for sharing.
Just about all of what you claim is supprisingly precise and that makes me ponder why I had not looked at this in this light previously. This particular article truly did switch the light on for me personally as far as this particular issue goes. Nevertheless at this time there is actually one particular point I am not too comfy with so while I make an effort to reconcile that with the actual core idea of your issue, permit me see exactly what all the rest of the subscribers have to point out.Well done.
I haven?¦t checked in here for a while since I thought it was getting boring, but the last several posts are good quality so I guess I will add you back to my everyday bloglist. You deserve it my friend 🙂
Good V I should certainly pronounce, impressed with your site. I had no trouble navigating through all tabs as well as related info ended up being truly simple to do to access. I recently found what I hoped for before you know it at all. Quite unusual. Is likely to appreciate it for those who add forums or something, site theme . a tones way for your client to communicate. Excellent task..
But wanna remark on few general things, The website style and design is perfect, the subject material is rattling excellent. “War is much too serious a matter to be entrusted to the military.” by Georges Clemenceau.
Hello there, I discovered your website by means of Google whilst searching for a comparable topic, your web site came up, it seems good. I have bookmarked it in my google bookmarks.
I got what you intend,saved to my bookmarks, very decent website .
Saved as a favorite, I really like your blog!
I do not even understand how I finished up here, but I assumed this publish used to be good. I don’t realize who you might be however certainly you are going to a well-known blogger when you aren’t already 😉 Cheers!
I intended to compose you the little remark in order to say thank you over again for your exceptional tricks you’ve shown in this case. It is tremendously open-handed with you to give freely all that many of us would have supplied for an e book in making some profit on their own, most importantly since you could possibly have tried it in case you wanted. These techniques likewise acted to provide a fantastic way to be sure that the rest have the same dream similar to my own to find out more and more with regards to this condition. I am sure there are several more pleasant periods in the future for individuals that looked over your website.
Boost your website’s SEO with premium quality backlinks, including niche-specific casino backlinks. Enhance your site’s authority and improve your search engine rankings with our high-quality, powerful backlinks. Perfect for websites looking to gain a competitive edge!
I have learn some just right stuff here. Definitely worth bookmarking for revisiting. I surprise how so much attempt you set to make the sort of magnificent informative website.
I conceive other website proprietors should take this site as an example , very clean and wonderful user pleasant pattern.
Lovely just what I was looking for.Thanks to the author for taking his clock time on this one.
Very interesting topic, regards for posting.
We are a group of volunteers and starting a new scheme in our community. Your site provided us with valuable information to work on. You have done a formidable job and our whole community will be thankful to you.
I like this post, enjoyed this one thanks for putting up. “It is well to give when asked but it is better to give unasked, through understanding.” by Kahlil Gibran.
Thanks for every other informative site. The place else may just I am getting that type of info written in such a perfect approach? I have a venture that I am simply now running on, and I’ve been at the glance out for such info.
I was very pleased to find this web-site.I wanted to thanks for your time for this wonderful read!! I definitely enjoying every little bit of it and I have you bookmarked to check out new stuff you blog post.
I’d perpetually want to be update on new articles on this internet site, saved to favorites! .
I want assembling useful info, this post has got me even more info! .
You really make it seem so easy together with your presentation but I to find this topic to be actually one thing that I think I might by no means understand. It sort of feels too complex and very vast for me. I am looking ahead for your next submit, I will try to get the hang of it!
I?¦m now not positive the place you are getting your info, however good topic. I needs to spend some time studying much more or figuring out more. Thank you for wonderful info I used to be looking for this info for my mission.
I was looking at some of your blog posts on this website and I conceive this site is really instructive! Retain putting up.
Can I just say what a aid to seek out somebody who really is aware of what theyre talking about on the internet. You undoubtedly know easy methods to convey a problem to light and make it important. Extra folks need to learn this and perceive this side of the story. I cant consider youre no more fashionable since you positively have the gift.
Hello.This article was really interesting, particularly because I was investigating for thoughts on this matter last Saturday.
Awsome website! I am loving it!! Will be back later to read some more. I am bookmarking your feeds also.
An excellent platform! The user-friendly interface and rich variety of content make it my favorite.
I have been surfing on-line more than 3 hours today, yet I never found any fascinating article like yours. It is beautiful price enough for me. In my view, if all web owners and bloggers made good content as you probably did, the internet shall be much more helpful than ever before.
مزاج , شيشةمزاج هو علامة تجارية تتخصص في صناعة وتوريد الشيشة ومستلزماتها. تتميز علامة التجارية بتصميماتها المبتكرة والعصرية، وجودة منتجاتها العالية، وتجربة العملاء
You actually make it appear really easy along with your presentation however I to find this matter to be really something that I believe I would by no means understand. It sort of feels too complicated and extremely large for me. I’m having a look ahead to your next publish, I will attempt to get the hang of it!
I went over this web site and I believe you have a lot of wonderful info, saved to favorites (:.
This site is truly addictive! Always filled with current and interesting content.
I believe this internet site has got some really good info for everyone :D. “When you get a thing the way you want it, leave it alone.” by Sir Winston Leonard Spenser Churchill.
Thanks , I’ve recently been searching for information about this subject for ages and yours is the greatest I’ve discovered so far. But, what in regards to the conclusion? Are you certain about the supply?
This is the appropriate weblog for anyone who desires to search out out about this topic. You notice a lot its virtually onerous to argue with you (not that I truly would want…HaHa). You undoubtedly put a new spin on a topic thats been written about for years. Nice stuff, just great!
Heya i am for the primary time here. I found this board and I find It really useful & it helped me out a lot. I am hoping to give something back and aid others such as you aided me.
There are some fascinating closing dates on this article but I don’t know if I see all of them center to heart. There is some validity but I’ll take hold opinion until I look into it further. Good article , thanks and we would like more! Added to FeedBurner as nicely
I don’t even know how I ended up here, but I believed this submit used to be good. I don’t recognize who you are however definitely you are going to a well-known blogger in case you aren’t already 😉 Cheers!
I like this website because so much utile stuff on here : D.
I was very pleased to find this web-site.I wanted to thanks for your time for this wonderful read!! I definitely enjoying every little bit of it and I have you bookmarked to check out new stuff you blog post.
cocuk escort anna ile sikiş
Hey there! This is kind of off topic but I need some help from an established blog. Is it tough to set up your own blog? I’m not very techincal but I can figure things out pretty fast. I’m thinking about making my own but I’m not sure where to start. Do you have any ideas or suggestions? Cheers
I have been surfing online greater than 3 hours these days, but I never found any attention-grabbing article like yours. It¦s beautiful value enough for me. In my opinion, if all web owners and bloggers made excellent content material as you probably did, the web will likely be a lot more helpful than ever before.
I do enjoy the manner in which you have framed this specific problem and it really does provide me some fodder for thought. Nevertheless, coming from what precisely I have seen, I just simply trust as the remarks stack on that individuals continue to be on issue and don’t start on a soap box associated with some other news du jour. Anyway, thank you for this fantastic piece and while I can not go along with this in totality, I value the perspective.
Loving the info on this site, you have done outstanding job on the blog posts.
Her ziyaretimde yeni bir şey öğreniyorum. İçerikler çok özenli ve profesyonelce hazırlanmış.
I wanted to thank you for this great read!! I definitely enjoying every little bit of it I have you bookmarked to check out new stuff you post…
I have been exploring for a little bit for any high quality articles or blog posts on this sort of area . Exploring in Yahoo I at last stumbled upon this website. Reading this information So i’m happy to convey that I have an incredibly good uncanny feeling I discovered just what I needed. I most certainly will make certain to do not forget this site and give it a glance regularly.
I would like to express my passion for your generosity giving support to persons who must have help with this important field. Your personal commitment to passing the solution all around appeared to be amazingly significant and have regularly enabled some individuals like me to get to their targets. The warm and friendly key points indicates a lot a person like me and especially to my mates. With thanks; from all of us.
Thank you for the good writeup. It in fact was a amusement account it. Look advanced to more added agreeable from you! However, how can we communicate?
Very interesting info !Perfect just what I was looking for!
Hello my loved one! I want to say that this article is awesome, nice written and include approximately all important infos. I’d like to look more posts like this .
I love this site! It’s full of up-to-date and useful information. Thanks to everyone involved.
I am glad to be a visitant of this pure blog! , thankyou for this rare information! .
There are some fascinating cut-off dates in this article but I don’t know if I see all of them center to heart. There’s some validity however I’ll take maintain opinion till I look into it further. Good article , thanks and we wish extra! Added to FeedBurner as properly
Siteniz sayesinde birçok konuda bilgi sahibi oldum. Emeğinize sağlık, gerçekten muhteşemsiniz!
I regard something genuinely special in this website .
لانجرينا يقدم تشكيلة واسعة من اللانجري والملابس الداخلية النسائية المثيرة والأنيقة. اكتشفي أجمل التصاميم والراحة المثالية لتجعلي كل لحظة خاصة.
A fantastic resource! The content is both informative and entertaining. I definitely recommend it.
I love this site! It’s full of up-to-date and useful information. Thanks to everyone involved.
Hmm it seems like your website ate my first comment (it was extremely long) so I guess I’ll just sum it up what I submitted and say, I’m thoroughly enjoying your blog. I too am an aspiring blog blogger but I’m still new to everything. Do you have any helpful hints for novice blog writers? I’d genuinely appreciate it.
Great paintings! That is the type of info that should be shared around the internet. Disgrace on the search engines for no longer positioning this publish upper! Come on over and seek advice from my site . Thank you =)
I wanted to thank you for this great read!! I definitely enjoying every little bit of it I have you bookmarked to check out new stuff you post…
Uzun zamandır böyle kapsamlı ve kaliteli bir siteye rastlamamıştım. Harikasınız!
I’m just writing to let you be aware of what a incredible discovery my friend’s girl encountered browsing your site. She discovered plenty of details, not to mention what it’s like to have a wonderful helping style to make men and women without problems grasp selected complicated topics. You truly exceeded our own desires. Thanks for imparting such great, safe, informative and even cool guidance on the topic to Ethel.
Hey there, You have done an excellent job. I’ll certainly digg it and personally suggest to my friends. I’m confident they will be benefited from this site.
Perfectly indited content, Really enjoyed studying.
IPTV Smarters Pro has 17000+ Live Channels No Buffering content with 99 Uptime. trial available, +80k Movies & Series +20Gbps servers.
It’s in point of fact a nice and helpful piece of information. I’m glad that you shared this helpful information with us. Please stay us informed like this. Thank you for sharing.
Siteniz sayesinde birçok konuda bilgi sahibi oldum. Emeğinize sağlık, gerçekten muhteşemsiniz!
I have been browsing on-line greater than three hours nowadays, yet I by no means found any interesting article like yours. It is lovely worth sufficient for me. In my opinion, if all webmasters and bloggers made good content as you did, the web will likely be a lot more useful than ever before.
Thank you for sharing superb informations. Your web site is very cool. I am impressed by the details that you have on this site. It reveals how nicely you understand this subject. Bookmarked this web page, will come back for extra articles. You, my pal, ROCK! I found simply the information I already searched all over the place and simply couldn’t come across. What a great website.
Enjoyed looking at this, very good stuff, thanks. “Talk sense to a fool and he calls you foolish.” by Euripides.
Its wonderful as your other blog posts : D, thanks for posting. “The rewards for those who persevere far exceed the pain that must precede the victory.” by Ted W. Engstrom.
I was examining some of your content on this site and I think this website is really instructive! Continue posting.
This site is truly addictive! Always filled with current and interesting content.
There is noticeably a bundle to know about this. I assume you made certain nice points in features also.
I’ve been surfing online greater than 3 hours nowadays, but I never found any interesting article like yours. It’s beautiful worth enough for me. In my opinion, if all web owners and bloggers made excellent content as you probably did, the internet will probably be a lot more helpful than ever before. “When there is a lack of honor in government, the morals of the whole people are poisoned.” by Herbert Clark Hoover.
Very good website you have here but I was wanting to know if you knew of any message boards that cover the same topics discussed in this article? I’d really like to be a part of online community where I can get feed-back from other knowledgeable people that share the same interest. If you have any suggestions, please let me know. Thanks a lot!
Hey There. I found your blog using msn. This is a really well written article. I’ll make sure to bookmark it and come back to read more of your useful information. Thanks for the post. I will certainly return.
Outstanding post, you have pointed out some wonderful details , I as well believe this s a very superb website.
I’m really impressed with your writing skills as well as with the layout on your weblog. Is this a paid theme or did you modify it yourself? Anyway keep up the nice quality writing, it is rare to see a nice blog like this one today..
This is a very good tips especially to those new to blogosphere, brief and accurate information… Thanks for sharing this one. A must read article.
I like this weblog very much so much good info .
Some genuinely wonderful information, Gladiolus I noticed this.
I love this site! It’s full of up-to-date and useful information. Thanks to everyone involved.
I think other site proprietors should take this site as an model, very clean and excellent user friendly style and design, let alone the content. You are an expert in this topic!
Howdy just wanted to give you a quick heads up. The text in your article seem to be running off the screen in Ie. I’m not sure if this is a formatting issue or something to do with internet browser compatibility but I figured I’d post to let you know. The style and design look great though! Hope you get the issue resolved soon. Cheers
Have you ever considered about including a little bit more than just your articles? I mean, what you say is fundamental and all. However imagine if you added some great graphics or video clips to give your posts more, “pop”! Your content is excellent but with images and video clips, this site could undeniably be one of the very best in its niche. Fantastic blog!
fantastic post.Ne’er knew this, appreciate it for letting me know.
I cherished up to you’ll obtain performed proper here. The comic strip is tasteful, your authored subject matter stylish. nonetheless, you command get got an nervousness over that you would like be turning in the following. sick indubitably come more earlier again as precisely the similar nearly a lot incessantly inside case you shield this hike.
Hey, you used to write magnificent, but the last several posts have been kinda boring… I miss your great writings. Past few posts are just a little out of track! come on!
Hello, Neat post. There is an issue together with your site in internet explorer, might test this?K IE still is the marketplace leader and a big component of other people will leave out your magnificent writing because of this problem.
I got good info from your blog
I see something really special in this web site.
Incredibly informative and entertaining site. I highly recommend it to everyone!
My spouse and I stumbled over here coming from a different page and thought I might as well check things out. I like what I see so now i’m following you. Look forward to exploring your web page for a second time.
Link Building: I will implement on-page and off-page optimization techniques to improve your website’s SEO performance.
obviously like your web site but you need to take a look at the spelling on quite a few of your posts. Many of them are rife with spelling issues and I find it very bothersome to inform the reality then again I will surely come back again.
Some really fantastic articles on this internet site, regards for contribution.
With a proven track record in the field of backlink building and SEO, I have successfully helped numerous clients achieve higher search engine rankings and drive organic traffic to their websites.
You are my aspiration, I own few blogs and occasionally run out from brand :). “Truth springs from argument amongst friends.” by David Hume.
Some really excellent info , Gladiola I observed this. “Reprove thy friend privately commend him publicly.” by Solon.
Very interesting topic, appreciate it for putting up. “The great leaders have always stage-managed their effects.” by Charles De Gaulle.
I learn something new every visit. The content is carefully and professionally prepared.
Good ?V I should definitely pronounce, impressed with your web site. I had no trouble navigating through all the tabs as well as related information ended up being truly easy to do to access. I recently found what I hoped for before you know it in the least. Reasonably unusual. Is likely to appreciate it for those who add forums or anything, site theme . a tones way for your customer to communicate. Excellent task..
Great line up. We will be linking to this great article on our site. Keep up the good writing.
I conceive you have noted some very interesting points, thankyou for the post.
You got a very superb website, Gladiolus I noticed it through yahoo.
Some genuinely nice and utilitarian information on this web site, likewise I conceive the design and style holds fantastic features.
A lot of thanks for your own effort on this web site. Betty take interest in carrying out investigation and it’s really obvious why. All of us learn all of the powerful ways you give efficient suggestions through this web site and as well strongly encourage contribution from other individuals on that theme and my girl is now studying so much. Take advantage of the remaining portion of the new year. You are always carrying out a very good job.
I haven’t come across such a comprehensive and high-quality site in a long time. You are awesome!
I used to be very happy to find this web-site.I needed to thanks on your time for this excellent learn!! I definitely having fun with each little bit of it and I have you bookmarked to check out new stuff you blog post.
Kuailian Game Accelerator helps overseas Chinese accelerate global mainstream and domestic games, as well as mainstream domestic applications, and enjoy the acceleration of global audio and video resources. One-click direct connection, permanently free, watch videos, live broadcasts, listen to music, and play domestic games anytime, anywhere.
Kuailian Game Accelerator helps overseas Chinese accelerate global mainstream and domestic games, as well as mainstream domestic applications, and enjoy the acceleration of global audio and video resources. One-click direct connection, permanently free, watch videos, live broadcasts, listen to music, and play domestic games anytime, anywhere.
Simply wanna comment on few general things, The website design and style is perfect, the written content is real excellent. “The enemy is anybody who’s going to get you killed, no matter which side he’s on.” by Joseph Heller.
Awsome post and right to the point. I don’t know if this is truly the best place to ask but do you folks have any ideea where to get some professional writers? Thanks in advance 🙂
I have been surfing online more than three hours today, yet I never found any interesting article like yours. It’s pretty worth enough for me. In my opinion, if all site owners and bloggers made good content as you did, the web will be much more useful than ever before.
I just could not depart your site before suggesting that I really enjoyed the standard information a person provide for your visitors? Is going to be back often to check up on new posts
certainly like your website but you need to check the spelling on quite a few of your posts. A number of them are rife with spelling problems and I find it very bothersome to tell the truth nevertheless I’ll certainly come back again.
Absolutely composed content, appreciate it for selective information. “The bravest thing you can do when you are not brave is to profess courage and act accordingly.” by Corra Harris.
Hi! I’m SEO QUEEN. I’m a Professional SEO Expert with over 10 years of industry experience, an SEO Specialist in White Hat SEO techniques, SMM, SEM, and Web Traffic, and a High Authority Backlinks/building expert. Please feel free to get in touch today and we can discuss your project and what you want to achieve
Awsome info and right to the point. I don’t know if this is in fact the best place to ask but do you folks have any ideea where to get some professional writers? Thank you 🙂
Do you mind if I quote a couple of your posts as long as I provide credit and sources back to your webpage? My blog site is in the very same niche as yours and my visitors would certainly benefit from a lot of the information you provide here. Please let me know if this okay with you. Cheers!
Hi! I’m SEO QUEEN. I’m a Professional SEO Expert with over 10 years of industry experience, an SEO Specialist in White Hat SEO techniques, SMM, SEM, and Web Traffic, and a High Authority Backlinks/building expert. Please feel free to get in touch today and we can discuss your project and what you want to achieve
Hi! I’m SEO QUEEN. I’m a Professional SEO Expert with over 10 years of industry experience, an SEO Specialist in White Hat SEO techniques, SMM, SEM, and Web Traffic, and a High Authority Backlinks/building expert. Please feel free to get in touch today and we can discuss your project and what you want to achieve
This is a very good tips especially to those new to blogosphere, brief and accurate information… Thanks for sharing this one. A must read article.
Im no longer certain where you’re getting your information, however good topic. I must spend a while studying much more or working out more. Thanks for magnificent information I used to be searching for this information for my mission.
I love this site! It’s full of up-to-date and useful information. Thanks to everyone involved.
Your place is valueble for me. Thanks!…
It’s great to come across a site that does its job so well. Congratulations and best wishes!
Hi, just required you to know I he added your site to my Google bookmarks due to your layout. But seriously, I believe your internet site has 1 in the freshest theme I??ve came across. It extremely helps make reading your blog significantly easier.
Whats up very nice site!! Man .. Beautiful .. Superb .. I’ll bookmark your web site and take the feeds alsoKI’m satisfied to search out so many helpful information here in the submit, we need work out extra strategies in this regard, thanks for sharing. . . . . .
I conceive you have remarked some very interesting points, regards for the post.
What Is Kerassentials? Kerassentials is a doctor-formulated oil for healthy skin and nails.
I’m a Professional SEO Expert with over 10 years of industry experience, an SEO Specialist in White Hat SEO techniques, SMM, SEM, and Web Traffic, and a High Authority Backlinks/building expert. Please feel free to get in touch today and we can discuss your project and what you want to achieve
Chic Hot Club: Womans Fashion Clothing Store At Chic Hot Club, We offer a curated selection of chic and trendy clothing pieces that inspire confidence and self-expression, at Competitive prices online.
I have learn a few good stuff here. Definitely price bookmarking for revisiting. I wonder how so much effort you put to make such a great informative site.
The Grand Goldman online store curates an extensive collection of premium travel gifts sourced from diverse cultures worldwide. This platform goes beyond mere product offerings, serving as a comprehensive resource for globetrotters, couples, and families alike. It features carefully selected, unique items that capture the essence of international destinations, complemented by expert recommendations and inspiring travel ideas. Grand Goldman’s thoughtfully curated inventory caters to discerning travelers and gift-givers, offering both practical essentials and decorative pieces that reflect the richness of global heritage.
My coder is trying to convince me to move to .net from PHP. I have always disliked the idea because of the expenses. But he’s tryiong none the less. I’ve been using Movable-type on various websites for about a year and am anxious about switching to another platform. I have heard fantastic things about blogengine.net. Is there a way I can import all my wordpress posts into it? Any kind of help would be really appreciated!
Valuable info. Lucky me I found your web site by accident, and I’m shocked why this accident did not happened earlier! I bookmarked it.
Excellent blog here! Also your site loads up very fast! What web host are you using? Can I get your affiliate link to your host? I wish my website loaded up as quickly as yours lol
Aw, this was a very nice post. In concept I wish to put in writing like this moreover – taking time and precise effort to make a very good article… but what can I say… I procrastinate alot and not at all seem to get one thing done.
I’ve recently started a website, the info you offer on this website has helped me greatly. Thank you for all of your time & work.
Just what I was searching for, thankyou for posting.
Hello this is somewhat of off topic but I was wanting to know if blogs use WYSIWYG editors or if you have to manually code with HTML. I’m starting a blog soon but have no coding knowledge so I wanted to get guidance from someone with experience. Any help would be enormously appreciated!
I keep listening to the news bulletin speak about getting boundless online grant applications so I have been looking around for the most excellent site to get one. Could you advise me please, where could i find some?
Loving the information on this website , you have done outstanding job on the posts.
I really appreciate this post. I have been looking all over for this! Thank goodness I found it on Bing. You’ve made my day! Thank you again
Hi, i believe that i saw you visited my site so i came to “go back the want”.I’m trying to in finding things to improve my web site!I assume its ok to use a few of your ideas!!
Good post. I learn something more challenging on completely different blogs everyday. It would always be stimulating to learn content material from different writers and observe slightly something from their store. I’d desire to make use of some with the content material on my blog whether or not you don’t mind. Natually I’ll give you a link in your internet blog. Thanks for sharing.
Youre so cool! I dont suppose Ive learn anything like this before. So nice to search out somebody with some original ideas on this subject. realy thank you for starting this up. this website is one thing that is needed on the net, somebody with just a little originality. useful job for bringing one thing new to the web!
Hi there, just became aware of your blog through Google, and found that it’s truly informative. I’m gonna watch out for brussels. I will appreciate if you continue this in future. Numerous people will be benefited from your writing. Cheers!
I will immediately grab your rss feed as I can not find your email subscription link or e-newsletter service. Do you’ve any? Please let me know in order that I could subscribe. Thanks.
Absolutely composed content material, appreciate it for information .
Hello, Neat post. There’s an issue with your web site in internet explorer, could test thisK IE still is the marketplace chief and a big element of folks will pass over your great writing due to this problem.
Thanks for the auspicious writeup. It in truth was a amusement account it. Glance complicated to more introduced agreeable from you! However, how can we keep in touch?
Hi just wanted to give you a brief heads up and let you know a few of the images aren’t loading correctly. I’m not sure why but I think its a linking issue. I’ve tried it in two different web browsers and both show the same outcome.
Hiya, I am really glad I have found this information. Today bloggers publish just about gossips and web and this is actually frustrating. A good site with interesting content, that is what I need. Thanks for keeping this site, I’ll be visiting it. Do you do newsletters? Cant find it.
I got good info from your blog
This design is wicked! You most certainly know how to keep a reader amused. Between your wit and your videos, I was almost moved to start my own blog (well, almost…HaHa!) Wonderful job. I really loved what you had to say, and more than that, how you presented it. Too cool!
Loving the info on this site, you have done outstanding job on the articles.
I have recently started a web site, the info you provide on this website has helped me greatly. Thank you for all of your time & work.
Wow that was strange. I just wrote an extremely long comment but after I clicked submit my comment didn’t appear. Grrrr… well I’m not writing all that over again. Regardless, just wanted to say wonderful blog!
Good day! This is kind of off topic but I need some guidance from an established blog. Is it hard to set up your own blog? I’m not very techincal but I can figure things out pretty quick. I’m thinking about setting up my own but I’m not sure where to start. Do you have any ideas or suggestions? Thanks
Lovely just what I was searching for.Thanks to the author for taking his time on this one.
Many of life’s failures are people who did not realize how close they were to success when they gave up.
I went over this web site and I conceive you have a lot of great info, saved to my bookmarks (:.
I loved as much as you will receive carried out right here. The sketch is tasteful, your authored material stylish. nonetheless, you command get got an nervousness over that you wish be delivering the following. unwell unquestionably come further formerly again since exactly the same nearly very often inside case you shield this increase.
After study a few of the blog posts on your website now, and I truly like your way of blogging. I bookmarked it to my bookmark website list and will be checking back soon. Pls check out my web site as well and let me know what you think.
I really appreciate this post. I’ve been looking everywhere for this! Thank goodness I found it on Bing. You have made my day! Thank you again
Hello! I’m at work browsing your blog from my new apple iphone! Just wanted to say I love reading your blog and look forward to all your posts! Carry on the outstanding work!
I appreciate, cause I found just what I was looking for. You’ve ended my four day long hunt! God Bless you man. Have a nice day. Bye
I was reading through some of your content on this internet site and I conceive this internet site is really informative! Continue posting.
Her ziyaretimde yeni bir şey öğreniyorum. İçerikler çok özenli ve profesyonelce hazırlanmış.
I have recently started a website, the info you provide on this website has helped me tremendously. Thank you for all of your time & work. “So full of artless jealousy is guilt, It spills itself in fearing to be spilt.” by William Shakespeare.
This blog is definitely rather handy since I’m at the moment creating an internet floral website – although I am only starting out therefore it’s really fairly small, nothing like this site. Can link to a few of the posts here as they are quite. Thanks much. Zoey Olsen
I will right away grab your rss as I can’t find your e-mail subscription link or newsletter service. Do you have any? Please let me know so that I could subscribe. Thanks.
Incredibly informative and entertaining site. I highly recommend it to everyone!
HEMA4D adalah Situs Slot Online Server Pay4d Tergacor dan Terpercaya hari ini 2024 dengan tingkat kemenangan tertinggi dan memiliki provider game slot tergacor gampang menang hari ini
Great site. Lots of useful info here. I am sending it to a few friends ans also sharing in delicious. And naturally, thanks for your effort!
There are certainly a number of particulars like that to take into consideration. That could be a great point to deliver up. I provide the ideas above as general inspiration however clearly there are questions just like the one you convey up the place an important factor might be working in trustworthy good faith. I don?t know if finest practices have emerged around things like that, but I am sure that your job is clearly identified as a good game. Each girls and boys really feel the impression of only a second’s pleasure, for the remainder of their lives.
I truly appreciate this post. I have been looking all over for this! Thank goodness I found it on Bing. You have made my day! Thank you again
Merely wanna say that this is very useful, Thanks for taking your time to write this.
Definitely believe that which you stated. Your favorite reason appeared to be on the web the simplest thing to be aware of. I say to you, I definitely get irked while people consider worries that they just do not know about. You managed to hit the nail upon the top and defined out the whole thing without having side effect , people can take a signal. Will likely be back to get more. Thanks
With havin so much content and articles do you ever run into any issues of plagorism or copyright violation? My blog has a lot of exclusive content I’ve either authored myself or outsourced but it seems a lot of it is popping it up all over the internet without my permission. Do you know any solutions to help reduce content from being stolen? I’d genuinely appreciate it.
A fantastic resource! The content is both informative and entertaining. I definitely recommend it.
I got what you intend, appreciate it for putting up.Woh I am thankful to find this website through google.
I’d have to examine with you here. Which is not one thing I usually do! I take pleasure in reading a post that may make folks think. Additionally, thanks for permitting me to comment!
I like what you guys are up also. Such clever work and reporting! Carry on the superb works guys I’ve incorporated you guys to my blogroll. I think it’ll improve the value of my web site :).
Explore all Fryd carts flavors, including new and disposable options. Buy now for the ultimate vaping experience. Satisfaction guaranteed!
I’m not that much of a online reader to be honest but your blogs really nice, keep it up! I’ll go ahead and bookmark your website to come back later. Cheers
Explore all Fryd carts flavors, including new and disposable options. Buy now for the ultimate vaping experience. Satisfaction guaranteed!
I haven’t come across such a comprehensive and high-quality site in a long time. You are awesome!
Hiya! Quick question that’s completely off topic. Do you know how to make your site mobile friendly? My site looks weird when viewing from my iphone. I’m trying to find a theme or plugin that might be able to correct this problem. If you have any recommendations, please share. Cheers!
Hi there, simply turned into alert to your weblog through Google, and found that it is really informative. I am gonna watch out for brussels. I will be grateful for those who continue this in future. Numerous folks can be benefited out of your writing. Cheers!
Elevate your sniping capabilities with Flash Bot, delivering unmatched efficiency across over 40 networks, including Ethereum, BSC, and Solana.
Simply wish to say your article is as astounding. The clearness to your submit is just excellent and i could think you’re a professional in this subject. Well together with your permission let me to snatch your feed to keep up to date with drawing close post. Thanks 1,000,000 and please continue the rewarding work.
Are you struggling to improve your website’s ranking on Google? Do you want to enhance your online presence and drive more organic traffic to your site? Look no further! I offer a premium service to help you achieve top Google rankings with high-quality SEO backlinks.🌟 High-Quality Backlinks: I will provide you with powerful, high-authority backlinks from reputable sources to significantly boost your website’s ranking on Google.
Are you struggling to improve your website’s ranking on Google? Do you want to enhance your online presence and drive more organic traffic to your site? Look no further! I offer a premium service to help you achieve top Google rankings with high-quality SEO backlinks.🌟 High-Quality Backlinks: I will provide you with powerful, high-authority backlinks from reputable sources to significantly boost your website’s ranking on Google.
I like this web blog so much, bookmarked.
Are you struggling to improve your website’s ranking on Google? Do you want to enhance your online presence and drive more organic traffic to your site? Look no further! I offer a premium service to help you achieve top Google rankings with high-quality SEO backlinks.🌟 High-Quality Backlinks: I will provide you with powerful, high-authority backlinks from reputable sources to significantly boost your website’s ranking on Google.
Thanks for another great post. Where else may just anyone get that type of info in such a perfect manner of writing? I’ve a presentation next week, and I am at the search for such information.
Hi my friend! I wish to say that this article is amazing, nice written and include approximately all significant infos. I would like to see more posts like this.
AICoin offers you real-time global cryptocurrency market quotes, professional candlestick charts, outstanding Web3 data analysis, AI-powered data analytics, curated industry news, and an investor community for exchange. Experience a diversified and convenient one-stop service. Compatible with macOS, Windows, iOS, and Android devices.
Good article and straight to the point. I don’t know if this is truly the best place to ask but do you guys have any ideea where to employ some professional writers? Thank you 🙂
快连VPN 采用全新内核,AI 智能连接,自动为您匹配全球最快的网络节点,只需要轻点“开启快连”,3秒之内,纵享丝绸般顺滑的冲浪体验。
This is very interesting, You’re a very skilled blogger. I’ve joined your feed and look forward to seeking more of your great post. Also, I’ve shared your site in my social networks!
I am always looking online for articles that can assist me. Thx!
I got what you mean , regards for putting up.Woh I am pleased to find this website through google.
Great write-up, I¦m normal visitor of one¦s website, maintain up the nice operate, and It is going to be a regular visitor for a lengthy time.
It’s truly a great and useful piece of information. I am satisfied that you shared this useful info with us. Please stay us up to date like this. Thank you for sharing.
I haven’t come across such a comprehensive and high-quality site in a long time. You are awesome!
Bursa escort bayan ve görükle escort profilleri ve iletişim bilgileri
Its such as you learn my mind! You appear to know so much approximately this, like you wrote the ebook in it or something. I think that you could do with some p.c. to drive the message house a little bit, however instead of that, this is magnificent blog. A great read. I’ll definitely be back.
Keep working ,remarkable job!
You are a very bright individual!
Have you ever considered about adding a little bit more than just your articles? I mean, what you say is valuable and everything. However just imagine if you added some great graphics or videos to give your posts more, “pop”! Your content is excellent but with pics and clips, this site could undeniably be one of the most beneficial in its niche. Awesome blog!
I’m often to blogging and i actually recognize your content. The article has actually peaks my interest. I’m going to bookmark your website and keep checking for new information.
Together with every little thing that appears to be developing throughout this area, many of your viewpoints are generally rather exciting. Nevertheless, I appologize, because I can not give credence to your entire plan, all be it stimulating none the less. It appears to everyone that your commentary are generally not completely validated and in fact you are generally yourself not really thoroughly convinced of your argument. In any event I did appreciate looking at it.
you’re really a good webmaster. The web site loading speed is amazing. It seems that you are doing any unique trick. In addition, The contents are masterpiece. you have done a great job on this topic!
I do enjoy the manner in which you have framed this particular problem and it does supply me some fodder for consideration. Nevertheless, through what precisely I have witnessed, I really wish as the feedback pile on that folks keep on point and don’t embark upon a soap box regarding the news du jour. Yet, thank you for this excellent point and whilst I can not really agree with the idea in totality, I respect the point of view.
I think that is among the such a lot significant information for me. And i’m glad reading your article. But should observation on some common issues, The site taste is great, the articles is in point of fact great : D. Excellent process, cheers
You are my breathing in, I own few web logs and often run out from to brand : (.
Yay google is my queen assisted me to find this outstanding web site! .
Very nice info and right to the point. I don’t know if this is really the best place to ask but do you guys have any ideea where to employ some professional writers? Thanks 🙂
Its like you read my mind! You appear to know a lot about this, like you wrote the book in it or something. I think that you can do with a few pics to drive the message home a little bit, but other than that, this is great blog. An excellent read. I will certainly be back.
I really like your writing style, good information, thankyou for posting : D.
You made a few fine points there. I did a search on the issue and found mainly persons will consent with your blog.
Great write-up, I am normal visitor of one’s site, maintain up the excellent operate, and It is going to be a regular visitor for a lengthy time.
I¦ll right away seize your rss feed as I can not find your e-mail subscription link or newsletter service. Do you’ve any? Please allow me understand so that I may just subscribe. Thanks.
Thanks for this rattling post, I am glad I observed this web site on yahoo.
Very superb info can be found on weblog.
naturally like your website but you need to check the spelling on quite a few of your posts. Several of them are rife with spelling problems and I find it very troublesome to tell the truth nevertheless I’ll certainly come back again.
I love looking at and I believe this website got some genuinely useful stuff on it! .
Saved as a favorite, I really like your blog!
Good write-up, I am regular visitor of one’s web site, maintain up the nice operate, and It’s going to be a regular visitor for a lengthy time.
Great – I should definitely pronounce, impressed with your web site. I had no trouble navigating through all tabs as well as related info ended up being truly easy to do to access. I recently found what I hoped for before you know it at all. Reasonably unusual. Is likely to appreciate it for those who add forums or something, web site theme . a tones way for your client to communicate. Excellent task..
There is visibly a lot to realize about this. I suppose you made some nice points in features also.
Hello. remarkable job. I did not imagine this. This is a fantastic story. Thanks!
I am now not positive where you are getting your information, but good topic. I must spend a while learning more or understanding more. Thanks for wonderful information I was looking for this information for my mission.
You have observed very interesting points! ps decent website.
I couldn’t resist commenting
Its like you learn my thoughts! You seem to grasp so much about this, like you wrote the e book in it or something. I think that you could do with some to drive the message house a little bit, however instead of that, that is excellent blog. An excellent read. I will certainly be back.
Someone essentially help to make seriously posts I would state. This is the very first time I frequented your website page and thus far? I amazed with the research you made to make this particular publish incredible. Great job!
You actually make it appear really easy with your presentation but I in finding this topic to be actually something which I feel I might by no means understand. It kind of feels too complex and extremely vast for me. I’m looking ahead in your subsequent post, I will attempt to get the cling of it!
I believe you have noted some very interesting details , appreciate it for the post.
I like this web blog very much, Its a rattling nice berth to read and receive information.
Hey very nice web site!! Man .. Excellent .. Amazing .. I will bookmark your site and take the feeds also…I am happy to find numerous useful info here in the post, we need develop more strategies in this regard, thanks for sharing. . . . . .
Hey, I think your site might be having browser compatibility issues. When I look at your website in Opera, it looks fine but when opening in Internet Explorer, it has some overlapping. I just wanted to give you a quick heads up! Other then that, terrific blog!
Hi, Neat post. There is a problem with your website in internet explorer, would test this… IE still is the market leader and a good portion of people will miss your magnificent writing because of this problem.
This blog is definitely rather handy since I’m at the moment creating an internet floral website – although I am only starting out therefore it’s really fairly small, nothing like this site. Can link to a few of the posts here as they are quite. Thanks much. Zoey Olsen
Hi! I know this is somewhat off topic but I was wondering if you knew where I could find a captcha plugin for my comment form? I’m using the same blog platform as yours and I’m having difficulty finding one? Thanks a lot!
I am not positive where you are getting your info, however great topic. I must spend some time finding out more or understanding more. Thanks for fantastic info I used to be on the lookout for this information for my mission.
Howdy very cool website!! Man .. Beautiful .. Amazing .. I’ll bookmark your site and take the feeds also…I am happy to search out so many useful information here within the submit, we’d like develop extra strategies on this regard, thank you for sharing.
Some truly nice stuff on this site, I like it.
As a Newbie, I am continuously searching online for articles that can benefit me. Thank you
That is the correct weblog for anyone who wants to find out about this topic. You notice a lot its almost exhausting to argue with you (not that I actually would need…HaHa). You undoubtedly put a new spin on a subject thats been written about for years. Nice stuff, simply great!
Hey There. I discovered your weblog the use of msn. This is an extremely well written article. I’ll be sure to bookmark it and come back to read extra of your helpful info. Thank you for the post. I’ll certainly return.
As I website possessor I think the content here is very great, thanks for your efforts.
Its wonderful as your other blog posts : D, thankyou for posting. “Age is a function of mind over matter if you don’t mind, it doesn’t matter.” by Leroy Robert Satchel Paige.
What is Zen Cortex? ZenCortex is not just another drop in the ocean of dietary supplements
I am also writing to make you understand what a fine experience our girl gained using the blog. She even learned numerous things, not to mention what it is like to possess an amazing helping heart to make certain people very easily learn a number of specialized things. You undoubtedly exceeded my expectations. Thank you for displaying such effective, trustworthy, edifying and in addition unique tips on the topic to Lizeth.
I cling on to listening to the rumor lecture about getting boundless online grant applications so I have been looking around for the best site to get one. Could you tell me please, where could i get some?
Your house is valueble for me. Thanks!…
Some truly nice stuff on this internet site, I like it.
Merely wanna comment on few general things, The website design is perfect, the written content is very great. “To the artist there is never anything ugly in nature.” by Franois Auguste Ren Rodin.
F*ckin’ awesome issues here. I am very happy to see your post. Thanks a lot and i am having a look ahead to touch you. Will you please drop me a e-mail?
Regards for helping out, wonderful info .
This web site is really a walk-through for all of the info you wanted about this and didn’t know who to ask. Glimpse here, and you’ll definitely discover it.
I would like to thnkx for the efforts you have put in writing this website. I am hoping the same high-grade web site post from you in the upcoming also. In fact your creative writing abilities has encouraged me to get my own site now. Really the blogging is spreading its wings quickly. Your write up is a great example of it.
What Is Exactly Emperor’s Vigor Tonic? Emperor’s Vigor Tonic is a clinically researched natural male health formula that contains a proprietary blend of carefully selected ingredients.
I have read some good stuff here. Definitely worth bookmarking for revisiting. I surprise how much effort you put to make such a magnificent informative web site.
Appreciate it for helping out, great information.
Hmm it appears like your blog ate my first comment (it was extremely long) so I guess I’ll just sum it up what I had written and say, I’m thoroughly enjoying your blog. I as well am an aspiring blog writer but I’m still new to everything. Do you have any recommendations for newbie blog writers? I’d genuinely appreciate it.
Normally I don’t read article on blogs, but I wish to say that this write-up very forced me to try and do so! Your writing style has been amazed me. Thanks, quite nice article.
Merely a smiling visitant here to share the love (:, btw outstanding design.
I haven’t checked in here for a while since I thought it was getting boring, but the last several posts are great quality so I guess I’ll add you back to my daily bloglist. You deserve it my friend 🙂
Very interesting points you have mentioned, thankyou for posting. “Custom is the great guide of human life.” by David Hume.
Very interesting subject , thanks for posting.
FitSpresso is a natural weight loss supplement crafted from organic ingredients, offering a safe and side effect-free solution for reducing body weight.
We absolutely love your blog and find nearly all of your post’s to be precisely what I’m looking for. Would you offer guest writers to write content in your case? I wouldn’t mind creating a post or elaborating on many of the subjects you write with regards to here. Again, awesome web site!
Thank you for sharing with us, I believe this website really stands out : D.
hello there and thank you in your info – I’ve certainly picked up something new from right here. I did however expertise several technical points the usage of this web site, as I skilled to reload the site lots of occasions prior to I may just get it to load correctly. I had been thinking about if your web host is OK? Not that I’m complaining, but sluggish loading instances times will sometimes have an effect on your placement in google and could harm your quality score if ads and ***********|advertising|advertising|advertising and *********** with Adwords. Anyway I am adding this RSS to my email and can glance out for a lot more of your respective exciting content. Ensure that you replace this once more soon..
Simply wish to say your article is as astounding. The clearness on your put up is just spectacular and i can think you’re knowledgeable on this subject. Well together with your permission allow me to grasp your RSS feed to stay updated with drawing close post. Thank you a million and please continue the enjoyable work.
I’ve been browsing online more than 3 hours today, yet I never found any interesting article like yours. It is pretty worth enough for me. In my opinion, if all website owners and bloggers made good content as you did, the net will be a lot more useful than ever before.
Your article helped me a lot, is there any more related content? Thanks!