This post contains affiliate links.
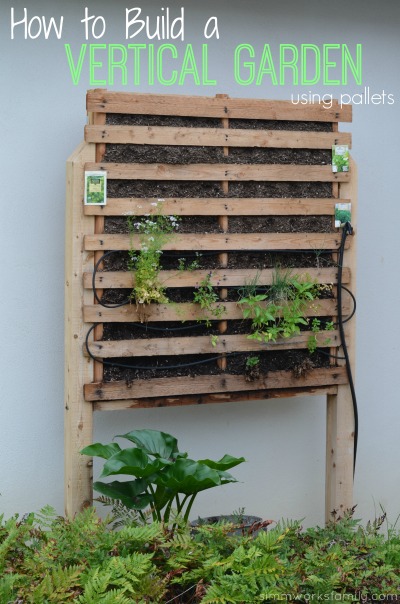
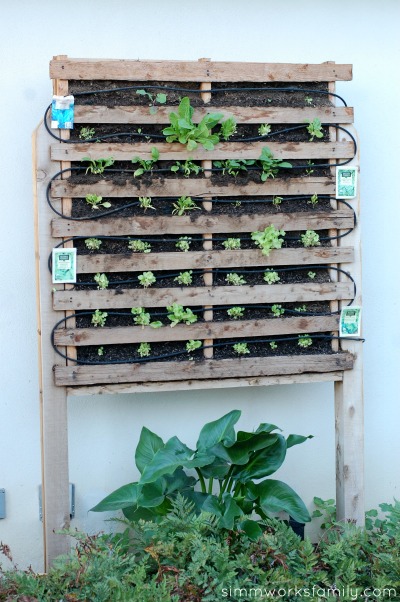
Ever wonder what else you can do with pallets? I mean besides the thousands of other ideas you find all over the interwebs? Well, my husband and I figured out how to build a vertical garden using pallets. And they’re quite fun!
Now, I want to tell you right now that we’ve had some interesting finds when building these. The first? It’s really difficult to get dirt to stay IN the pallets once you start watering them. Especially if you don’t use a soaker hose line and just spray them with the garden hose.
My son had fun with the muddy clumps that came with that! But once the dirt is settled into the pallets it’s actually quite a good way to grow fun things and makes an awesome display for your yard.
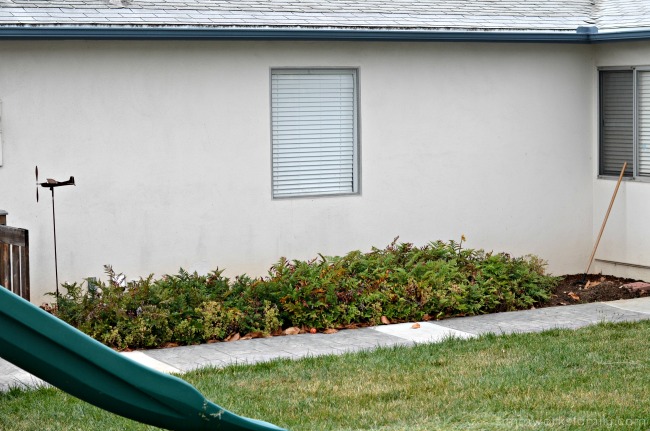
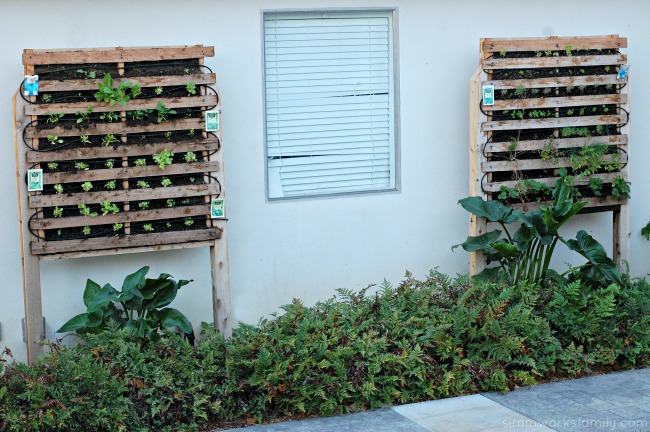
This above was the side of our house in the front yard before we put the pallets in. I hated how empty and plain the space was and wanted to use the vertical garden to spruce it up and bring life to this part of the yard.
I don’t think my husband quite understood exactly what I was envisioning in my head but with some team work, a few dirty looks and rolling eyes, and some muddy kids, we got it done.
Oh… and if you’re having trouble finding pallets because everyone and their mom is grabbing them up to make things like this, go to Home Depot or whatever other hardware stores you have around and ask for their sod pallets. They’re more flimsy/rickety (hence the support added) but are perfect for this type of project!
Here’s how!
How to Build a Vertical Garden Using Pallets
Supplies:
Wood
- wooden pallet
- 2×2 doug fir
- 2×4 doug fir
- 1×8 cedar fence board
- 2 4×4 cedar posts
Materials
- wood screws
- drill
- black weed block fabric
- staple gun
- post hole digger
- shovel
- level
- carpenter’s square
- carpenter’s pencil
- mulchy garden soil
- large piece of cardboard
- variety of seeds
What you do:
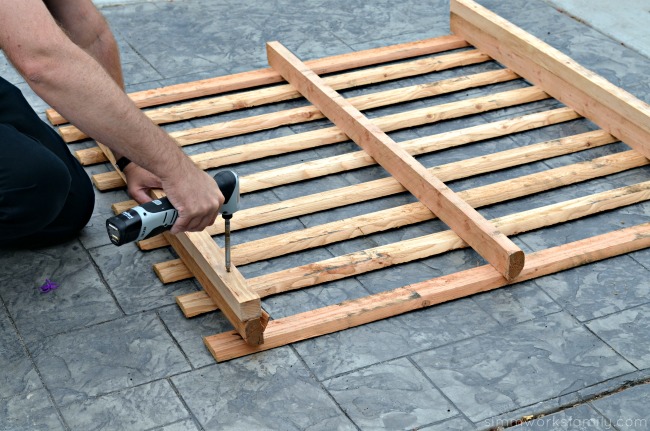 1. Measure length of pallet and cut 2x2s to that length. These will give extra support to the pallet.
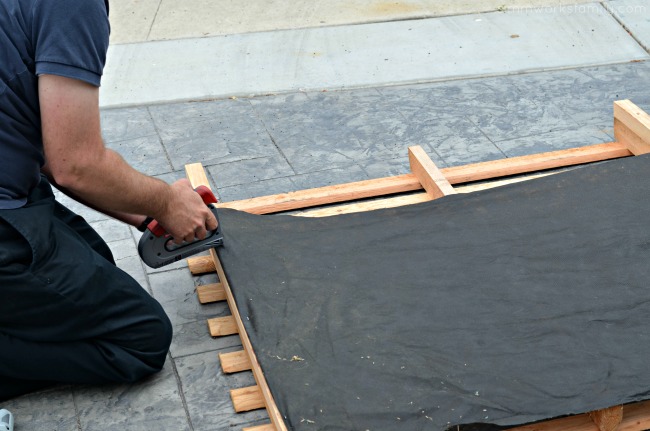
2. Staple weed block fabric to the back of the pallet, pulling taut to make sure it’s stretched all the way across. Layer if needed to cover the full back.
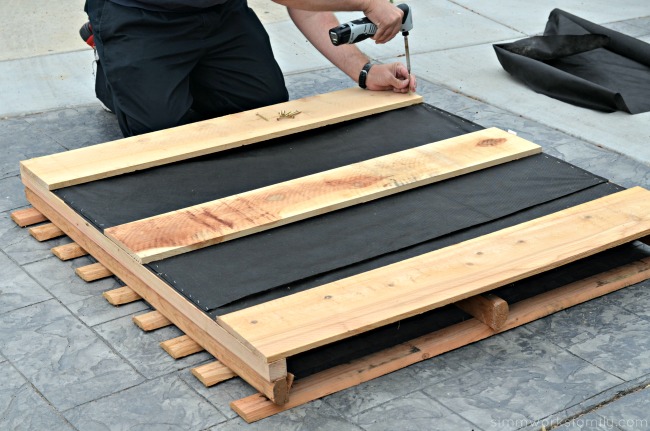
3. Measure the width of the pallet from 2×2 to 2×2 and cut 1×8 fence boards to that length. Screw in place over the weed block fabric.
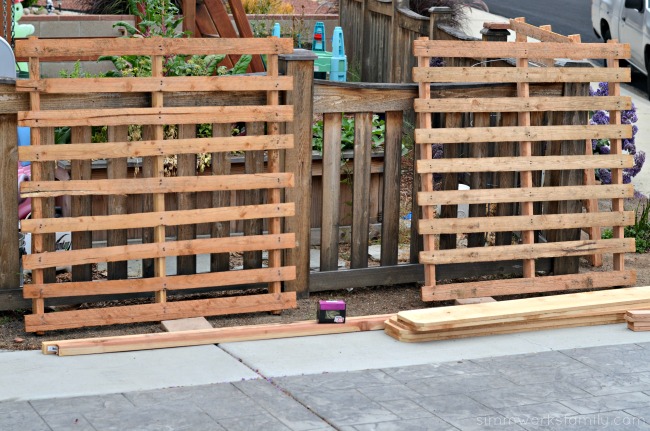
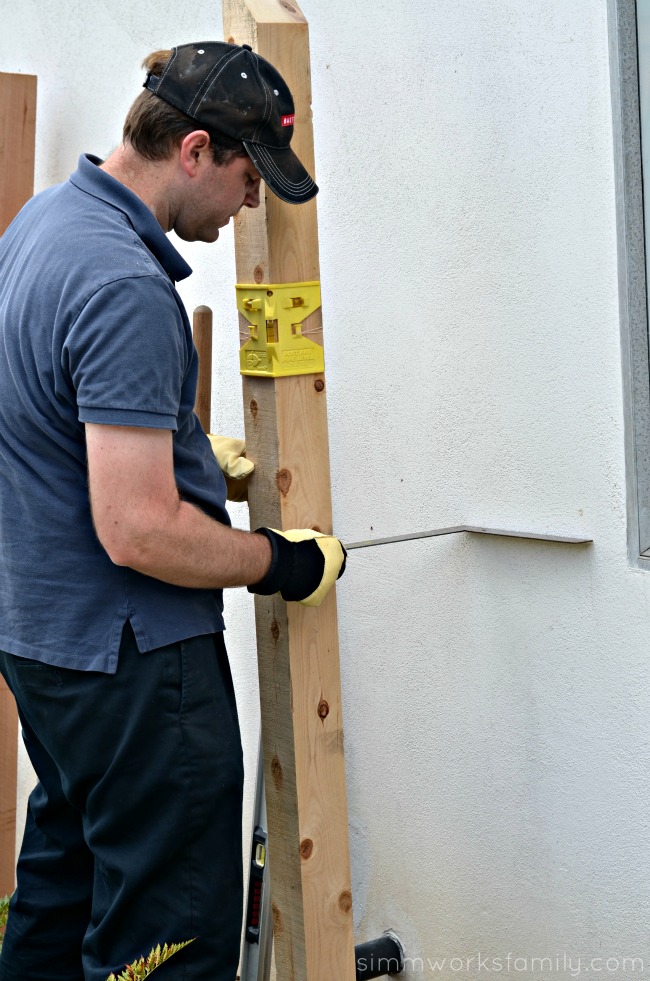
4. Measure the distance you need your posts to be installed on the ground and dig holes for posts. Cut posts to size depending on how far above the ground you want the pallets to be. Make sure to bury them about 1-2′ in the ground to provide a sturdy base.
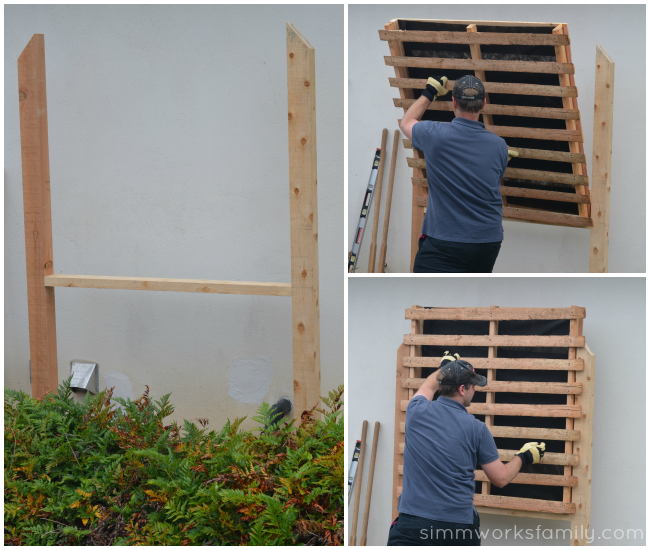
5. Set posts in the ground by covering with dirt and using a level to determine if you need to move or shift the posts. Measure the back dimensions of the pallet to determine exactly how far apart the posts should be. This will vary with every pallet.
6. Measure where you want the bottom of hte pallet to be and mark off that height on each post with a pencil. Then cut the 2×4 to the width between the posts. This board will act as a frame for the pallet to sit on. Screw the 2×4 into position directly underneath the line you’ve drawn.
7. Lift pallet into place on the frame and screw to secure.
Next up is the hard part… this is where we had the most trouble… trying to pack in the soil to make sure it stayed in place and didn’t spill all out.
Now you’re probably asking why we didn’t start our pallet garden on the ground and then lift it into place once the plants were established. Well.. you *could* do that but just think of how heavy those pallet gardens would be. Crazy heavy! So we did it this way.
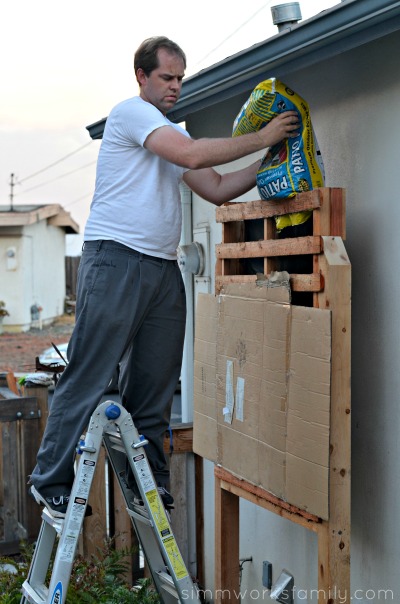
8. Using the cardboard stapled to the front of the pallet, fill the pallet with mulchy garden soil. Pack down each layer as you go to make sure it’s secure. There will be some dirt that falls out, simply fill it back again or leave it as is to settle more and fill later.
9. Plant with whatever seeds you think will grow best! We stick to lettuce in one planter and herbs in another with a few strawberries at the bottom. It’s pretty fun to step out and grab herbs whenever I need them!
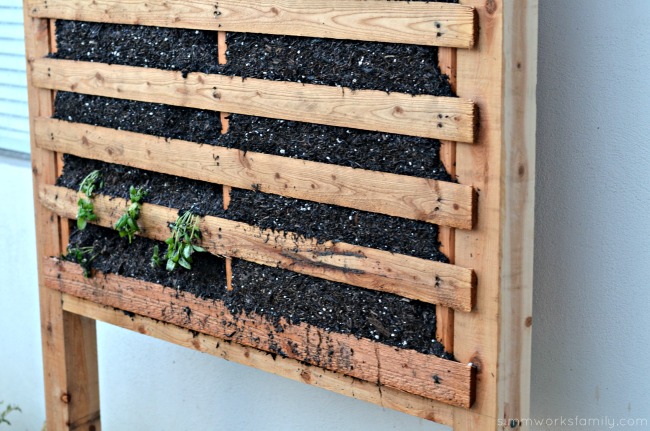 Another problem we ran into was using starter plants we purchased instead of seeds. While in theory this would work great, when you put a plant that’s been growing vertically in a horizontal planter into a vertical planter and ask it to grow horizontally it looks like this above… droopy.
It’s also quite messy and hard to get the starter plants IN the planter and you spill a TON of dirt everywhere. Our solution? Seeds… start from seed and install an irrigation system with a soaker hose. You can find everything you need for the soaker hose in the irrigation aisle at your local hardware store.
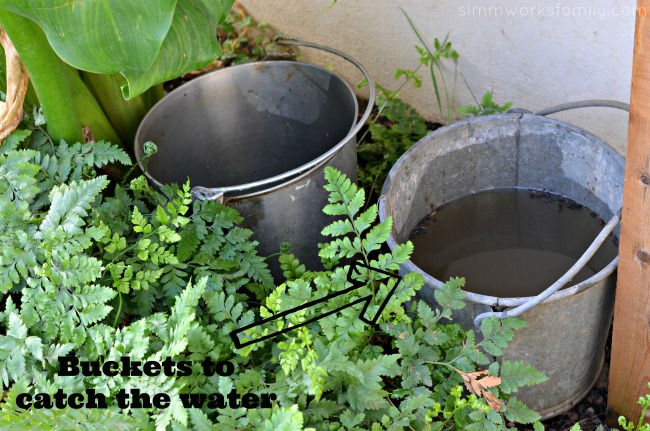 If you’re going to use an irrigation system with your garden, know that there will be water that drips down constantly. In order to conserve that water to use on our other plants and in our raised garden beds, we simply put buckets underneath to catch the excess water.
You know what else we found? Bees LOVE to come and drink the water that pools on the last rung of the pallet because they love mineral rich water. That means you’re helping the bees with your vertical garden too! Here’s a close up of a bee drinking. This is a regular sighting.
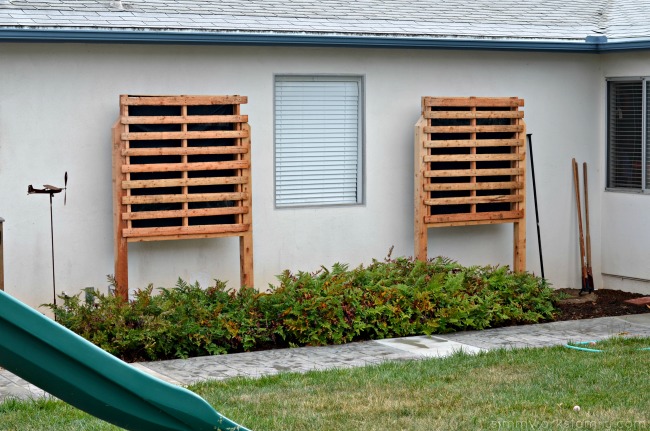
While it’s been a crazy process, I absolutely love how the vertical gardens make the side of our house look. I consider them more of a decorative piece in our front yard but love that we also get the benefits of growing our own herbs and lettuce.
And since our pallets are in the shade for most of the day, we had to choose plants that would work well in these conditions. I’m sure there are other things one could grow if their vertical garden were directly in full sunlight.


Online aankoop van medicijnen in Eindhoven lek Pescara precio del
medicamentos sin receta médica
I believe this is one of the such a lot important
info for me. And i’m glad reading your article. But wanna statement on few normal issues, The site taste is
great, the articles is in point of fact great
: D. Good activity, cheers
CBD exceeded my expectations in every way thanks. I’ve struggled with insomnia looking for years, and after demanding CBD like in the course of the from the word go mores, I at the last moment trained a busty night of calm sleep. It was like a bias had been lifted mad my shoulders. The calming effects were indulgent still profound, allowing me to inclination afar obviously without feeling confused the next morning. I also noticed a reduction in my daytime angst, which was an unexpected but allowed bonus. The partiality was a bit lusty, but nothing intolerable. Blanket, CBD has been a game-changer for my slumber and solicitude issues, and I’m grateful to arrange discovered its benefits.
My brother suggested I may like this blog. He used to be totally right.
This put up truly made my day. You cann’t consider just how a lot time I had spent for this information! Thanks!
I agree that you should put fabric over the pallet. That way, the vertical garden looks better. I think it also helps the plants to not get too tangled around the crevices.
Hallo Danielle, its really nice to see that a vertical garden can be easily made with the use of wooden pallets. I was searching around for some ideas on how I can put my old wooden pallets to use and I feel that this one is something that I should really give a try. Thanks for sharing the step by step guide on how to set this up.
Cheers
Ginny
Those vertical pallet gardens are so cool. I saw one that used succulents in them, and I’m absolutely in love. That would be nice for my garden, considering I can’t hardly keep grass alive.
I’M MOST IMPRESSED THAT YOUR HUSBAND IS MAKING THIS FOR YOU. KUDOS TO HIM AND BE SURE YOU REWARD HIM WITH HIS FAVORITE DESSERT. AS FOR THE PALLET IDEA, I HAVE SOME BUT NOT SURE I’D BE LUCKY IN KEEPING PLANTS WATERED TO STAY ALIVE IN OUR 110 DEGREE HEAT. BUT KEEP UP YOUR AWESOME IDEAS. SINCE I LOST MY HUSBAND 6 YRS AGO I’M ON A CRUSADE TO TELL OTHER LUCKY WOMEN TO SPOIL THEIR HUSBANDS WHEN THEY DO THINGS FOR YOU. AH! LOVE
Oh yes, I am truly lucky to have such an awesome husband. With the watering, I found that the drip line really helped with the heat we have in the summer (90s-100s at least one month a year) and still keeping the plants watered/moist. It also provided a water source for local pollinators like the bees, butterflies, etc. I’m so sorry for your loss.
Just thinking and wondering what about sweet-peas and other peas they could be beautiful growing from the bottom up…..
I’ve always planted those alongside our fence but it might work in a vertical garden too!
wont the dirt wash out when it rains.?
Nope. It gets more compact and stays in place. Then as the plants’ rooys take hold it stays together.
Not to make it more difficult, but if you put chicken wire or even another layer of screen on the other side it would hold in the dirt better. Perhaps run the drip line in the soil alternating, soil, line, soil, line?
I totally agree! We moved to a new home and are working on a new design that works better for it. I’ll share when we tackle it.
I love this so much! We are in the need of vertical gardening in our tiny space we are living now. I’m glad you posted the tutorial because I would’ve never figured this out on my own.
This is brilliant. I’ve been wanting to build these for our yard. Hmm. Project for a weekend in March maybe?
This looks like a great project, especially for my home. We have three dogs, and getting the herbs up off there ground means no chance for being trampled! It looks like a lot of work, but the finished product is fantastic. Your pictures really take us through step by step!
Thank you! Yes, I really think that it helps with critters too. We get squirrels and rabbits in our raised beds all the time so I wanted lettuce and herbs to be inaccessible. The project really came together nicely though and once we got everything, didn’t take a lot of time to assemble. It was the dirt filling and actual planting that took more time.
You could put the weed fabric on the inside front, too, and cut holes to put your plants in. That would hold the dirt in, and once the plants get big enough it’ll look the same. Great idea – I have a stack of pallets!
Genius!
This is seriously amazeballs! I want to come over and see it. And then I will put it on my dream board. What a fun bonus that you are helping the BEES! They need our help too.
Come over whenever you get the chance! They’re in the front yard and easy to spot. Then I’ll show off our rain barrels 😉
I have made a few pallet gardens now and LOVE them. They really add some beautiful and rustic uniqueness to your home. You’re are beautiful. Great JOB!
Spring is right around the corner. The Vertical Garden is a great way for us to bring some color to our yard while having something unique. Thanks for the idea.
I would love to grow my own strawberries in a vertical garden. We had a vertical garden when I was just a kid and my mom grew the best strawberries. Love all your step by step directions and photos.
I love the step by step pictures. It really helped me see how I could possibly do this too!
This is crazy smart!!! I want some for my home!! I love the way they look on the home too!
This is fantastic! Oh my gosh – I know the perfect spot at my house where I could do something like you did! Thanks for the inspiration
Oh my gosh, this is SO cool! I would love to do this. I would definitely plant some herbs to use for cooking.
That’s awesome! I love it! This is a perfect solution for us because we have a dog. I have been planting in plastic tubs placed in the middle of a table to prevent the dog from getting them so this is fabulous. Have you noticed any issues with birds? I had a birds eating my seeds when I did mine on the table… I wonder if this would help eliminate that problem too?
Very inventive! Is it sad that I’ve never planted a garden? I love the look of the vertical garden though. I have to wait till the ground thaws though before I can even think of planting anything!! I’ve pinned this to save for later.
That is awesome! It should make weeding a whole lot easier, too. We had a huge garden years ago, and the weeding was so much work. Nice job!
Vertical gardens using pallets is AMAZING!!!! I love, love, love these. Of course, I oogle over pallets and I oggle over gardens, so putting them together is genius! I would love to plant lettuce in a vertical garden.
What a great looking idea! I love all kinds of flowers, so any type would be great if I built one of these.
Wow that is such a cool idea! I love wildflowers, but am not sure how well they would do in a vertical garden.
I’m sure they’d do great! We were considering flowers but then found some pretty flowering thyme and oregano (with purple flowers) so we used that.
Oh my goodness, I love this idea! We have extra pallets. I think i might add this to our garden!
This is really cool! How great to have a handy husband, maybe we’ll try something like this on a smaller scale.
Wow, these look amazing, Danielle! Last year, I had Hubby build me some planter boxes and this year, I’m going to have him make me a couple more as well, so maybe I can get him to make me one or two of these to go with them..? I’m definitely pinning this so I don’t forget to talk to him about. I am SO ready for Spring! 🙂
The kids are getting excited deciding what varieties of lettuce to plant again! And we already have seeds growing in the back yard as starter plants for our raised beds and the bed we have at our community garden. Cannot wait to get growing again!