5 Natural Ways to Get Rid of Fleas in your Home

5 Natural Ways to Get Rid of Fleas in your Home

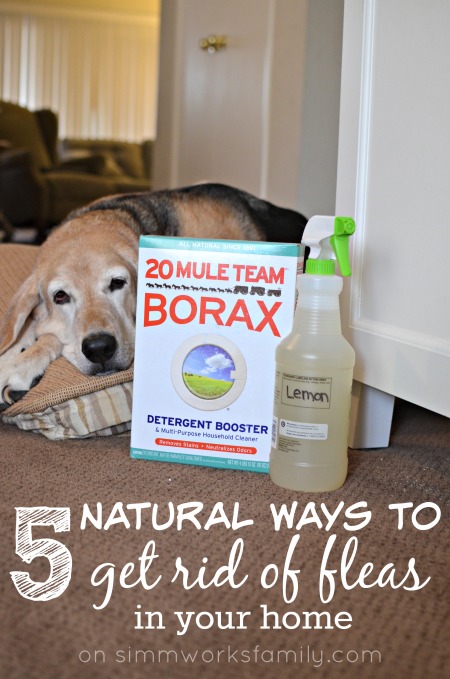
We ran into a little problem last week. Our poor Scout got fleas for the first time in his 12 years and we had no clue where to start with treatment! Since we moved next to a home with 3 other dogs we knew it was a possibility but we were hoping we’d get lucky and not have to deal with it.

Luckily we were able to find some great ways to eradicate the situation and, hopefully, reduce the chance of fleas returning again in our home. But if they do, we’ll be ready!

Here’s what we did to tackle our flea problem in our home and on our beloved dog. [Read more…]

10 Steps to Creating a Toxin Free Home

10 Steps to Creating a Toxin Free Home #FightToxins

When I first became a mother I started to think long and hard about the chemicals we bring into our homes. And the number surprised me. Shortly after this realization I began creating a toxin free home in the hopes that my kids wouldn’t be exposed to the majority of the 80,000 synthetic chemicals introduced into the market since the Toxic Substances Control Act was passed in 1976.

Recently I’ve teamed up with Seventh Generation to help spread awareness about the importance of chemical reform in the United States. The Toxic Substances Control Act (TSCA) was passed in 1976, and unlike other major environmental laws, has never been updated. As it currently stands, tens of thousands of potentially harmful chemicals continue to be used in the marketplace since the 1970’s without proper testing and without disclosure by the companies that produce them.

Scientists have linked exposure to toxic chemicals to many health risks, such as Cancer, Alzheimer’s, learning disabilities, asthma, birth defects, and various reproductive problems. And those aren’t health risks I’m willing to expose my kids to.

toxin free home with kids

10 Steps to Creating a Toxin Free Home

Are you ready to fight toxins? Lets start at home.

Here are 10 steps to creating a toxin free home:

  1. Use non-toxic cleaning and washing products when possible, like Seventh Generation products that don’t release toxic chemicals into the air. This means chlorine-free products and cleansers with natural cleaning properties.
  2. In the shower and by the sink, fragrance-free, vegetable-oil-based soaps are a healthier choice and can be found at a variety of locations.
  3. Open your windows, when possible, to circulate fresh air in your home.
  4. Use exhaust fans in the bath and kitchen and attic that ventilate outdoors to circulate any toxins in the air outdoors.
  5. When re-painting your home, consider low- and zero-VOC paints now commonly available at paint stores. Be aware that even though the chemicals in these low- and no-VOC paints don’t off-gas, they are still present so make sure to air out the spaces you are painting.
  6. Avoid new furniture coated with polyurethane. To avoid this exposure, look into purchasing furniture made of whole wood, glass, metal or chrome.
  7. Purchase clothing, sheets and mattresses made of natural materials, such as unbleached cotton, wool and hemp as opposed to synthetics which are made with chemicals.
  8. When choosing flooring, consider natural fiber carpeting such as wool, sisal, cotton or jute, laid with solvent-free adhesives. Synthetic carpeting — made from petroleum-derived plastic fibers — is usually installed with solvent-based adhesives, which emit toxic gases believed to create asthma, dizziness, headaches, and other allergic reactions.
  9. Avoid plastic food packaging. Consider swapping plastic out for stainless steel or glass. And ditch the plastic bags and purchase a good set of reusable bags (or make your own!).
  10. Purchase non-GMO and organic whenever possible. If you can’t afford purchasing all organic food, take a look at the “Dirty Dozen” list and find out what foods are recommended to be purchased organically.

How are you creating a toxin free home?

Washing Wool {Cloth Diapering Tips and Tricks}

Wool covers can be a bit intimidating at first. But once you start using them I’m sure you will start to love this amazing fabric. Not only is it absorbent, it’s breathable as well. I love using wool covers at night to reduce the chance of any irritation or redness on my children’s legs due to PUL covers. I do have to admit that I was quite scared to wash them when I received my first wool soaker in the mail. I was scared that I’d somehow ruin it and I would have spent a lot of money on nothing. But I followed the directions I was given very carefully and have never looked back!

So once you add a piece of wool (or two or five) to your collection, the first thing you’ll need to do is learn how to properly clean it. The best part about cleaning wool is that, at most, you’ll only have to wash it once a week. I actually go every 2-3 weeks with my wool since I switch two covers every other night. But you can definitely tell when it’s time for a washing.

You’ll need a few basic supplies for washing your wool diaper covers:

Sink, pot or bucket: We like to use a large pot for one item, but for more wool items you’ll need to use the sink (or a large 5 gallon bucket).
Water: You will need warmish, but not hot water to clean your wool without shrinking or felting.
Wool soap: Liquid or solid, you choose! We have both liquid wool wash and a wool wash bar.
Towel: We use a bath sized towel. Choose an older one in case any color bleeds out of the wool.

Here’s how to get started:

  • Rinse your wool covers in cool water and gently squeeze out excess water. This will remove any urine salts in the wool that will dry the fibers and retain odor.
  • Fill your sink, pot or bucket with tepid (not hot or boiling) water.

Now for the soapy part

      • If using liquid wool soap, add about a teaspoon to about 1 quart of water. Use approximately 1 tsp and 1 qt of water for each item when washing multilple items together.
      • If using a bar wool soap, lightly lather the bar under the water as you fill the basin.
      • Gently move the water in and around the wool in the sink for 1-2 minutes.
      • Soak your wool diaper cover for 10-15 minutes, without any further agitation. The wool wash will work on its own without your help.
      • Watch your wool in case of bleeding color. If your wool diaper cover is bleeding color you may want to shorten the soaking time.

      And the drying part

      • Drain the water from the sink and gently squeeze some of the water from your wool diaper cover. Be sure to handle it carefully, supporting all of its weight. Don’t let any parts dangle.
      • Refill the sink with cool water and place the wool diaper cover into the clean water to rinse. This will remove soap residue and any grime that didn’t go down the drain.
      • Drain the water again and let the diaper cover drain in the sink after the water is all out, or move the diaper cover to a colander.
      • Gently squeeze the diaper cover to remove additional excess water.
      • Carefully place your wool diaper cover on the towel, roll it up into the towel and press to remove excess water.
      • Lay the wool diaper cover out flat on a screen or another towel, shaping it gently back to its original shape and let it air dry.

          Once your cover is completely dry you can start to use it again. It’s as simple as that! And some say that they’ve had success using their washing machine to wash their wool (not the crochet or knitted stuff!) however I haven’t been brave enough to try yet. Now start shopping… if you’ve already begun cloth diapering then I’m sure you are already addicted to purchasing the diapers. Just wait till you see what wool options are out there! Dangerous. But only for your bank account.

          Source: Zany Zebra Designs, Pinstripes and Polkadots

          How to Strip Cloth Diapers

          Due to a few inquires from others on my Washing Cloth Diapers post I thought it might be beneficial to also go over how to strip your cloth diapers as well. You see, as you wash and use your cloth diapers a build up can sometimes occur. Usually that build up is due to the detergent you use. There isn’t anything wrong with your detergent, it’s just something that naturally happens over time.

          In order to get rid of that build up and increase the absorbency of your diaper (as well as reduce the chance of irritation for your baby) it’s best to strip your diapers from time to time. I usually strip my diapers once a month but I know other mamas who do it every few washes. Basically when you start to notice that your diapers either a. are getting a little smelly or b. aren’t as absorbent you want to strip them.

          There are two different products I’ve seen out there that cloth diapering mamas use:

          Bac-Out
          Bac-Out is a product made by Bi-O-Kleen and it’s an amazing neutralizer. It eliminates the most difficult, organic stains, odors and waste the way nature intended. Bac-Out is a very unique blend of natural living enzyme cultures and botanical extracts, with more strains of cultures for more effective performance than commercial brands.

           Dawn
          Yes, it’s true. You can use Original Dawn to strip your cloth diapers. But remember to buy the original blue Dawn, not the scented or foaming Dawn. You can also use this product to strip other things like your clothes and towels. If Dawn can cut through oil on a baby duck then it can take care of your diapers! There are also a few other uses for Dawn too highlighted on a few blogs. Check out Blissfully Domestic or Wise Bread for more suggestions.

          Now to get to stripping… no, not that kind of stripping. Diaper stripping. Stripping your diapers is super easy. Just follow these steps and you’ll have clean and absorbent diapers in no time!

          How to Strip Cloth Diapers

          1. Wash With Hot Water
          To strip your diapers you will need the hottest water possible. If your washer machine does not have hot, hot water you may consider boiling a large pot of hot water and adding it to the wash to make the water hotter. Once you have the hot water add a squirt or two of Dawn, or Bac-Out, to the water (I literally just take the whole bottle, put it upside down and squirt the product into the water). Once the Dawn dissipates into the water add your diapers.

          2. Rinse, Rinse, Rinse
          Once your diapers have gone through the wash cycle it may take a few rinse cycles to get rid of the soapy bubbles. I rinse my diapers in cold water 2-3 times or until there are no more soapy bubbles. Don’t confuse soapy bubbles with bubbles caused by agitation. Soapy bubbles will linger whereas agitation bubbles will disappear pretty quickly.

          3. Air Dry
          I like to air dry my diapers after I’ve stripped them. I feel as if I’m freshening them up by stripping them so why not freshen them up some more with some clean air. And the sunshine only adds to the cleaning process (plus it bleaches out any lingering stains). Pop the dried diapers in the dryer and dry on low for 10-15 minutes to fluff them up and you’re ready to go!

          And if stripping your diapers doesn’t take care of the stink or absorbency problem please do not hesitate to contact the diaper manufacturer. They will more than likely be willing to help you out in finding a solution. You might have a yeast problem and yeast sucks. But don’t give up hope! Pinstripes and Polkadots has a few suggestions for yeast problems and prevention. Some other great resources and suggestions on alternative methods to strip your diapers can be found on Zany Zebra Designs and Lite Green Living.

          Tips and Tricks for Green Cleaning in Every Room

          Looking to go green? These tips and tricks for green cleaning in every room can help you tackle your daily cleaning chores without worrying about nasty chemicals! 


          Ever since the birth of my son I’ve been on the hunt for ways to go green and stay as organic as possible. So when I started looking under the sink and in the closet at all of the cleaners we had I knew we had to make some changes. Thinking of my little one crawling on a ground where harsh chemicals resided and putting his mouth all over surfaces where I cleaned with chemicals made me change quickly. I have received many tips from other mamas as well as other websites so I figured why not share them here too.

          The most important part of my arsenal of tools for green cleaning is vinegar. I buy it in the huge gallon size and use it for just about anything from cleaning toilets to freshening up my laundry. I mix vinegar together a few other natural cleaners to create the perfect solution for different problem areas. I’m going to list my “must have” ingredients and then will go into detail by room on how I mix and use them.

          Must Have Green Cleaners

          • Vinegar
          • Water
          • Tea Tree Oil
          • Dr. Bronner’s Liquid Soap
          • Baking Soda
          • Oxy Clean
          • Lemons
          • Salt
          • Vanilla Extract
          • Cedar Hanger Rings
          • Wash Cloths or Cloth Rags
          • Sponges
          • Stiff Bristle Brush
          • Steam Mop

          The Kitchen

          Tile Floors
          Any hard floor surface in my house is cleaned with the steam mop. The hot steam paired with the cloth, re-usable pad cleans my floors deeply. I have purchased extra pads so that I can clean more than one room at once. I’ve found that one pad gets dirty after cleaning 1/2 of my living room or all of my kitchen and I don’t want to have to wait to get the energy to start cleaning again. Side Note – I recently broke the handle off my steam mop because I am apparently a very deep cleaner 😉 I’m hoping to upgrade to the steam pocket mop soon!

          Counters
          My all purpose cleaner for any surface in my house consists of the following:

          • 1 part water
          • 1 part vinegar
          • 10 drops tea tree oil

          I place this solution in a spray bottle and use it to spray down the counters, stove top, oven door, microwave door and fridge. I wipe everything down with a sponge  

          Cutting Boards
          To clean my cutting boards I sprinkle them with salt and use 1/2 a lemon to scrub the salt into the wood. I then rinse with a wet wash cloth and let air dry. This also works great for the counter tops if there are bits and pieces to be scrubbed off.

          Sink
          When the sink needs shining (every morning ;)) I sprinkle baking soda all around and spray with the vinegar solution given above. I then scrub down with the abrasive side of my sponge and rinse down with water.

          Microwave
          The most favorite solution I have in my cleaning arsenal is the solution I have for my microwave. I not only love how well it works but also love how it leaves my kitchen smelling!

          Take a microwave safe bowl and fill it with water. Then sprinkle in a few drops of either lemon or vanilla extract (based on my mood) and place a microwave safe wooden spoon into the water to reduce the chance of a boil over. Then set the microwave to heat for 3 minutes.

          Let the bowl cool a bit before removing from the microwave and be careful! It’s hot. Take a wash cloth and wipe off the sides, top and bottom of the microwave. Any food bits and pieces should come off easily without the need to scrub.

          Oven
          Confession… I’ve never cleaned my oven. And I use it. Like a lot. But if I were to clean my oven I’d use the simple tips from The Daily Green and would make a paste out of baking soda and water. I’d then spread the paste all over the inside of my oven and would leave it overnight. Then I’d use an abrasive sponge and would scrub the inside down (with gloves on, of course). After I scrubbed like crazy I’d use a wet wash cloth to wipe down one last time.

          The Living Room

          Laminate Wood Floors
          I use the steam mop on my laminate wood floors as well. I make sure to wipe them down with a towel after if the water doesn’t evaporate right away just in case. I don’t want them to warp on me 🙂 My husband has also used a dry cloth mop before with Bona wood floor cleaner if he thinks my steam mop isn’t doing a good enough job.

          Tables
          When we had our table resurfaced when we got married we were told by the wood worker to only use water and a wash cloth to wipe down the table. So we’ve stuck with this. I make sure to wipe it down soon after we eat our meals so nothing sticks.

          Couches and Chairs
          I’m not sure about you but I just vacuum my couch and chairs off. I also wipe down my leather chairs and wooden dining room chairs with water. Sometimes, if needed, I use the vinegar solution but I try to stay away from any cleaners for fear of discoloring them

          Windows
          I clean my windows the same way I clean my mirrors. I spray them with my vinegar solution and use newspaper to wipe it up. No streaks and no dirt! Although I do confess that I clean the windows maybe


          The Bathroom 

          Laminate Floors
          Due the the small space in the bathroom we usually just sweep it every day and mop with a regular mop and a solution of water, Dr. Bronners, vinegar and tea tree oil. I then dry with a towel (usually a bath towel that needs to be washed). I could also use this solution with my kitchen floors if I’m too lazy to get the steam mop out. 

          Sink/Mirror/Toilet Surfaces
          I use my vinegar/water/tea tree oil solution to clean the sink. That way I can spray everything in the bathroom down at the same time. I then wipe the sink and toilet (in that order) off with a clean towel or wash cloth and dry the mirror with newspaper so no streaks or particles are left behind.

          If there is something stuck to the sink or surface and I need a deeper clean I just sprinkle with baking soda then I spray with the vinegar solution and scrub with a sponge or stiff brush.

          Tub
          My disinfectant solution for the bathroom is a simple solution of:

          • 2 cups water
          • 3 tablespoons of Dr. Bronners 
          • 15-20 drops of tea tree oil

          I put this solution into a spray bottle and keep it under the sink. When my children are done bathing I squirt down the tub and take a wash cloth to wipe everything away. I then spray the surfaces with the shower head and let air dry.

          Once a month (or more frequently if needed) I take all of the toys out and soak them in the disinfectant solution given above while I deep clean the tub. I sprinkle the tub with baking soda and spray the vinegar solution over the baking soda. I then use a scrub brush to scrub the tub down. I then rinse off with water.

          Clogged Drains
          Now most of the time if my tub is clogged I use this nifty little tool my husband picked up at the hardware store. Seriously. This thing stays in our bathroom and is used once a week. It always gives us results. No matter how gross they may be (and being 7 months postpartum I’m still shedding like crazy). I highly suggest keeping one of these in your bathroom. You can even buy it on Amazon if you don’t find it at Pro-Build!

          But if your drain gets really bad and the Zip It can’t fix it just pour some baking soda (about 1/4 to 1/2 a cup) and boiling water into the drain and wait a few minutes. Then rinse with water from the tub spout. You can also use this for your toilet as well.

          Trash Cans
          The trash cans in each of our bathrooms are lined with plastic bags that we receive at the grocery store when we fail to remember our reusable bags. If we don’t have any plastic bags we use paper bags in their place. We try to clean the trash cans with the disinfectant solution once a week to get the funk out of them and allow them to air dry before placing a bag in them. 

          The Bedroom

          Carpet/Rugs
          The best natural deodorizer and stain remover out there is baking soda. You can sprinkle a little bit of baking soda directly on your carpet or rug and just vacuum it right up. Or if you have a spot to remove, mix a little water into the baking soda to create a paste and spread it on the stain. Scrub it into the spot with a terry cloth towel and let dry. Once it’s dried just vacuum the remnants up.

          We also get our carpets professionally cleaned every 6 months. We have a fabulous carpet cleaner who has been helping us keep our carpets beautiful since my son was a newborn. And all of his cleaners are safe for my children. He even has a heavy duty cleaner that takes care of any doggy or kid problems you may have.

           Closets
          A great and natural way to keep the moths away (and other bugs as well) are cedar disks or planks. Just line the closet with cedar or grab a few cedar disks to hang on your hangers and those pesky bugs will look elsewhere for things to eat. 

          The Laundry Room

          Washing
          We don’t use anything special here. We wash our clothes with Kirkland brand eco friendly detergent. I used to pay more for a special eco friendly powder detergent on Etsy but after a few months I couldn’t justify the cost and switched over to the Costco stuff.

          Rinse
          Another room where vinegar is the star is the laundry room. Instead of using static dryer sheets and leaving a film on our clothes (and the dryer) we use a 1/4 cup of vinegar in the rinse cycle of our wash. You can also buy a downy ball and fill that 1/2 way up with vinegar so you don’t have to wait for the rinse cycle to add the vinegar. Don’t worry, your clothes won’t smell like vinegar afterwards! The scent washes off completely

          Drying
          Whenever possible we try to either line dry outside, hang dry in the garage or dry our clothes in the dryer on the lowest setting. Using either the natural power of the sun and heat outside or the lowest setting on the dryer saves energy and is also less harsh on your clothes (meaning you don’t have to buy new clothes as often). We also use dryer balls in the dryer to aid in the reduction of static in the dryer.

          Stain Remover
          The best stain remover for white clothes is the sun. When you set out wet clothes to dry the sun acts as a bleaching agent and will bleach out any stains (or color) from your clothes. This method works the best for removing stains out of cloth diapers as well.

          We also use oxyclean in our wash to remove other stains in our darks and lights. If there’s a lot of stains on one piece of clothing or if there’s a stain that I don’t think the regular wash will handle I will create an oxyclean soak in a large 5 gallon bucket and add a concentrated amount of oxyclean to warm water to soak the clothes before the wash.

          I’m sure you’ve noticed that throughout the post I haven’t mentioned bleach. I don’t like bleach. It scares me a bit to be honest. There’s lots of articles about the harmful effects of bleach so I won’t preach about it here 🙂 

          Sources: The Daily Green, Natural Rug Cleaning Secrets

          I know I have to be missing something so if you have a question on a particular room or spot in your house please let me know! And if you have any tips to add please feel free to share them 🙂 I’ll make sure to add them and give you a link back for credit.

          Read more: 

          Kids Cleaning Tips

          Trading Clean Time for Screen Time

          5 Tips for Cleaning the House Before a Party


          © A Crafty Spoonful - All Rights Reserved
          It is OK to use one of my photos provided a link back and/or proper credit is given. It is NOT ok to copy and paste a whole post including instructions. Please do not remove watermarks or alter images in any way. Please contact me with any questions at danielle@acraftyspoonful.com

          .