5 Alternatives to Carving Pumpkins {Fun Kids Crafts}

Having small children can sometimes make pumpkin carving a bit difficult. So this year we went with something a little different and let the kids make a few varieties of pumpkins. Grab some glue, your potato head pieces, and even the paint and see what your kids do to create their Fall masterpieces!

If you’re in the same boat and are looking for great alternatives to carving pumpkins this year, here are our suggestions.  [Read more…]

How to Make a Spider Web Pumpkin

Each year we take the time to cut, gut, and carve out a few pumpkins. And every year we complain about the mess, the time, and the clean up. So this year we went simple! We let the kids paint pumpkins and we took an alternative approach.

We also used paints but used different kinds to make these spider web pumpkins. With the help of some spray paint and puffy paints we were able to make these super cool spider web pumpkins for our Amazing Spider-Man party and for our Halloween display.

It was super easy to do and I’m sure you’ll find it just as simple to create a pumpkin masterpiece of your own! Here’s what you do:

Spider Web Pumpkins

What you’ll Need: 

  • Pumpkin
  • Spray Paint
  • Puffy Paint

What you do: 

1. Paint your pumpkin with your base color. We chose to go with black.

2. Using the puffy paint, make lines going down and across the pumpkin to create your web.

3. Add a spider to the web with puffy paint and let dry completely. 

Once the pumpkin is completely dry set it outside your door for everyone to enjoy!

How do you decorate pumpkins for Halloween? 

Simple Ideas for a Magical Disney Princess Halloween Party

There’s something magical about Halloweentime. The change of the seasons, the feel of the air, and the decorations and dressing up.

This year my kids have caught on to the magic! They eagerly awaited the day we chose our costumes for this year (my son will be going as a duck and my daughter a ladybug, both homemade) but didn’t want to leave it at that.

So I decided to create a celebration separate from our Halloween party next week to allow the kids a chance to dress up and have some fun!

Delicious Pumpkin Bars with Cool Whip Frosting

Oh Fall! I’m so happy you’re here again. We could definitely use the cooler weather (if that ever happened) and I’m very excited about the upcoming holidays. But a more important reason why I’m here… is because with Fall comes pumpkins! And canned pumpkin is on the shelves in full force.

That means I get to try a whole new batch of recipes out on my friends, family, and playgroup and this year is no different. I decided to go with a pumpkin bar. But the special ingredient isn’t the pumpkin, it’s the Cool Whip Frosting on top. If you want the perfect pumpkin treat this season you need to try this recipe.

Pumpkin Bars with Cool Whip Frosting

  • 3 eggs
  • 1 2/3 cups sugar
  • 1 cup vegetable oil
  • 15 oz pumpkin puree
  • 2 cups flour
  • 2 teaspoons baking powder
  • 2 teaspoons cinnamon
  • 1 teaspoon baking soda
  • 1 teaspoon pumpkin pie seasoning
  • 1 teaspoon salt

1. Preheat oven to 350 degrees. Grease an 8×8 pan with butter or cooking spray.

2. In a stand mixer with a paddle attachment, beat together sugar, pumpkin, oil, and eggs on medium until light and fluffy.

3. In a large bowl, sift together flour, baking soda, baking powder, cinnamon, pumpkin pie spice, and salt.

4. With a spatula, add flour mixture to liquid mixture until just combined. Make sure not to over-mix.

5. Pour batter into prepared pan and bake at 350 for 35-40 minutes.

 
6. Once the pumpkin bars are cooked, transfer to a cooling rack.

7. When completely cooled, cut off top to make an even, flat surface.

8. Cut into squares.

9. Grab the Cool Whip Frosting and start spreading it on.

10. Top each bar with a pecan and serve.

This recipe makes 16 servings.

Note: 
You can easily bake in a 9×13 pan instead for thinner bars to feed a larger crowd. Simply reduce cooking time to 20-25 minutes. Feel free to frost then cut if you feel that frosting each individual bar will take too long. I just hate dealing with crumbs in my frosting.

What do you love to make with pumpkin? 

Smarties Are The Perfect Halloween Sweet Treat

One of my favorite parts of my childhood Halloween experience was racing home from trick or treating to sort out all of the Halloween candy I received. I was obsessed with finding my favorites (Smarties were at the top of the list along with chocolate). And one of my favorite parts of Halloween now are the decorations we put up each year. I absolutely love how festive and creative we get each year.

My husband is quite the Halloween decor enthusiast. Each year he purchases foam pumpkins from the store and creates a new face. And in an effort to keep up with him, I try to get creative as well in the decor inside our home.

Smarties Halloween candies #IAmASmartie

Gluten-Free and Allergen Free

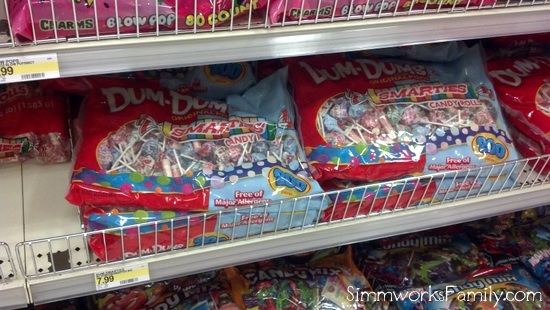
This year I headed to Target to pick up some decorating supplies and candy to pass out. Since there are so many allergies and special diets these days, we went simple. Smarties all around! And I planned on decorating with Smarties as well.

Smarties are not only gluten-free, but they also contain no peanuts and are fat free! They’re the worry-free, one-size-fits-all candy this holiday and are the perfect choice for passing out. I was able to pick up a large bag of Smarties and another bag of Smarties and Dum-Dums mixed together. My daugther was absolutely elated to put these bags into the cart to take home.

Fun for All Ages

I always make sure to pick up some goodies for smaller children who aren’t able to eat candy so I grabbed a pack of Play-Doh as well. Once I had everything I needed to pass out to the kids, I grabbed some decorations to make our home festive.

Since we also needed a bucket for my daughter (she was a bit too young last year for a bucket), we picked up a classic pumpkin bucket to match her brother’s. My son’s bucket is personalized so I grabbed some scrapbooking alphabet stickers to personalize hers as well. It makes a simple bucket their own and I love the ease of it.

You can check out the rest of my shopping experience in my Smarties Google+ Album.

Fun and Festive Wreath

In an effort to tie in the fun of one of my favorite candies with the decor in my home, I decided to turn a Target $1 Spot foam wreath into a festive piece for my front door. Along with the pumpkins and spider webs in our front yard, our trick-or-treaters would also see this gorgeous wreath and know exactly what they’d be getting in their buckets.

To create my wreath I simply glued Smarties in their wrappers onto the wreath. By gluing them seam side down, the wreath can stay in tact for many years. Because the Smarties left gaps as I glued the first layer I decided to add a second layer. And even though it added a bit of weight to the wreath I absolutely loved the look it gave to the finished piece. I simply tied dome wire ribbon to the top and hung it on my door.

To find out how to make this wreath step by step, check out my Smarties Wreath DIY Tutorial here.

Sweet Treats

After creating our wreath, we wanted to celebrate by using our Smarties in a different way.With our Parish Festival coming up we were already planning on making some delicious goodies to sell in the Bake Shop to raise money for the church. We made some delicious Smarties Sugar Cookies that were absolutely delicious.

Instead of using the Smarties whole in our cookies I decided to crush them into a flour and use them in a family sugar cookie recipe. not only did they give great flavor to the sugar cookies, they were the perfect treat for Halloweentime. We packaged them in with a few whole Smarties in with the package to share our Smarties love.

You can check out my Smarties Sugar Cookies recipe here

If you’re looking for a great treat to pass out to the goblins and ghouls who come to your door this Halloween, pick up a large bag of Smarties and you’ll be set! And if you want to get a bit creative… see what you can make with Smarties this Halloween.

Make sure to head over to visit Smarties on Facebook and follow Smarties on Twitter to indulge in their sweet goodness.

What would you do with Smarties candy?

Disclaimer: I am a member of the Collective Bias™ Social Fabric® Community. This shop has been compensated as part of a social shopper insights study for Collective Bias™ and Smarties. All opinions are my own. #CBias #SocialFabric

Smarties Sugar Cookies

I love when I can take something that I love and create something equally as great. Smarties are one of my favorite Halloween sweet treats and I love passing them out to trick-or-treaters. Not only are they gluten-free, they’re free of most allergens and are low in fat as well. But in this recipe they are most definitely not gluten free. Nor are they low in fat…

By pulsing the Smarties in a food processor I created a flour and used the Smarties in a family sugar cookie recipe. I simply reduced the amount of sugar called for in the recipe and subbed the Smarties flour. The end result was fantastic! A not-too-sweet sugar cookie that was definitely flavored by the Smarties. Yum!

And perfect for any Halloween party coming up. We baked them up for our parish festival’s bake sale and they were quite a hit. Three to a bag with a few Smarties thrown in. Who could resist? [Read more…]

How to DIY a Smarties Wreath this Halloween

When we get ready for Halloween, decorations in our home are up there with Christmas. We decorate the whole house inside and out to celebrate for the whole month of October. Many of the decorations we use can be carried into November as well with a festive Fall theme but a few we make just for Halloween!

This Smarties Wreath is just that. The perfect celebration of Halloween and the excitement that each child feels as they go from door to door saying, “Trick or Treat!” This wreath is not only festive, it’s easy to make as well! You only need a few simple items to put it together and it takes less than 30 minutes to make!

As an added bonus, it only cost me $5 to make. The $1 Spot at Target has these foam wreaths and the Smarties candies are only $7.99 for a huge bag and I only needed 1/2 the bag to make the wreath. I had the ribbon on hand from the end of season sale last year. And the left over Smarties will be passed out to trick or treaters on Halloween! [Read more…]

Recycled Portable Snack Container {How-To}

With a love of coffee and creamer comes a surplus of creamer bottles left over once I’ve had a few morning cups. So taking a spin on recycling a bit further, I removed the wrapper over one of my creamer bottles and cleaned it out very well after it was empty.

What resulted was simple recycled portable snack container. And it’s perfect for little hands!

Here’s how to make a Recycled Portable Snack Container: 

1. Grab an empty creamer container.

2. Rinse and wash thouroughly.

3. Remove outer plastic from bottle.

4. Fill up with your child’s favorite small snack.

5. Enjoy a snack on the go!

Not only does it fit perfectly in my daughter’s stroller, it also pours out just a few snacks at a time reducing waste and messes. Each time we go out for a run my daughter reaches for her portable snack container so she can enjoy her snack on the go!

What does your child love to snack on? 

Pear Pancakes with Cinnamon {Breakfast Recipe}

Every morning we wake up and decide what to have for breakfast. Sometimes it’s eggs, sometimes it’s yogurts and berries, and sometimes it’s cereal. But every once in a while we get a special treat.

Pancakes! 

Now, it’s not that pancakes are hard to make. Or that they’re labor intensive. We just don’t eat them all the time. So when we do, we make them special. And I have to admit, when I run out of my Alton Brown pancake mix, I grab a box mix.

But I don’t leave it at that! We spice up our pancakes with the fruit and spices we have on hand and make them extra special and nutritious. When my kids were small I would add different purees into their pancake mix but now that they’re older we like to dice up our fruit before adding it in.

And here’s how we do it:

Pear Pancakes with Cinnamon

  • 1 cup Trader Joe’s multigrain pancake mix
  • 1/2 cup milk 
  • 1 egg
  • 1/4 pear
  • 1 tsp cinnamon

1. Dice up the pear into small pieces.

2. Mix together the pancake mix, milk, and egg with a whisk until just incorporated. Do not over-mix.

3. Add in the diced pear and cinnamon. Fold in gently.

4. Let pancake batter sit while you prep the pan. Heat pan on medium heat.

5. Coat pan with butter. Take a towel and wipe off the excess batter (thanks, Alton, for that tip!)

6. Using a measuring cup, pour 1/4 to 1/3 of the batter onto the hot pan.

7. Let cook until batter is bubbling and edges look firm and underside is golden brown, about 1 1/2 to 2 minutes. Flip.

8. Let the other side cook until golden brown, about 2-3 minutes.

9. Repeat with the rest of the batter. If making large batches, store cooked pancakes in a warm oven (I set mine on the lowest setting and place pancakes on a plate with a towel on top to keep warm while I finish the rest of the batches).

10. Enjoy!

Makes 6 pancakes

Pancakes are so easy and versatile! Why stick with the same old plain pancakes when you can jazz them up? Switch up apples for pears and add some peanut butter on top and you have a tasty, and healthy meal perfect for this Fall!

5 Great Ways for Moms to Get Out in San Diego

Being a mom doesn’t mean that we can’t get out and have fun anymore. It just means that we need to get a little creative to do so. Lucky for me, I live in a city filled with entertainment and a never-ending list of places to go and things to do.

Since my time away from the family is much valued but short lived, I need to make the most of it and really create great memories to hold me over until the next time I get out.

Here are a few ways I like to enjoy my time away from the kids and family while enjoying the city I live in.

5 Great Ways for Moms to Get Out in San Diego

1. Happy Hour – 

Now happy hour is not the same as it was pre-kids. No longer are we heading to an upscale bar after work for a few drinks, appetizers, and some girl time that goes late into the night.

Happy Hour has now become any time the girls get together at a place with food without the kids. Drinks may or may not happen but all we know is that we’re eating a whole meal without having to feed another being.

We also will be able to eat our meal while it’s still hot and won’t have to worry about asking for it to-go because of a tantrum. Meals away from the family means chit chat and girl time at its best… un-filtered!

And if there is booze involved… watch out! Cause moms are usually quite fun when tipsy (but always safe)!

2. Networking in Disguise – 

One of the best things about my life as a mom is the fact that I get to hang out with other cool moms all the time. And sometimes we get to network with each other finding out that we might be able to help each other more than we thought!

And one event that brings moms together to do just that are the SD Mom’s Night Out events. They are an absolutely amazing way to relax, reconnect, and network with other moms in San Diego who you might not have known about. From Momtrepreneurs to bloggers to stay-at-home-moms looking for a great way to get out and explore. Each event is different and has something else to offer.

The next event is their one year anniversary and it isn’t to be missed! Not only is it being held at Kin Spa, it also includes some amazing perks and goodies! To read more about the SD Mom’s Night Out Anniversary Event, check out my post here.

Click here to purchase tickets for the event.

3. My Favorite Things – 

Every few months my mom friends and I get together for what we call a My Favorite Things party. We each bring 5 $6 items that we’ve dubbed as our favorite thing and we pass them out to each other (drawing names to choose who gets what). We eat and drink our favorite things too!

I love this type of event because it’s low maintenance and it’s a way to learn about things I might not have known about in daily conversations with my friends.  Our last Favorite Things party focused on our favorite kid items. And as you can imagine it was pretty hard to chose one item for $6 or less to share. But I was amazed again at the products that were shared and have fallen in love with a few new awesome things!

4. Playdates – 

Yes, I know. This technically is not getting away from the kids but my friends are awesome. And when we get together, we are able to mingle and chat while our kids play around us. Most of the time I’ll host playdates at my home and just rope the kids off into certain parts of the house and yard. That way the moms can sit in one central location and chat without having to worry about what trouble our kids are getting into.

This option does require a little bit of work but the reward is much worth it. Not only do we each get to sit and enjoy adult conversations, we also get to tire our kids out so that when we do go home they (hopefully) take nice, long naps. Win-win!

Now these adult conversations aren’t always just about us. Usually one way or another we end up talking about some pretty fun topics. Bladder control, birth, and a few other wonderful mommyhood moments having to do with poop usually come up.

5. Shopping – 

Whether it’s for groceries or for clothes… shopping alone is always considered a great way to get out in my book. Not only do I get to enjoy some peace and quiet, I get to participate in one of my favorite activities… spending money!

While I love time with my kids, I don’t love having to worry about my kids breaking everything within reach while we’re out and about. I’ve learned that I’m a lot less stressed when I can go to a store alone and actually consider it relaxing to shop knowing that my kids are elsewhere having fun and not asking if they can have every.single.thing they see at the store.

What do you do for your mom-time without the kids?

Disclaimer: This post is sponsored by SD Mom’s Night out. I received two tickets for their SD Mom’s Night Out Anniversary event in exchange for this post. Regardless, I only recommend products or services I use personally and believe will be good for my readers. 


© A Crafty Spoonful - All Rights Reserved
It is OK to use one of my photos provided a link back and/or proper credit is given. It is NOT ok to copy and paste a whole post including instructions. Please do not remove watermarks or alter images in any way. Please contact me with any questions at danielle@acraftyspoonful.com

.