Charlie Brown Halloween Costume for Baby

We had a wonderful day today. It all started with pumpkin carving and ended with a wonderful Halloween party at my neighbor’s mother’s house. Little E had a wonderful time with all the kids and I took many pictures!

Everyone loved his costume and we got many compliments for it. Most were shocked to find we made it ourselves but it was so simple I couldn’t see NOT making it!

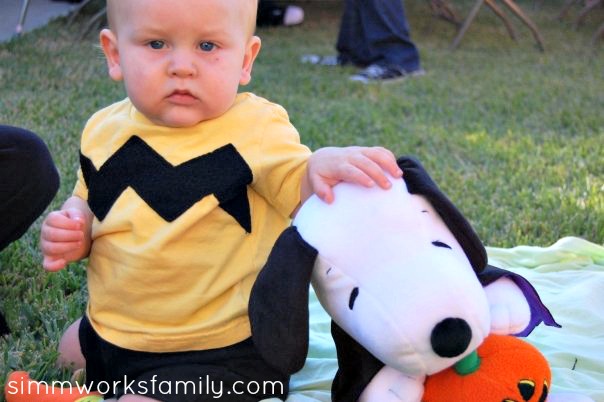
Since this was Ethan’s first Halloween we didn’t want a costume that would make him too hot or uncomfortable so we stuck with an easy Charlie Brown costume. A t-shirt with a squiggle and shorts, how simple is that!
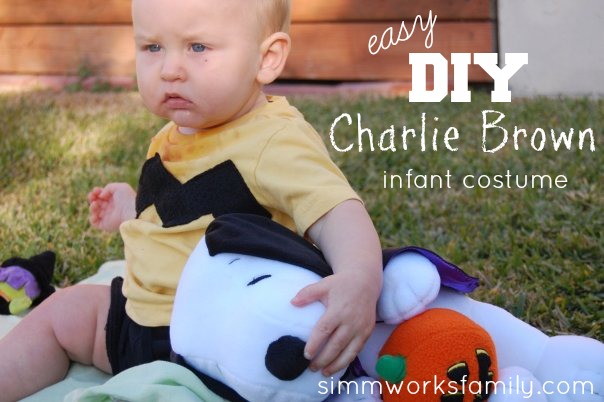
Charlie Brown Halloween Costume for Baby

How to make aΒ Charlie Brown Halloween Costume for Baby

What you’ll need:Β 

What you do:Β 

Ok guys… this can’t get more simple. Cut your black fabric in a zig-zag pattern. Apply No-Sew to the back of the fabric and adhere to shirt. Let dry completely.

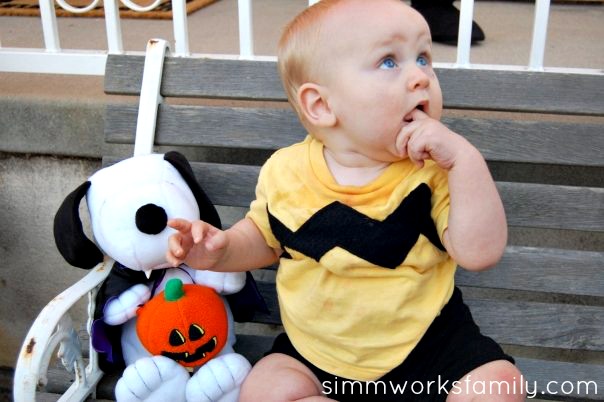
Try the shirt on, add the black pants and brown shoes and your Charlie Brown is ready for his big debut! Remember to add Snoopy for an added touch so no one will ask what your little man is for Halloween.

Extra bonus points if baby is still bald… like mine!

charlie brown halloween costume for baby 1

My husband made an iron-on transfer for his shirt that had a picture of Charlie Brown and it said “Wah, Wah, Wah” all over it and underneath Charlie it said “Charlie Brown’s Dad” so everyone would know what the “Wah, Wah, Wah” meant. So cleaver he is!

Image and video hosting by TinyPic

And one more showing Charlie Brown with his Pirate mommy… my neighbor is the lady in front of me with the most adorable panda bear πŸ™‚ He’s 5 months old and we always talk about how E and him are going to be the best of buds when they’re older.

E and his buddy. And shortly after this was taken…
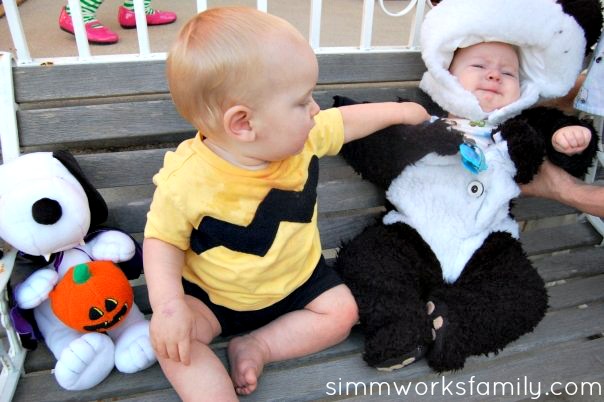
charlie brown halloween costume for baby 4

He didn’t know what he did wrong πŸ™‚

charlie brown halloween costume for baby 5

I hope everyone had a safe and Happy Halloween!

Safety: Baby Proofing

We changed things around in our living room to accommodate our new lifestyle. One of the major things we needed to do was to find storage for E’s toys. Since he’s had a fond interest in the end tables we decided to take all the junk we were storing in them and filling them with his toys. He loves it! He can go in at any time to pick up a toy or two and than is on his way.

And he loves the fireplace area so much we decided to just put a whole bunch of toys up there too so he doesn’t climb up and hurt himself. We put a bunch of his soft blocks in the wicker basket (to the right of E in the picture) and put his bumbo with Tad his leap frog frog in it to block the space that he’s currently occupying in the picture above.

It’s kept him from getting into too much trouble. He knows where he can go and what drawers he can get into (i.e. pots and pans drawer). He hasn’t yet tried for any of the other drawers/cupboards yet *crosses fingers*. His favorite spot lately is the coffee table we’re using to house our cable box/DVDs/Wii and Wii games/etc. He loves to pull up on the table and cruise from one side to the other getting into all the fun stuff up top.

I really didn’t want to hide everything/tape stuff off/put up blockers because E is going to go to other houses with the same types of set ups. I would rather redirect him from something dangerous/off limits than to completely block it from him so that when he goes somewhere new where it’s available he goes right for it. It’s worked for us so far!

Breastfeeding: A Vent

Can I vent a little here?? When I first got pregnant (well… I guess before then too) I knew that I wanted to do everything I could to successfully breastfeed my baby. I read about all of the health benefits of breastmilk and the statistics of breastfed babies vs. formula fed babies. I was very aware of the different problems I could have and the ways to get help if needed.

Now that I am actually breastfeeding I am lucky enough to have had no major problems and no supply issues. I had a bit of thrush early on but that was quickly resolved by applying yeast cream to the nips (yes, I put vag yeast cream on my boobs!). E seems to enjoy breastfeeding as much as I do and it just feels so natural.

Now that I’ve been breastfeeding for 7.5 months I’m starting to get comments from various people about when I am going to stop. Why do people feel the need to ask this? Why would I consider stopping? Why would I share this personal information with others??? I completely understand if a family member or close friend were to ask this if they were truly curious but I get this comment from people I barely know and from co-workers.

My standard answer is I’ll stop when he wants to. And I get various reactions. Some are shocked that I would even think about breastfeeding after he gets teeth or after he turns one. Others ask if he wants to keep breastfeeding until he’s in school will I continue. And sometimes I get the jaw-drop. “Seriously? You’d breastfeed for that long? Isn’t that a bit weird?” Again, there’s a line… and they just crossed it. I shouldn’t have to justify myself with regards to how I raise/care for my child.

And FWIW, I will probably try to wean E when he’s two if he hasn’t already done so himself. I don’t mind getting through the teething. I don’t mind the night wakings. I don’t mind his using me for comfort by nursing. I actually quite enjoy it. I am nourishing my baby and he is thriving. And if he chooses to earlier than we’ll do that.

This post is in no way criticizing those who choose to formula feed, or who breastfeed for a few months. I think that whatever works out best for the family is the best thing to do. And this works for us.

Now you tell me how you feel on the subject. I know I don’t have a lot of readers but those of you who read my blog… let me know how you feel πŸ™‚

Why We Use Prefolds and Covers

I love cloth diapering. I love that there are no nasty chemicals touching my baby’s butt. I also love that he’s only had two instances of redness in the diaper area (not even a real rash). One of the best things about cloth diapering is you decide how much (or how little) you want to spend! The cheapest way to cloth diaper is by using prefolds and covers.

This post contains affiliate links.

Why Prefolds? Sizes and Types

I have only used Green Mountain Diaper (GMD) prefolds. There are two types of prefolds, Indian and Chinese. I have no idea what the difference is but GMD was recommended and we fell in love with their absorbency and durability after using them. There are multiple sizes. Most likely you can skip sizes and go to the next size up instead of buying every size. We went from Orange Edged (newborn) to Yellow Edged to Brown Edged. Most suggest either doing the Orange & Red combo OR the Yellow & Brown combo so I did it a bit different but I loved having the newborn size. We now use them as inserts for our pocket diapers.

Why Prefolds? Types of Folds

There are a few folds for a prefold. The most known are the angel wing fold, the jelly roll fold and the newspaper fold. For the longest time we would only use the angel wing fold but every time he pooed we’d have to get a new cover because the prefold leaked. So now we use the jelly roll fold exclusively (tutorial to follow in next post). 

I use a Snappi to pin the diaper in place because frankly… diaper pins scare me. It’s not that I don’t think I can do it but I think of the pain I’d cause E if I screwed up. Just can’t do it… so I am sticking with the Snappi for now. I may change later on.

Why Prefolds? Covers

The great thing about prefolds is that it has a cover to keep everything IN. Our favorite diaper covers are the Thirsties brand covers. I don’t think we’ve ever had a blowout that went out of the Thirsties diaper covers we use. I’m sure that there could be some chance that it’d happen if the baby was positioned a certain way and had a large explosion but it’s very rare. 

Another great thing about the Thirsties covers (and this goes along with prefolds in general) is that they aren’t as expensive as other cloth diapering options. And they hold up VERY well. We use our covers daily and they still look as good as they did when I first bought them.

The prefold is the workhorse of the diaper family. You can do just about anything to it and can’t screw it up. I’ve sometimes accidentally let one slip into the regular wash with my clothes (it was clean… just being used as a burp rag instead of a diaper) and it was still as absorbant as my others. And one final thing about prefolds… even my mother-in-law and husband know how to fold a prefold successfully. So if you’re thinking… oh, I couldn’t do that, think again! You can!

Why do you love prefolds? 

Want to know more about cloth diapering? Read on! 

Pin this article for later! 

Click the Pin button on the image below to save for later. 

Cleaning & Housework: 4 Tools for Getting Things Done with a Baby

When it comes to cleaning and housework these tools for getting things done with a baby make my life so much easier!

Since my son was born, I always rushed to get things done while he was asleep. It’s just easier that way because when he’s awake he’s either eating, wants constant interaction or wants to be held. Which is typical for a 2 month old. 

Well for the past few weeks he’s been spending more and more time alone. No, I don’t leave him in places alone. I mean he’s been hanging out on his activity mat longer, staying in his swing and not sleeping, playing in his bouncer and even sitting in his car seat for longer.

So we’ve been able to find a few tips for getting things done with a baby. And let me tell you, these tools are life saving! 

Cleaning & Housework: Tools for Getting Things Done with a Baby

Baby Bouncer

One of the best things we received for the baby was the bouncer we got. It is my life saver when I want to take showers and it keeps the baby entertained when I’m doing laundry in the garage or putting things up and down from the clothesline outside. He stays in there and either watches me or plays and talks to his hanging toys. It’s great because I know he’s safe and I get things done!

Activity Mat

Another great thing is his activity mat. I will bring the laundry in to be folded and set up the activity mat on our bed. I turn on a little Regina Spektor on the iHome and we both sing as I fold clothes. Yes, E sings along… it might sound like squealing but he’s singing πŸ™‚ He does his tummy time for 1/2 the time and then I turn him over when he gets sick of that and he looks at the hanging animals that he so frequently talks to.

Car Seat

I have, in a pinch, also used his car seat to sit him in while I do things around the house. Sometimes both the bouncer and activity mat are in the back bedroom and I need to clean the kitchen or the living room & dining room so I lay him in the car seat and make sure he can see me. I then start talking to him while moving around the house and he can last 15-20 minutes before getting sick of being there. Then I just move him to the swing…

Swing

I LOVE his swing πŸ™‚ It’s so great. It’s the only place he’ll fall asleep beside my arms (we’re going to start working on that). I don’t feel bad for putting him in there because he actually likes it. And when I time it right he falls asleep within 10 minutes 99% of the time. If I time it wrong… well, he fusses for about 10 more minutes and then falls asleep. Or he’s not really ready to go to sleep and I take him out.

What tools do you use to get things done around the house with a baby? 

Like what you just read? Read on! 

The Secret to Remove Stains From Cloth Diapers: Sunning Diapers

Did you know that the sunning diapers can actually work like bleach and get stains out? We share how below!


Did you know that the sun can actually work like bleach and get stains out? We had no clue! I had to try it out because I did not believe it. I mean, I understood how it could work because every summer I get great highlights just by going outdoors so there must be some truth to it.

So I had my husband set up a clothesline in the back yard. Oh, The clothesline isn’t for our clothes… it’s for the cloth diapers πŸ™‚ Baby poo stains like no other. And when diapers are white there are a lot of stains. And then you dry them in the sun and they magically disappear!

Where does the stain go?

How to Remove Stains From Cloth Diapers

  1. Wash your cloth diapers like you normally would. 
  2. When still wet from the wash, take them out to your clothesline in direct sunlight and pin onto the clothesline. 
  3. Let dry completely in the sun and watch the stains fade away!
  4. If you still have some staining on your diapers, dampen a bit and let dry again. 
  5. Pop the diapers in the dryer for 2-5 minutes to soften them up a bit before putting away. 

This also works on white clothing that baby spits up on as well! Or if you have an antique gown or outfit you want to remove the yellowing from. Such magic! 

While this won’t work for all stains, it does work for the ones baby creates (until they start eating food and playing in the dirt). 

What great laundry tricks do you use? 

Love what you’ve read? Read more! 

Pin this article for later! 

Click the Pin button on the image below to save for later. 

Nursery is Complete: Jungle Animal Themed Nursery Ideas

 These Jungle Animal Themed Nursery Ideas are great for a gender neutral room for baby.

Our son has a finished room! But it’s not like he’s sleeping in it anytime soon πŸ™‚ I quite like him right by me when we sleep. At least for these first few months… maybe longer. Let me know what you think.

We went with a jungle animal theme and didn’t go too crazy with furniture or design. My husband painted the stripes on the walls using a low VOC paint and alternated solid colors on the other walls. 

I found a cute line of nursery items at Babies R Us to complete the room with a few personal touches throughout. 

Furniture: Upcycling and Repurposing

We were given a crib from my husband’s brother to use for the nursery. The colors fit perfectly in with the jungle themed crib set. We fixed the drop side with a kit we received from the manufacturer. 

In an effort to save room, we purchased a full sized dresser and simply added a changing pad to the top of the dresser. The top of the dresser will be used as a book shelf after he outgrows the changing pad. We added a non-slip under mat to the underneath of the pad and strapped it to the dresser so there’d be no accidents. 

The only new item in the room is my new glider. We scored at Costco and found it as soon as we walked into the store. I had never seen gliders at Costco so it had to be fate. After our jaws dropped at the cost of the ones at Babies R Us, it was a great relief to find a budget friendly option. 

The Little Details: Utilizing Gifts and Memorabilia 

To decorate the room, we used items we had either received as baby shower gifts or memorabilia we had already. We had purchased a few prints from Disneyland that went perfectly with the jungle and kid theme so we framed them and added them ot the walls. There is still enough space on the walls to add some other fun items as he grows. 

With the crib set, we also got a matching mobile and diaper holder. Since we’re using cloth diapers, we’ve been using the diaper holder as a laundry hamper but I’m sure it won’t be able to hold all of his dirty clothes as he grows! 

We also got an adorable little chair at our shower that fits the theme perfectly. I just know he’s going to grow to love that chair. 

We were so grateful to receive such amazing hand-me-downs, gifts, and other items to complete this room. And I know that it will be the perfect place for our son to grow and learn. 

What’s in your nursery that you can’t live without? 

Like what you’ve read? Here’s more great suggestions! 

Pin this article for later! 

Click the Pin button on the image below to save for later. 

Ethan Joseph is here!

He was born on Sunday, February 22nd at 2:45pm. Delivery went well (as it could have). Water broke at 7:45am. We called L & D shortly after (I took a shower and ate first). They told us to come in. We came in and I was having no contractions/no pain and was only 1cm dilated. We tried to walk around a bit to get contrax going but weren’t progressing so they had to put me on pitocin πŸ™

I tried to labor it out without going for meds but had to at least get something to take the edge off. At that time I was 3cm dilated. When that wore off I couldn’t handle it anymore and went for the epidural. I was about 4 cm dilated at the time. After an hour or two of intense pressure they checked again and I was at 9cm! Shortly thereafter I was ready and so was he. His head was right there ready to come out!

After 30 minutes of pushing he joined us. Throughout the pushing I had no tears and than when he came out I did tear quite a bit because he came so fast. But I don’t mind it. He’s just perfect. He’s 7 pounds 13.5 ounces and 21 inches long. He has blonde hair like his mama and papa and his eyes are gray-blue for now. We’ll see what they are in a few months. More pictures to come when we get settled.

Our Kitchen Remodel (Almost) Complete!

I just wanted to share a few photos of our (almost) complete kitchen remodel.

The only things we have left to do are install the knobs and pulls and repair/paint the window sill. I couldn’t be more happy with the results. Joseph worked long hours to make sure that the kitchen was done before the bridal shower I threw Amanda and all of his hard work definitely paid off.

I now have a beautiful kitchen to cook and entertain in. The extra space is just wonderful and all of the details help to make the kitchen easier to use. From spice racks next to the stove to fully extending pull out drawers in the pantry this kitchen is our dream kitchen.

I’ll take pictures of the different components and post those soon but wanted to show the over all changes πŸ™‚


A view from the barstools overlooking the main counter space


Dog food bowls… now you see them…


Now you don’t! When we entertain we can push the bowls in


Can lighting that Joseph installed along with our pantry and broom closet (left) and extra counter & cabinet space (right). From right to left on the bottom cabinets we have a cabinet for our trash & recycle bins, a cabinet with a stand for my KA mixer, a lazy susan corner cabinet, and a cookie tray rack.


A view from the living room into the kitchen. See how open it is??

Here’s a Quick Way to Make a Maternity Bun In The Oven Halloween Costume

Bun in the Oven Halloween Costume


I had to share my Halloween costume with everyone. Yes, there is a bun in the oven. Yes, my hair looks really bad and I have no makeup on… hopefully, I can get a better picture to post soon!

Making this costume was super easy. I grabbed a white box I had lying around, printed off a clip art photo of a bun, grabbed some hardware from my work, and printed out the due date as the time on the oven. All in all, it took less than 30 minutes and was perfect for me to wear to work. This would also be great for parties and is super comfortable and not too intrusive. 

Bun In The Oven Halloween Costume

What you’ll need:

What you do:

1. Close up one side of the box and tape shut.

2. Turn the box around and cut off the two smaller panels and one of the longer panels off leaving one long panel.

3. On the closed side, paste the bun image onto the box. Trace with a sharpie to create the oven window. Attach the cabinet door hardware.

4. On the top of the box create oven range coils by using the sharpie.

5. On the long flap add rectangle print out of due date in time form as the clock on the oven. Then add the oven knob.

6. Add the ribbon on either side of the long flap and place over your neck to wear.

Were you ever pregnant on Halloween? What did you dress up as? 

Love this idea and want more? Read on! 


Β© A Crafty Spoonful - All Rights Reserved
It is OK to use one of my photos provided a link back and/or proper credit is given. It is NOT ok to copy and paste a whole post including instructions. Please do not remove watermarks or alter images in any way. Please contact me with any questions at danielle@acraftyspoonful.com

.