On the Move with the FitBit Ultra

When I started my weight loss journey this time around I knew I needed something that could easily track my fitness. I have a heart rate monitor but I only wear it when I’m going to the gym so I wanted something that would be great for all day use.

And since sadly I haven’t found enough time to fit in the gym, I’ve been trying to stay active in my day-to-day activities by walking more and doing at-home training. So it’s hard to track all that I’m doing to stay fit.

That’s when I found the FitBit Ultra. And I’ve been in love ever since.

The FitBit Ultra wirelessly tracks any and all activity in the form of how many steps are taken each day, calories burned, and how far you’ve traveled, with it’s 3-D motion sensor (think: Wii technology). All in one little device that securely attaches anywhere from your waistband to your bra to the clip it comes with. It can even track floors climbed with the new altimeter technology built in. This device is much, much more than a pedometer.

I love securing it to my pocket or waist during the day and even while running around with the kids and getting up and down 100x it has never once fallen off. It can be attached via the clip that comes with it or by simply attaching the device to your waist, bra, or pocket.

And if you’re worried about someone noticing this device, don’t. It’s so small that I’ve only once been asked about it and that’s only because a friend had read a previous blog post where I mentioned using the FitBit. She didn’t even know I was wearing it at the time!

I keep the FitBit docking station on my nightstand plugged into my laptop. That way I remember to wear it as soon as I get up and I place it back on the dock when I go to sleep. I absolutely love how easy it is to keep track of everything. All of the data is instantly sent to my computer wirelessly without me having to push a button.

AND I get super awesome reports with a run down of my activity each day. A summary of the previous week is even emailed to me so I can keep up with how active I am over the course of 7 days.

Take a look at what a typical day looks like for me: 

How awesome is this for motivation?

I’m always trying to beat the previous day’s steps. Some days I succeed, others I fail miserably. But I’m having so much fun doing it. And with the push of a button I can tell how I’m doing at any point in the day.

Not only does the display on the FitBit Ultra have the steps, stairs, and calories; it also includes a clock, stopwatch and a personalized greeting! When I’m out and about I just need to look down and check what time it is instead of pulling out my cell phone. Quick and easy!

Being home full time with my kids and working from home allows me little time to really focus on the time I spend being fit. By including the FitBit Ultra in my daily routine I not only am aware of how active I am but how active I need to be; I spend less time worrying about it! And less time tracking fitness means more time focusing on what really matters.

I have yet to use it to track my sleep but will be delving into that function this month! So stay tuned for another review of the Sleep Tracker functionality of the FitBit ultra in August.

And if you want to check out the FitBit Ultra for yourself head over to the FitBit website to purchase one today! 

Disclaimer: I received a FitBit for review purposes only. Regardless, I only recommend products or services I use personally and believe will be good for my readers. 

True Food Kitchen: Delicious Food and Kid-Friendly Atmosphere {San Diego Restaurants}

Move over Nordies Cafe, I think I’ve found my new lunch spot at the Fashion Valley Mall.

True Food Kitchen, the brainchild of Dr. Andrew Weil, is a new restaurant chain that follows the principals of Dr. Andrew Weil’s Anti-Inflammatory Diet & Food Pyramid. It’s health conscious meets eco-friendly and the results are amazing and tasty food!

When we arrived we were greeted with a wide open room filled with smiling faces, both the diners already seated and the staff at the restaurant seemed excited to be there. And while we didn’t have to wait at all we noticed the cucumber basil water offered to guests who might not get seated right away. I’m pretty sure we’ll be enjoying this yummy water soon when we return with my husband because this restaurant is going to be packed in no time!

I requested a booth to help corral the kids and make it easier for them to enjoy their meals without having to resort to using high chairs and was seated in a perfect corner booth that gave the kids both room to play a bit and eat their food.

I was excited to try a few different things on the menu but first my son had a specific request. As soon as the waitress asked us if we needed anything he ordered orange slices. No looking on the menu, no checking to see if they actually had orange slices available. He had a craving for orange slices and wanted some to start his meal.

I was so pleased when I heard the hostess say that grabbing orange slices and quickly realized how easy it was to meet the demands of a stubborn 3 year old. They had fresh, organic produce ready and available to serve for every meal and even offered fresh squeezed juices and cocktails. A chef easily sliced up an orange and had it over to my impatient son in no time.

When a restaurant caters to my 3 year old like True Food Kitchen did, it makes me want to come back again and again and invite friends and family along with me.

We ordered a starter of shrimp pot stickers (my favorite!) since Daddy wasn’t there to veto the spicy dish and asked for a few minutes to decide on what we wanted as our main course. I was excited about the menu options and honestly wish I could have chosen more than one dish. Luckily this location is super close to the house and in the mall so I can come back and enjoy more yummy meals in the near future.

I finally decided on what we would have and settled on a Teriyaki Brown Rice Bowl to split between myself and my daughter and ordered a Almond Butter, Banana, and Strawberry sandwich with carrots for my son. He actually ordered for himself for the first time. I was so proud.

To check out the other selections for lunch time check out their lunch menu here

When the food arrived at our table it took all the willpower I had not to dig in right away without taking pictures. But I couldn’t stop my son for grabbing a carrot stick and biting before I snapped a shot.

The three sticks they gave him were gone in no time and as soon as the waitress came around again he quickly asked for more carrots before I could stop him. This time they brought out a whole plate of whole, organic carrots in various shades of orange and purple for him to gnaw on. He was in heaven!

Once we finished our meal we were given the dessert menu. It was so hard to choose but we finally decided on a flourless chocolate cake with vanilla ice cream. I requested the ice cream on the side so the kids could dive in on their own.

Little did I know that my daughter would take “diving in” to a new, literal level.

She wanted nothing to do with the ice cream and instead enjoyed the chocolate cake with Mommy. She has such a sweet tooth!

From the atmosphere, open and relaxed, to the food, organic and sustainable, to the amazing service I can definitely say that we will be coming back to True Food soon. And while the pricing is a tad higher than what we normally pay, we’d gladly shell out a bit more for their food.

If you’re in San Diego and looking for a fun, kid-friendly, delicious place to eat head on over to Fashion Valley and check out True Food. You won’t be disappointed!

What tasty options would you want to try for lunch from True Food?

Disclaimer: Our meal at True Food was complimentary. Regardless, I only recommend products or services I use personally and believe will be good for my readers. All opinions are my own and are not influenced by monetary compensation.

Chicken with Creamy Sun Dried Tomato Sauce {Dinner Recipe}

Chicken with Creamy Sun Dried Tomato Sauce

When I can prepare a meal that is both delicious and quick to make then not only have I found a winner but I’ve found a winner that deserves a spot on our monthly line up!

This dish not only creates an all in one meal (where each component is layered together… grains, veggies, meat, etc) it’s a meal that you can drink wine while cooking. And any meal that includes wine both before and during dinner is a good one.

If you enjoy goat cheese you can totally sub it for the cream cheese we used. We just don’t like it in our home.

Inspiration: Annie’s Eats

Chicken with Creamy Sun Dried Tomato Sauce
  • 2 chicken breasts, pounded thin & cut in half
  • 1 tablespoon olive oil
  • 1/2 cup white wine
  • 1/2 cup chicken broth
  • 2 tablespoon sun-dried tomatoes, chopped (and drained, if packed in oil)
  • 4 ounces cream cheese
  • 1 teaspoon Italian seasoning
  • salt and pepper
  • 1 cup frozen peas
  • noodles


Boil some water and add pasta.

Sprinkle chicken breasts with salt and pepper. Heat skillet over medium-high heat and add oil. When oil is hot, add chicken breasts. Cook through, about 6-8 minutes per side, depending on the thickness. Set aside and keep warm.

Add frozen peas to pasta for last 1-2 minutes of cooking.

In the same skillet the chicken was browned in, add the wine. Cook over medium-high heat until reduced by half, being sure to scrape up the browned bits from the chicken. Add the chicken broth and reduce that by about half too. Add the sun-dried tomatoes and heat through.

Remove skillet from heat and stir in the cream cheese. Drain the pasta and peas. Put a piece of chicken breast over pasta and peas and top with sauce. Enjoy!

Serves 4

Top 10 Reasons Why You May Need A Double Stroller

DIY Color Bubble Art

This week I’ve found the perfect EASY craft that’s both fun for the kids and makes for some great artwork to hang in the house or playroom. And what kid doesn’t love bubbles?

My kids love bubbles so much that we have to buy them in the gallon size because we go through them so much. And I’m excited to announce that my daughter now says bubble with no prompting, clear as day! How cute is that?

All you need for this project is 5 things. And I’m sure most of these are in your home already! Don’t feel like you have to go out and purchase a canvas for this artwork, simply use a piece of paper, cardboard, or cardstock you have lying around and if you love it enough just frame it later! That way you can keep changing out the artwork as your kids create new masterpieces.

DIY Color Bubble Art

What You’ll Need: 

  • White canvas or cardstock
  • Bubbles
  • Bubble wands
  • Dishes for bubbles
  • Food coloring


What you do: 

1. Take the bubbles and food coloring and mix some colors together. Remember, a few drops go a long way!

2. Get out a variety of wands and tools to help change up the patterns on the artwork. Small and big bubbles alike look equally as cool.

3. If you have a bubble container lying around, fill it with some bubbles and add some food coloring right to the container to create an easy-to-use option for younger kids.

4. Start blowing bubbles towards the canvas!

5. If the bubbles don’t go directly onto the canvas you can always just get closer like my son did and make them blow onto it. Feel free to change up the colors and size of the bubbles by using different wands.

It helps when Mommy and Daddy get involved too. That way the kids can blow the bubbles and pop them!

6. Then enlist an official bubble popper to pop all of the bubbles that are still on the canvas.

7. Allow artwork to dry then hang wherever you see fit!

 
Every week Danielle brings great kids crafts to Formula Mom!

Danielle is a work-at-home-mom of two beautiful kids and writes at the Simmworks Family Blog. She loves to blog about her family, healthy living, going green and crafting. Danielle would love for you to come visit! You can reach her on facebook and twitter as well. If you have any questions feel free to email her at  simmworksfamily@gmail.com

Create a Masterpiece in No Time with My Wonderful Walls {#NoiseGirls Review}

When I first started planning my kids bedroom I had no idea what I wanted to do. I knew we needed to repaint because the striped walls from my son’s nursery just had to go. I wanted something bright, cheery, and gender neutral so that both my daughter and son would get enjoyment out of it.


Even before I had my son I always wanted some sort of wall art or mural in my children’s rooms. I would go to home shows or design/decor events and would oohh and aahh at the gorgeous murals done in fabulously decorated bedrooms. But, of course, we could never afford the hefty price tag that came along with the interior designer that designed the room and the artist that painted the murals.


So we searched for a great alternative.

I first became inspired to use decals in my kids room after seeing some adorable decals at my son’s gymnastics class. Simple monkeys hanging in a tree and clouds around the room. But when I got a closer look at the decals they used I was not impressed. The decals were bumpy, you could see where they met with each other, and the colors were simple and boring.

So when I saw My Wonderful Walls on my friend Jessica’s blog I knew I had to check them out to see what they offered. And boy was I happy that I did! Their selection of wall stickers cover everything from under water adventures to life on the farm.

I quickly was able to settle on the cute and animated Forest Friends wall stickers for my kids room. It was the perfect blend and definitely gender neutral (although the description states boy).

Not only are My Wonderful Walls decals super easy to use, they’re so versatile!

We started by painting the whole room in a few fresh coats of paint. If not starting with freshly painted walls please make sure to clean the walls very well to remove any debris and dirt from the walls.

Then we got to designing!

The decals proved to be very easy to remove from the backing and even easier to apply to the walls. Once I tested them out by applying the sun and clouds to the sky I let my son and daughter get in on the action as well.

I was pleasantly surprised to find how easy it was for them to help!

And I didn’t have to worry about where they placed the decals or if the decals folded over on themselves because I could easily remedy these situations. The decals were so easy to remove and reposition as needed until we got the right placement and fit for the room’s layout.

Once we were done and had applied all of the decals to the walls we sat back and looked at what we had created. My daughter was very excited to now share a room with so many friendly animals and started to wave and greet each new animal who appeared with a very happy hello.

She continues to greet the animals each day in the same fashion. Always pointing out her favorites. She even will overhear her brother talking about randomly wanting to hold frogs (because of a commercial or ad he saw) and she quickly runs to her little pond and points to the frog leaping out of the water. See, Brother, you can hold a frog!

My son made a few suggestions and changes to move a few items around and I happily obliged. I mean it is, after all, his room. Once he was happy with the layout we took a few pictures.

To see all of the photos of our toddler bedroom makeover including before and after photos please check outour photo album on G+ here.  Or if you prefer Facebook, head on over to my Facebook album here.

My Wonderful Walls not only offers amazing wall decals, they also offer wall stencils, wall murals, and canvas art as well. There are so many themes and designs to choose from that I’m sure you will find the perfect one for your home!

We are already planning on purchasing a few daffodils and blue birds for the playroom when we redesign it to give a little life to the walls. The price is affordable, the quality is excellent, and the customer service is stellar. And when/if we ever decide to build onto our home and have separate rooms for our children we’ll be coming back again to let them choose the wall art they want from My Wonderful Walls.

 
Ready to pick out your set of My Wonderful Walls decals or stencils? 
Head on over to their website and use the code sw625 at check out for 20% off your order

But hurry! This offer expires on 7/18


If you are interested in keeping up with new and exciting information from My Wonderful Walls please feel free to join them on Facebook by liking their page. Or following them on twitter. I’m sure they’d love to hear from you!

Enter to Win a $100 Gift Card

My Wonderful Walls has been kind enough to offer one lucky winner a $100 Gift Card of their choice in the Noise Girls’ Around The House giveaway event in the Kids Package.

The giveaway event will be held from June 25th to July 16th and will include multiple packages valued at over $3,500! Make sure to head back and enter to WIN one of these amazing prize packages.

Disclaimer: I received a My Wonderful Walls decal set for review purposes only. Regardless, I only recommend products or services I use personally and believe will be good for my readers. 

A Few of my Favorite Things

One of the best parts about running a playgroup is that the women I meet become more than just “other moms” they be come friends as well. And sometimes these friends come up with awesome ideas. Recently an idea was posted on our meetup page about having a My Favorite Things party. I wasn’t quite sold on it until I found out what it was.

Don’t know what a My Favorite Things party is? Well channel your inner Oprah and read on!

My guests’ favorite things

A My Favorite Things party is a night in (or out) where each guest shares their favorite item under a certain dollar amount with their friends. For our party we chose a dollar limit of $6 per item. Each guest brings 5 of the same item under that $6 limit to share and gift to the others at the party.

When you get to the party, write your name on 5 pieces of paper. Each guest will choose 5 different people to give their favorite thing to (make sure to do this in advance to avoid duplicates or drawing your own name). Once the names are drawn, go around the room and explain why the item is your favorite and then announce who the lucky girls are to receive your item The party can be general, like our first one was, or themed!

My favorite thing – Earth Mama Angel Baby!

We each brought one of our favorite dishes to share and our favorite bottle of wine so that before we jumped into the fun of exchanging our favorite things we were able to eat and mingle together. Since each dish was a favorite I made little signs to go along with them. The party can also be hosted at a restaurant or other location outside of the home but since we all didn’t have childcare this was the best option for us. Dads watched the kids outside while the moms enjoyed some time to chat and talk.

Once everyone had a bite to eat we got to sharing! And boy was this part fun.

When the kids heard that presents were involved they quickly came in to help pass out the favorites. Once they realized what was inside the presents, they weren’t too excited about helping. Ignore my son, spiderman… he just got home from a birthday party.

Here’s the favorites from our party:

  • My Favorite – Earth Mama Angel Baby Happy Mama Hand to Toe Wash
  • Elizabeth’s Favorite – Krispy Kreme gift cards
  • Clarissa’s Favorite – Muir Glen Organic marinara sauce
  • Jen’s Favorite – Tresemme dry shampoo
  • Kari’s Favorite – Lush Bubble Bar in Dorothy
  • Sophia’s Favorite – Yellowtail wine
  • Nikki’s Favorite – Bath & Body Works CO Bigelow Mentha Lip Tint

In addition to these awesome favorites, Chobani was kind enough to send each of my guests Family 4 Pack tickets to Kidsfest AND 2 free product coupons.  Boy were these mamas excited about yogurt!

I also included my Lipton Tea & Honey Klout perk samples and some Hot Dog on a Stick temporary tattoos for the kiddos that I received in a prize package I won at the SD Mom’s Night Out Tweetup. What fun is it to keep all these fun goodies to myself, right? Gotta spread the love!

Each mama went home with five new and fun items. I was so excited to see what each person brought and was surprised to find how diverse each of our items were. We’re already planning our next My Favorite Things party and this time we’re going with a theme: Baby/Kid’s Favorite Thing!

I gave a little bonus to my guests courtesy of Earth Mama Angel Baby and shared my Baby/Kid item, Angel Baby Bottom Balm. I’ve blogged about it before and can’t say enough about how awesome it really is. And EMAB was kind enough to also send samples of their awesome Monthly Comfort and Milkmaid teas (both of which I needed!). So stay tuned for our next party and what new favorites we come up with!

Check out more photos of my party on Facebook and G+!

What would you bring to the My Favorite Things party?

Disclaimer: I was given a free product or sample. I was under no obligation to receive the sample or talk about this company. I get no additional benefits for talking about the product or company.

DIY Newspaper Hut

You know how sometimes you go to make a craft with your kids and it ends up being completely different from the vision you had? Yeah, that was this project. We started working on a newspaper house made with the left over Sunday paper. We didn’t have much time until Sister woke up so we quickly got to work rolling up the newspapers.

We taped up a few and were ready to begin building the rest of the structure when… the phone rang. By the time I got off the phone with my husband and returned outside. It was too late. Our craft had turned to mush as my son continued to pour water from his water table all over it.

So we picked back up and made a cool hut instead of a house. And you know what? My son loved it just as much as he did the house. He now has grand ideas for making a tunnel, a hula hoop, and a giraffe all out of rolled up paper. Sounds like fun to me!

DIY Recycled Newspaper Hut

What you’ll need: 

  • 1 Sunday Newspaper
  • Scissors
  • Tape

What you do: 

1. Take two pieces of newspaper and roll them up from one corner to the other to form a long pole.

2. Cut off a piece of tape and secure the loose end of newspaper.

3. Repeat as necessary until you have all the poles you need to build your structure. We used 8 poles for our hut.

4. Lay out the base of your structure.

5. Attach three pieces together forming a right angle with each of the poles, two on the ground and one standing up.

6. Tape the pieces together. Repeat on all sides.

5. Gather the four poles standing straight up in the center and tape together to form a pyramid.

6. Enjoy your structured creation! You can add more newspaper to enclose the hut or leave it open.

7. Build more structures to add to this one and create a super structure!

 
Every week Danielle brings great kids crafts to Formula Mom!
Danielle is a work-at-home-mom of two beautiful kids and writes at the Simmworks Family Blog. She loves to blog about her family, healthy living, going green and crafting. Danielle would love for you to come visit! You can reach her on facebook and twitter as well. If you have any questions feel free to email her at  simmworksfamily@gmail.com

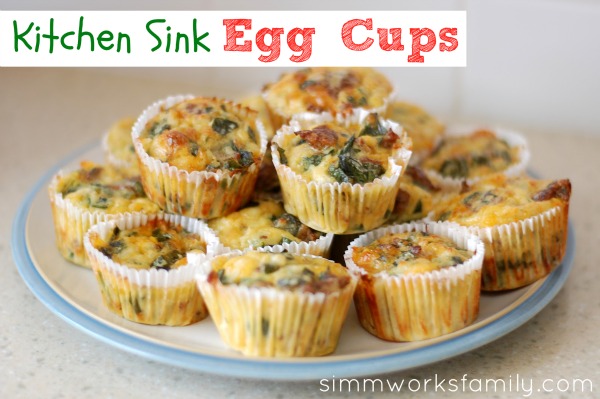
Kitchen Sink Egg Cups {Breakfast Recipe}

Kitchen Sink Egg Cups

One of my favorite meals of the day is breakfast. The versatility of it, the flavors, the mimosas you can pair with it… So I love making breakfast foods. There’s one breakfast recipe that I make that EVERYONE asks for once they’ve tried it. And it’s a recipe I never make exactly the same each time. Don’t you love those types?

These egg cups are easy, portable, and re-heatable. You can switch out the meat, veggies and cheese for any other kind and they’ll taste equally as good. I love to add chicken sausage to give it a little kick every once in a while.

If you have a brunch to attend or a playdate to go to, bring these! They’re sure to be a hit. I know they’re a hit at my playgroup. And I have to thank my friend Rachel for introducing me to them.

Kitchen Sink Egg Cups

  • 4 pieces bacon, crumbled
  • 8 eggs, beaten
  • 1 (16 ounce) container fat free cottage cheese
  • 1 cup low fat cheddar cheese, shredded
  • 1 onion, diced
  • 3 cups swiss chard, washed and cut into small pieces
  • 1/2 cup all-purpose flour
  • 1/2 cup butter, melted
  • 1 teaspoon baking powder
  • 1/2 teaspoon salt

Place bacon in a large, deep skillet. Cook over medium high heat until evenly brown. Drain and set aside to cool. Crumble or cut up into smaller pieces.
Add onions into pan and sautee. When almost done add swiss chard and cook until wilted. Set aside to cool.

In a large bowl, combine eggs, cottage cheese, cheese, veggies and cooled meat. Cover and refrigerate overnight (or use right away).

The next morning, preheat oven to 350 degrees. Remove cheese mixture from refrigerator; stir in flour, butter, baking powder and salt. Spoon batter into 24 lightly greased muffin cups.

Bake in preheated oven for 25 to 30 minutes, until cups are slightly golden on top.

Girl Time {The Importance of MNO}

Over the past few months I’ve come to realize the importance of girl time.Not only does it bring me out of the house and away from the kids but it also allows me to form and build on relationships with my peers. I’m able to have adult conversations without wiping a nose or chasing a kid. And I get to meet new people too!

So how do I make this happen. It’s simple!

  1. Write it in on the calendar
  2. Remind the husband the night before
  3. Run out the door

This past week I was able to attend an awesome launch party for The Pulse SD at Whiskey Girls. Not only were there delicious Pulsetinis from Smirnoff, but the entertainment from Lucient Dossier Experience was amazing to say the least.

I was able to sit back, have a glass or two of wine, and enjoy some girl time with my good friend Kari and her sister (not to mention the fabulous ladies we also hung out with). We had fun, danced, acted silly and Kari even managed to talk her way into scoring a swag bag. What that girl will do for free stuff! I kid, I kid!

And I always make time for SD Mom’s Night Out. Not only are these events fabulous, they’re always at a different venue and feature different companies as well. The most recent event at Bliss 101 had chair massages, wine from Whole Foods, Skinny Shots, swag bags, and more. Plus the famous raffle! This time if you purchased $20 worth of tickets you got double the amount!

These events are definitely networking in disguise. Not only do I get to spend time with my girlfriends but I get to branch out and network with other moms and businesses as well all in one location. Much easier than trying to talk via email or online.

Then there are fun events that I get to partake in. Recently I won tickets to the advanced screening of What to Expect When You’re Expecting. We got some pretty nifty shirts, boxes of prenatal vitamins and some hemorrhoid wipes. Never know when you’re going to need those, right?

Aside from the goodies, I got to chat with friends beforehand and enjoy a hilarious movie! Usually I go to the movies with my husband so going with girlfriends is a much different experience!

Perhaps some of the most fondest moments of getting out with the girls is gathering with friends who come to visit San Diego after moving away. Whenever any one of our book club buddies comes back we always make a point to schedule something awesome to spend at least a few hours chit chatting like they never left!

Breakfast at Snooze? Heck yes! Good friends who’ve been together for 5!! years already? Do you really have to ask?!

Do you get out for a night (or morning or afternoon) with the girls?


© A Crafty Spoonful - All Rights Reserved
It is OK to use one of my photos provided a link back and/or proper credit is given. It is NOT ok to copy and paste a whole post including instructions. Please do not remove watermarks or alter images in any way. Please contact me with any questions at danielle@acraftyspoonful.com

.