Lego Duplo Party {The Food}

As I mentioned in my party post, I wanted to keep this party focused on the basics. With a few simple decorations and some doctored up fun foods our party was the perfect Lego Duplo

To show off the drink cups a bit more I covered them in yellow paper and drew little faces on each of the cups to represent a different Lego guy. If you look closely you can see that each face actually matches the Lego on top of (and hanging from) the cups.

Munchies were also Lego themed. We went with peanut butter and honey sandwiches and cheese and crackers.

The peanut butter and honey sandwiches were super simple and fun! I made the sandwiches, cut off the crust (and ate them!), and cut the sandwiches in half.

Then I used my smallest round biscuit cutter to cut out small holes out of another slice of bread. I used some more peanut butter to adhere the bread to the top of the sandwiches. Two for each rectangle.

If you have a peanut allergy you can easily use sunflower butter instead. Or make the sandwiches with meat and use cream cheese to adhere the bread dots to the top. I was also considering making cucumber and cream cheese sandwiches as well. There are endless possibilities!

The cheese and crackers used the same techniques. I slathered two crackers with cream cheese and sandwiched in a piece of cheese in the middle. Then I used the cream cheese to adhere some cheese circles to the tops of the cracker sandwiches.

I had all intentions to coat these rectangle sandwich cookies with red, green, and blue chocolate and cover them with little m&m dots but time got away from me so I simply served them as is. Not as exciting but still fit the theme! And the kids couldn’t get enough of them.

As a play on the Lego guy’s head shape I made some watermelon & feta skewers for the mamas. This is my latest favorite combo and adding a bit of basil makes this a super tasty bite on a stick. You can also cube up the watermelon, toss with feta and basil, and serve as you would a salad!

In order to satisfy the mamas at the party I decided to throw together a simple quiche. Honestly, there’s nothing special about it. And really… it’s more of an egg bake in a pre-made frozen pie crust. I simply combined cooked sausage, spinach, 6 eggs, a cup of cheese, a cup of cottage cheese, some salt and pepper and poured it into the crust. I then baked until it smelled done (maybe 35 minutes?) and pulled it out.

And the color is yellow like a Lego head, right? Haha… might be too much of a stretch.

Yum!

If you were planning a Lego Duplo party what would you serve?

Mia Francesca {A Family-Friendly San Diego Restaurant Review}

Having two small kids can prove to be quite a feat when it comes to dining out. Not only do we have to be very choosy about where we go, we also have to make sure thatthe items on the menu are “kid-friendly.” And by kid friendly I do not mean breaded chicken nuggets and quesadillas (not that there is anything wrong with a good quesadilla). I mean something that will actually appeal to my children, whether it be what I order and share with them or what I order for them to eat together.

This afternoon we were invited to head over to Mia Francesca‘s newest Del Mar Highlands location to taste a bit of what they had to offer. And boy was I glad we went!

Not only is their menu simple and fabulous, everything I tasted was delicious as well! We started out with a few appetizers for the table. There were two types of bruscetta, the first was topped with bruscetta, fresh mozzarella (like… made recently fresh!), and avocado, the other was sans avocado but loaded with cheese! Both were topped with fresh basil. So good!

Next we tried the calamari. Now calamari has been one of my favorite dishes for quite some time. Not only is it delicious, but paired with a tangy marinara it just hits the spot. My son has never had calamari but when I offered him some he quickly approved and gobbled down a few pieces. So happy he enjoyed it!

After allowing our tummies to settle from our tasty appetizers, we were brought our main dishes.

I absolutely loved the kids options. Simple and, for the most part, healthy as well! I ordered pasta with broccoli for my daughter and chicken with fries for my son, knowing he’d share some of his sisters broccoli. Both shared wonderfully with each other.

The one thing I did love was that the chicken I ordered for him was not breaded tenders. It was a full grilled chicken breast perfectly seasoned. I cut it up and he devoured what I offered him. The servings were large and I could probably get away with letting the kids split a meal next time but for now we have left overs for the week!

After being undecided for quite a while about what I was going to get I decided to go with the pizza of the day. As soon as I saw fontina cheese I knew I had a winner. A simple margharita pizza with pesto sauce made my day. Sometimes a slice or two of pizza just puts you in a good mood!

The other pizzas they had ot offer also sounded yummy as well and I know my husband will want to come with us to try a few more of the menu options later on. 

While this location is a bit out of the way for us, I’m looking forward to trying out the Little Italy location closer to home. And coming back to the Del Mar Highlands location when meeting up with  my family in North County. But for the 25 minute drive, lunch was totally worth it! Both locations can be found on their website here.

If you’re looking for a family-friendly restaurant with a great, relaxing atmosphere you have to check out Mia Francesca. The patio is the perfect place on a warm day to let the kids play a bit while enjoying a great Italian meal with friends and family.

You can find Mia Francesca Del Mar on Facebook and Twitter.

Disclaimer: I received a complimentary lunch for myself and my children at Mia Francesca. Regardless, I only recommend products or services I use personally and believe will be good for my readers.

How To Turn a Mirror into a Chalkboard {DIY Tutorial}

My baby boy started preschool yesterday.

I still can’t believe he’s old enough! But he’s 3 1/2 and ready to go. He was practically shoving us out the door so he could get to school.

He excitedly grabbed his backpack (filled with a change of clothes and LOTS of dinos) and headed out. But not before I grabbed a few snapshots of him to mark the special day.

The chalkboard I used is something I made. Yup! And it cost me $7 + a can of chalkboard paint. And no, I didn’t use all of the chalkboard paint. There is plenty left for lots more projects. Wanna know how I did it? Here’s how!

How to Turn a Mirror into a Chalkboard

1. Head over to your local furniture store. Check their clearance section to see if they have any cracked mirrors. The one above had a HUGE crack down the center of the mirror and was clearanced at $7. You can’t find frames that inexpensive!

2. Carefully remove the glass by taping the mirror and lightly tapping on the glass with a hammer. Use gloves to remove the glass from the frame.

3. Once the glass is removed, tape the sides of the frame so no paint gets on the wood.

4. Paint a thin coat of chalkboard paint onto the backing of the mirror (ours had a nice piece of chipboard behind the glass)

5. Let dry for 2 hours, or as recommended on the paint can, and reapply another thin coat.

6. Allow paint to dry overnight or until completely cured. Then start coloring!

Thats it! This was such a simple craft that I enjoyed doing. And the possibilities are endless. Peruse yard and estate sales for older mirrors, check out the flea market and thrift shops, etc. Then change up the color of the frames with some spray paint, remove the glass, and start making chalkboards!

Smores Brownies Recipe

Did you know it’s National S’mores Day? No, seriously! It is.

And you know any dessert that has it’s own day needs to be celebrated. The right way. With lots and lots of dessert!

Hershey’s chocolate, Jet Puffed marshmallows and yummy Honey Maid graham crackers are the perfect way to satisfy any sweet tooth. But I was sick of the same old s’more recipe. I wanted something different!

So I gathered my s’mores ingredients and took them to the next level. And the end product… well, it was totally worth it.

Mommy and Me at the San Diego Zoo

My family is pretty lucky. Living in San Diego we’re blessed to have a few amazing places to visit with the kids to teach, learn, and enjoy ourselves. One of the most frequent places we visit in town is the San Diego Zoo. And we make it at least once a month for a special program I’ve been able to participate in, the Zoo’s Mommy and Me tours.

Each month the San Diego Zoo has a themed tour that teaches the kids something different about the zoo. We spend an hour discussing different animals, their features, where they come from, and fun quirks about them. Then we end our time together with a story and stickers!

Here are a few of the recent tours we took:

  •  Animal Ambassadors: What is an Animal Ambassador? Animal Ambassadors are animals that visit schools and community events as part of our educational programs. They also appear in our shows, Keeper Talks and during special tours. This month we will discover how important these Animal Ambassadors are to the Zoo and the ways they connect people with wildlife. As we explore Urban Jungle, you will see many of the Animal Ambassadors that live there. 
  •  Alphabet Bus Tour: B is for Bus Tour! This month, we are leaving the strollers behind as we board a bus and take a non-stop tour through the Zoo. Join us as we see our striped, spotted, and furry friends while learning letters in the alphabet (G is for Giraffes).
  • Children’s Zoo Tour: Wear some of your favorite colors this month of July as we invite you on a colorful journey through the Children’s Zoo. Kids can practice their colors, and moms will awe at some surprising facts about the history of the San Diego Zoo!

The last Mommy and Me tour we went on (the Children’s Zoo Tour) ended with a visit from a very special animal, this porcupine from South America!

Each visit takes us to a new part of the zoo. We get to explore a little bit, learn, and then are left to do what we’d like after our tour. This makes visiting the zoo stress free and easy. Especially with two kids. Instead of spending the whole day, we do the tour with the group and then afterwards we head to the children’s zoo to play, visit meerkats, and pet goats.

I couldn’t imagine a better way to see our zoo! We don’t stress about seeing this animal or that. We don’t feel exhausted because we didn’t have to trek around one side of the zoo to the other pushing a double stroller up hill. And we get to hang out with our friends! 

The San Diego Zoo also has an amazingly fun interactive site for kids as well at San Diego Zoo Kids. Visit their Mommy and Me section to learn more about the animals you visit at the zoo. You can even view the animals (including babies!) on the animal cams in the different animal habitats.

As we visit the zoo over and over again, my son has been increasingly interested in the jobs available at the zoo. Being able to speak with the staff, find out exactly what each person does, and how involved they are with the animals can help motivate my son to find out what he wants to be when he grows up. Sure he’s only 3 1/2 but sometimes a dream can start early on in life!

If you haven’t already joined a playgroup for your little one, I highly suggest it! Being able to connect with different locations around San Diego while bringing a large group means discounts, special tours, and much much more!

I found my playgroup by simply perusing the playgroups in our area on Meetup.com. I’m sure if you check them out you can find one that fits perfectly for you!

Learning to Communicate with my Baby and Toddler Through Sign Language

Being able to communicate with my children is something I think is very high on the list of importance. Ever since both of my children were small I’ve tried to learn and teach them (and myself) how to communicate better. One of the tools I’ve used over the past few years is sign language. And I really have to give credit to Joann of Sign4Baby for teaching me almost everything I know!

I attended Joann’s classes with my daughter when she was fairly young and continued the classes until she was just under a year old. After that we had quite a handle on her signs and were able to teach her new signs we picked up elsewhere (as well as on Sign4Baby’s Facebook page and blog).

While teaching my daughter signs I’ve learned a few things about communication from Sign4Baby:

1. Sometimes The Sign Isn’t Perfect –
My daughter and son both were very interested in signing back to me starting at 9-12 months old. But sometimes the trouble I had was that I was interpreting signs as hand gestures that didn’t mean anything. Sometimes your child sees the sign that you show them in a different way than what you think. Take the time to really watch your child and their reaction when they’re flailing their arms around. You might be surprised to find a sign or two mixed in there!

2. Don’t Stick to the Basics –

Please and thank you. More and eat. These words might be important to you but your baby might not want anything to do with them! So while you can teach these signs to your child (at the appropriate age) make sure to teach them the fun, everyday signs they might be more interested in. My daughter loved talking about her dog, my son talked about ducks. Both loved airplanes! Think outside the box and you’ll encourage more conversation.

3. Don’t Do Too Much at Once – 

Sure, you’re excited to be learning all of these fun signs and want to teach them all to your child. But using too many signs may be overwhelming for your child. Start by using and repeating three different signs each week (or one if your child is small). Use the sign whenever you do or talk about what the sign is. Then slowly build up the signs you learn and use every week!

Do you sign with your baby? How do you communicate with your children?

DIY No Mess Finger Paint

DIY No Mess Finger Paint

Sometimes having a nice, mess-free craft is fun. And a lot easier on mama! One of the best ways to keep painting mess free is to simply cover up the paint in plastic wrap and let the kids go at it. This no mess finger paint is simple, easy, and, best of all, FUN!

We love that this craft can be done indoors and outdoors so if the weather is bad we have an activity to do that won’t get too crazy. This can also be a great way to teach children about primary colors and what two colors mixed together will make. [Read more…]

DIY Car Tracks

This week we busted out a typical rainy day activity because we needed something to keep us busy but didn’t want to deal with the outside heat. So we decided to create our own DIY car track to play with our race cars.

My kids have a great selection of cars from tv show characters, to rescue trucks, to tractors and trains. But they get kind of bored with playing on their own with their cars. Sure they make believe that there are roads, tracks, and driveways but sometimes it’s much more fun to have a road already built so that your imagination can be used elsewhere.

Here’s how we turn our kids room into a large race track and how you can too!

DIY Car Tracks

What You’ll Need:

  • tape (we used electrical tape but any masking tape or colored tape will do)
  • vehicles with wheels
  • scissors

What you do:

1. Start out by choosing a starting point. Simply start laying down the tape in the shape you want to make for the outer line of the track.

2. Then grab your widest car and measure how far apart each line should be so that every car fits on the track.

3. By following the width (eyeballing is fine) and the outer line, create the inner line to finish up your roadway.

4. Now it’s time to play! Grab your kid(s), your cars, and your imagination and start racing!

4a. And don’t just think that this activity is for the boys! Girls love to race too!


Every week Danielle brings great kids crafts to Formula Mom!

Danielle is a work-at-home-mom of two beautiful kids and writes at the Simmworks Family Blog. She loves to blog about her family, healthy living, going green and crafting. Danielle would love for you to come visit! You can reach her on facebook and twitter as well. If you have any questions feel free to email her at  simmworksfamily@gmail.com

Tomato Zucchini Soup {Lunch Recipe}


I love simple lunches. Something I can whip up or reheat easily is key. So when I was figuring out what to do with all of the tomatoes we have coming in right now from our garden, I knew that a soup would be perfect. Now I normally roast my tomatoes with some other veggies to make the base for my marinara sauce so I thought why not roast up some tomatoes for a soup as well.

This recipe, from start to finish, takes 30 minutes and can easily be made in larger quantities to store for future lunches (or dinners!). It’d go great with a grilled cheese and a salad. The kids loved it as well!

Tomato Zucchini Soup

  • 4 Roma tomatoes, diced
  • 2 medium zucchini, diced
  • 2 cloves garlic, minced
  • 2 tablespoons olive oil
  • 1 handful fresh basil, stems removed
  • Salt & pepper

Preheat oven to 375 degrees.

Line rimmed baking sheet with foil and lay tomatoes and zucchini on sheet.

Mix olive oil and garlic together in a small bowl. Drizzle over vegetables. Roast for 15-20 minutes or until slightly golden.

Remove veggies from the oven and let cool for 5 minutes. Add to Magic Bullet, food processor, or blender (your choice!) and blend for a few seconds until just combined. Add basil and salt and pepper. Blend until it’s at the consistency you like.

Pour and serve. This soup can be served cold, lukewarm, or hot. It tastes good either way!

Serves 2-4 depending on portion size

What type of soup do you love? 

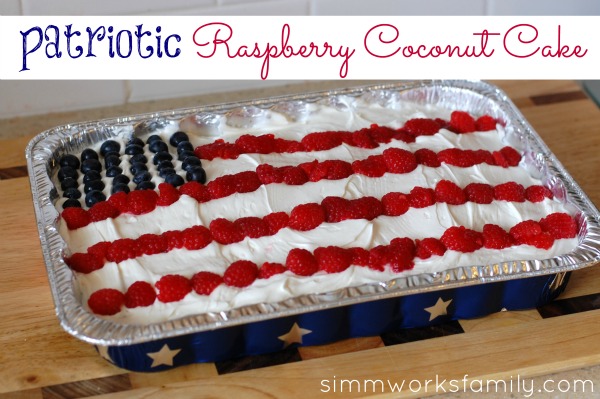
Patriotic Raspberry Coconut Cake {Dessert Recipe}

Raspberry Coconut Cake

Sometimes the holidays are just more fun when the foods we eat are festive. So in celebration of the 4th of July I made this delicious, and very easy, Raspberry Coconut Cake. This cake is the perfect addition to any summer party and will please all of your guests!

Desserts don’t have to be fancy or made from scratch every time. When you’re in a pinch, using boxed mixes and sprucing them up a bit to make them your own is the perfect solution. If you have a summer party to go to (or if you’re hosting one) this is sure to be a crowd pleaser! And per my father-in-law’s suggestion… next time I may add a bit of rum to the mix to change the flavors a bit.

[Read more…]


© A Crafty Spoonful - All Rights Reserved
It is OK to use one of my photos provided a link back and/or proper credit is given. It is NOT ok to copy and paste a whole post including instructions. Please do not remove watermarks or alter images in any way. Please contact me with any questions at danielle@acraftyspoonful.com

.