The Perfect Birthday Pancakes {How-To}

The Perfect Birthday Pancakes

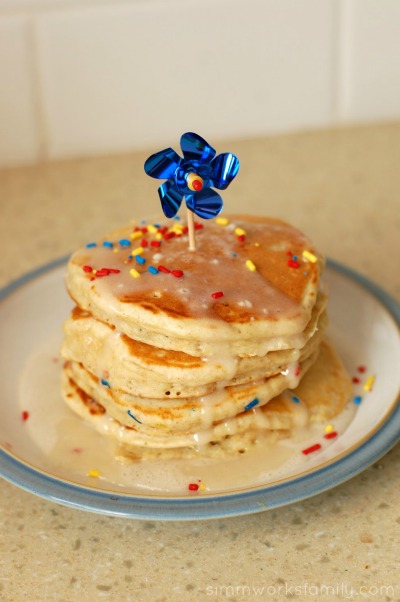
Our family loves pancakes and waffles. But we hardly ever get to making them on weekdays. So when my son asked for pancakes on the morning of his birthday I had to give in. But I couldn’t just make any normal pancake. They needed to be special birthday pancakes! So I grabbed a box of multigrain pancake mix from Trader Joe’s and got to work.

Here’s how to make the perfect birthday pancakes:

Perfect Birthday Pancakes ingredients

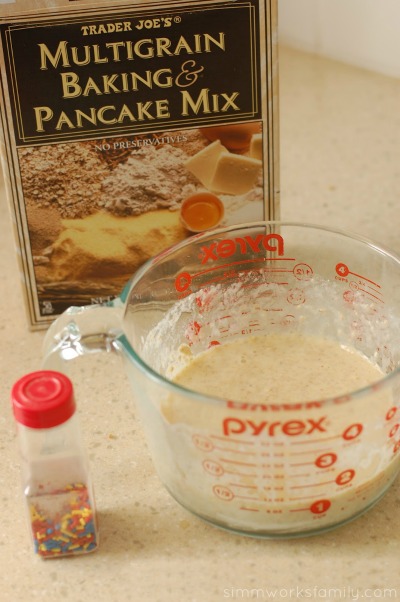
1. If you aren’t making your pancakes from scratch (they’re super easy to do!) pick out a multigrain mix. Grab the sprinkles while you’re in the pantry.

2. Mix ingredients together and let the batter sit and thicken. This will allow the batter to thicken and make fluffier pancakes. You can add in sprinkles now or wait till later.

3. Preheat your skillet on medium. You’ll know it’s ready when you place a  few drops of water on it and they sizzle and evaporate quickly.

4. Grease skillet with butter. Then wipe away any excess with a towel.

Perfect Birthday Pancakes adding sprinkles

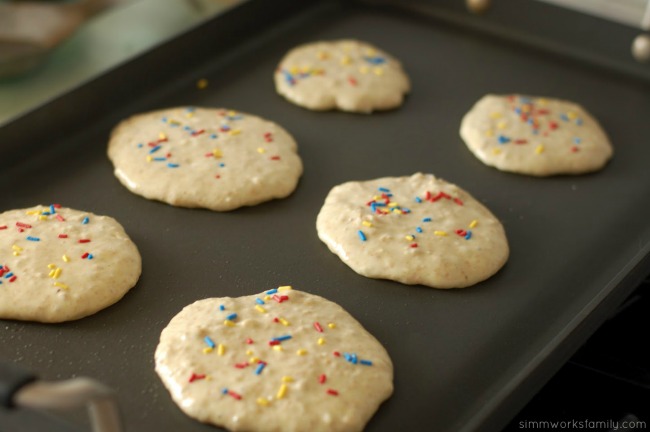
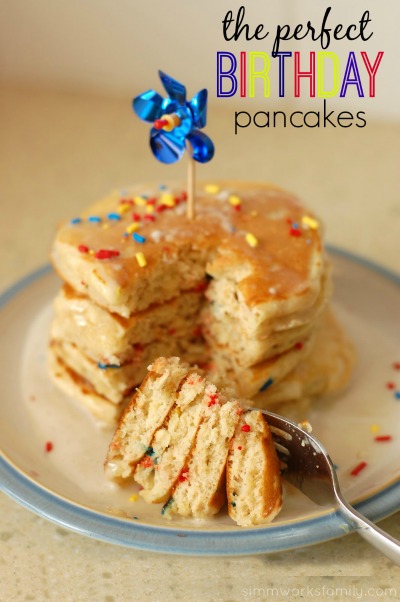
5. Place no more than 1/4 cup of batter for each pancake (unless you’re a pancake master). Sprinkle each pancake with sprinkles and set timer for 1.5 minutes.

Perfect Birthday Pancakes baking

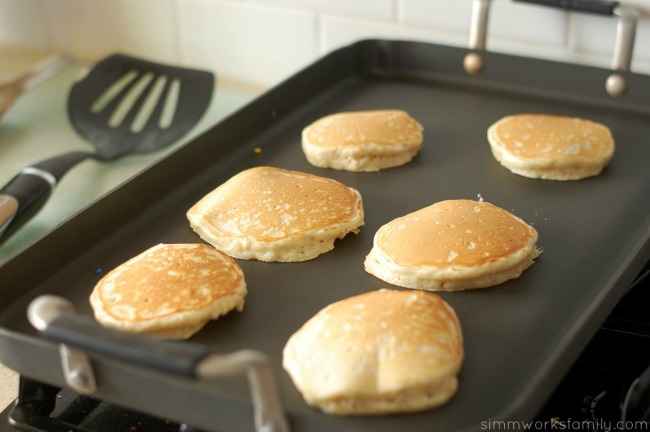
6. Turn pancakes when the edges start to bubble or when timer goes off, whichever comes first. The pancakes should be golden brown.

7. Let the other side cook for 1-1.5 minutes or until golden brown.

8. Place pancakes aside and cover loosely to keep warm. You can also put them in a 200 degree oven if you have a lot of pancakes to make.

9. Make a special icing instead of using syrup and butter. Take 1/2 a cup of powdered sugar and add in 1-2 tablespoons of milk. Stir vigorously to combine and remove lumps. Add more milk if too thick. Add 1-2 teaspoons of maple syrup to the icing.

10. Top with icing, sprinkle more sprinkles on top and include a candle or fun cupcake topper to make this special stack of pancakes perfect.

Enjoy!

Perfect Birthday Pancakes stacked

What do you do to make your child’s birthday special? 

Disneyland with Infants and Toddlers

After being asked a few times for tips and tricks to visiting Disneyland with an infant and toddler I thought I’d finally just write everything down in a post. My husband and I have been annual passholders since before we were married. He actually proposed right next to Snow White’s wishing well.

So Disneyland has always held a special place in our hearts. And it comes as no surprise to those who know us that we would frequently take our little ones to visit the park. Both kids have been going since they were newborns and we’ve never felt limited or held back because of them!

Here’s what we do: 

Bring a small umbrella stroller

Both kids use it and switch when the other is walking (or the youngest is in the Boba carrier). Invest in a swivel hook like these if you don’t already have one. It makes carrying bags around so much easier. We have one on each side of the stroller. If you really don’t want to bring your own stroller then you can easily rent one from Disneyland starting at $15 a day. Just remember you can’t take it with you outside of the park (and that includes Downtown Disney).

We choose not to bring our double stroller because 1. we’ve heard of others getting stolen and 2. it’s just too bulky to lug on and off the tram and/or busses. If you bring your double please make sure to bring a stroller or bike lock with you just in case.

Pack snacks in a lunch bag & bring a reusable water bottle or two

That way you can snack as you go and fill up the water bottle at any restaurant or food line (just ask them to fill it up and take off the lid… we do this to save money and never buy sodas). These don’t need to be stored in lockers if you don’t want to. You can just hang it from your umbrella stroller or put it in the basket underneath.

Buy meals to split

Lets face it… most places serve meals that can easily count as 2-3 servings. Why not take advantage of the big portion sizes and split your meals amongst each other? We usually buy two meals and split it between the four of us. Sometimes we get a kids meal for the kids to split (they also have toddler meals most places… just ask!)  and a meal for us to split or we get two adult entrees and share. In the end we pay about $15 for the whole meal when it could easily be $30+.

For breakfast we always get a parfait and a cinnamon twist inside the bakery to share. It’s more than enough food for all of us. And I get my coffee from the coffee & tea place on the right hand side of Main Street next to the snack cart because they give you free refills all day with your receipt. If you want a nice place to sit down and eat for dinner check out Downtown Disney before you head back. Or you can eat outside the park at one of the restaurants around Anaheim.

And since we pack snacks we usually allow our children one or two treats inside the park. One of our son’s favorite treats is a fresh popped box of popcorn. The whole family can enjoy it and there’s more than enough to satisfy everyone. When we’re leaving the park we can’t help but stop for a sweet treat in the bakery or candy store. We usually buy a box of cookies for the road and a small chocolate or sucker for the kids.

Take advantage of the baby care center

It’s located at the end of Main Street has quite a few amenities for their smallest guests. Here’s what they have to offer:

  • Diaper Changing Stations – these are not your hard surfaced, bathroom changing stations. Each station is a padded, comfortable area with more than enough room for a squirming baby and your diaper bag. They have disposable liners to put under baby to insure each change is germ free.
  • Small Toilets – right next to the changing stations there are two small toddler-friendly toilets to make going to the restroom a lot easier for our little ones. These are potties that the kids can actually touch the ground while sitting down. Makes potty training a LOT easier.
  • Feeding Station – Need a quiet place to nurse or feed your child a bottle or are you away from baby and need to pump? This is the perfect place to do so in peace. There are comfy chairs to sit in and there’s even a curtained off area for more privacy. There are also high chairs available for the babies on solids!
  • Diapers/Accessories – if you’ve forgotten anything at home have no fear, the Baby Center has diapers, formula, wipes, baby food and much more for sale at a reasonable price. I remember having a horrific morning at the park and going through every single diaper we had in the bag. Thank goodness for the Baby Center! No need to turn home (or to the Target down the street).

Make sure to get commemorative pins

First time at the park? Celebrating a birthday or other celebration? You can go to City Hall on Main Street when you first get in the park OR if there’s a line at City Hall just ask any cashier in the stores on Main Street for a special button to make your toddler’s day.

Packing Extra –

We always bring a sweater or jacket for each kid but store an extra set of clothes in the back pack just in case. These are lightweight, easy to store outfits that won’t take a lot of room in the bag. It does get chilly in the evenings so we always keep a pair of warm clothes in the car in case we’re coming back for the evening.

Rides! –

Just about every ride at Disneyland (save for a few “big kid” rides) is toddler and infant friendly. And you’ll find a ride for every age in every land. That’s the magic of Disney! Some of our family favorites are the Disneyland Railroad, Casey Jr., It’s a Small World, The Haunted Mansion and Astro Blasters. So don’t hesitate to jump in line and enjoy the excitement!

I suggest going to Fantasyland either right when you get to the park or in the late afternoon because there’ll be a lot of people rushing to the “big” rides first and it’s less busy. Also, a great time to ride without lines is parade time. Everyone’s lined up to get a great spot on Main Street and the lines for the rides are near non-existent.

And if you want to catch a parade, don’t worry about sitting to save a spot to watch it. There’s always room for more people right as the parade starts.We actually don’t even look at the parade times and more likely than not we “run into” them as we’re going from one attraction to the other. We also usually stumble onto other forms of entertainment around the park. There’s always something exciting in the form of music, laughter and dance going on in every land.

Whether it be the Billy Hill and the Hillbillies at the Golden Horseshoe, the marching band on Main Street (with Conductor Mickey) or the Jazz Band in New Orleans Square, there’s never an end to the awesome entertainment found at Disneyland.

If you have any questions about your upcoming trip to Disneyland I’d be happy to answer them! Email me at simmworksfamily (at) gmail.com and I’ll answer as best I can.

Health and Fitness Update

It’s been a few weeks since I’ve given an update on how I’m doing on my weight loss journey. And I have to say that I’m kind of at a standstill. I’m in the middle of my second 6-Week Challenge at the YMCA and I just can’t seem to get out of the slump I’m in. I’m working out with a trainer as part of a group 2 times a week, I’m working out on my own the other days of the week and I’m tracking everything I eat. So I give myself a pat on the back for that.

But I kinda got ahead of myself and jumped onto the 17 Day Diet plan in hopes of an “easy” way out of the current decade I’m in. And I half assed it. I was just so excited about the success my friends have had on the plan and I knew if I was diligent enough I could see success too. But I’m working out too much for the first phase of the plan to be doable. And I found myself making excuses for sneaking bites of foods that weren’t on the list. Sure, I could have stuck with it for just a bit but I was feeling icky and almost… empty.

The lean meats and veggies (TONS of veggies) are still around but I need whole grains… I need my oatmeal! Especially when I’m doing difficult workouts with a trainer and exerting a lot of energy. So I’ve put the 17 Day Diet aside for a bit and am just focusing on the calories. I use myfitnesspal.com to input what I’m eating and I try to stick with their calorie recommendations. But instead of eating the calories I’ve burned in my workouts I leave those as a deficit. So I’m consuming about 1250 calories a day.

What I have learned from the plan is that I need to stop eating carbs after 2pm. If I do that, I lose! It might not be as much as when I totally cut out the whole grains. And I’m eating yogurt regularly. Two servings a day. With those two things combined with lean meats, low-sugar fruits and LOTS of veggies I think I can stay on track and slowly get back to losing. And once this challenge is over I might just re-visit the 17 Day Diet.

I am excited to say that I am happily in a size 12. Last Friday I tried on an old pair of jeans from high school (OMG!) and they fit. Sure they were a tiny bit snug but they fit. (Want to see how good they look on me? Check out my butt in my Boba review!) And all of my 14s are falling off of me. Too bad I have to stick with my budget. I’ll be visiting the Goodwill later on this week. Because as soon as I have more pants I’m getting rid of the 14s for good! No more turning back. I’m on a roll and I’m going to make it to goal!

Weight Loss Progress
Starting Weight: 224.6 1/30/2011
Size 16
Current Weight: 192.7 2/18/2012
Size 12
Total to go: 37.7lbs
Total lost: 31.9lbs

This post may contain affiliate links.
By using these links you are supporting the Simmworks Family Blog.

Babywearing with Ease: Boba Baby Carrier 3G {Review}

Boba Review 3

Love. I’m in love. No, seriously… I am. With this baby carrier. It’s amazing. And cute, versatile and comfortable. Now I’ve shared my love of baby carriers and babywearing before. I own quite a few and have shopped around for the perfect one for each stage in my children’s lives.

I love carrying my babies close and thought that my Ergo was the end all and be all of baby carriers. Until I met Tweet, my new Boba baby carrier.

Boba Review 2

Why am I so smitten you ask? It’s the little things. The way the bottom strap contours up and around my waist instead of going straight around. The fact that I can put the hood into it’s little pouch instead of having it hang down in the front.

Or the fact that the gorgeous pattern can be seen when the hood is in use and when it’s put away. Oh, and one of my favorite things… the pockets on the bottom of the carrier. So convinient for my keys and cell phone when we’re out and about.

There are so many great features on this carrier. I think that the folks at Boba thought long and hard about what they wanted to include in this perfect carrier and they hit the nail on the head. I have been amazed at the response I’ve had from other mamas who I’ve shared my Boba with. Most are eager to try it on and test it out and I think I’ve created a few converts in the two short weeks I’ve had it. Here are a few other reasons to love the Boba Carrier 3G:

Boba Review 1

How to Use It

The Boba baby carrier is an all-in-one system that doesn’t need to be tied, twisted or folded. To hold your infant in a front carry you simply adjust the straps to allow a snug fit, snap the waist strap along your waist, hold your baby against your chest, bring the carrier up over the child’s back, put your arms in and buckle the top buckle.

You can then adjust the straps and tightness to your comfort level making sure baby is snug and secure. And if you are using the back carry there are these nifty foot straps that allow baby to rest his legs by putting his feet in the straps instead of having them hang down.

And if you have a newborn (7-15lbs), you can use the Newborn Hold. No insert or special instructions needed! That means you can wear your baby with the Boba Carrier 3G from birth (7lbs) to toddlerhood easily! How awesome is that?

Do you babywear?

Disclaimer: I received a Boba Baby Carrier 3G for review purposes only. Regardless, I only recommend products or services I use personally and believe will be good for my readers.

Homemade Playdough {DIY Tutorial}

When we were planning our activities out for Valentine’s Day I wanted to do something special with the kids, just me and them. Now, we do special things together almost every day but I wanted to find a special time to focus solely on them without thinking about what we needed to do next (or what I needed to work on). And since I’ve been pinning crafts to do with them for a while now I thought it’d be a great time to try out a pin.

So after we hosted a super fun Valentine’s Day party with our playgroup I put the kids to bed and got out the ingredients for playdough. I found the “recipe” on one of my favorite blogs, How Does She?, and loved how easy the project sounded so I got to work. It took me all of 5 minutes to take the ingredients out, snap some photos and pre-measure everything. And once the kids woke up we were ready to get our DIY on!

Homemade Playdough

What you’ll need: 

  • 1 cup flour
  • 1 cup water
  • 1/4 cup salt
  • 2 teaspoons cream of tartar
  • food coloring
  • medium pot
  • wax paper

What you do:

1. Grab a medium pot and pre-measure all of the ingredients except the food coloring (if you’re including a little helper into the mix).

2. Let your little helper dump all of the ingredients into the pot except the food coloring (look at that concentration!).

3. Stir, stir, stir until combined.

4. Now it’s time for the adult to take over (unless your child is old enough to use the stove). Place pot on stove and set heat to medium and add food coloring (as many or as little drops as you’d like to get the color your going for).

5. Stir the mixture until it starts to form a ball.

6. Once the mixture forms into a non-sticky ball, dump it out onto wax paper and let cool.

7. Once the playdough has cooled a bit start kneading the dough a few times until there is a smooth and soft consistency. You can let your helper take over this part for you if the dough has cooled down enough.

8. Re-form into a ball and give it to the kids to enjoy! How easy was that?

The playdough lasts quite a while when stored in an air tight container. I love that Missy over at How Does She? repurposed baby food containers to store her playdough so I grabbed some containers I had in the tupperware cupboard that weren’t being used and use them. Little hummus or pizza sauce containers seemed to be the best size and held the full batch of playdough perfectly.

Also… if you want your playdough to smell wonderful too I’ve heard that using kool aid as food coloring not only makes pretty colors but leaves great scents too. Cinnamon will do the trick as well but you still have to add the food coloring. And if you’re really wanting to spice things up you can add glitter to the dough to add some sparkle while you’re kneading.

Molly had a lot of fun playing with the dough once it was ready. She tried to eat it at first…

Then decided it was a phone and she called Daddy…

Then she just played with it in her fingers and squeezed it a bit before trying to share with me…

What a great afternoon treat! And the perfect way to spend Valentine’s Day with my little valentines.

Do you have an awesome DIY project that would work great for kids? I’d love to hear them! We’re always looking for awesome things to do together and to incorporate with our Tot School.

Footsie Heart Valentine {DIY Tutorial}

This valentine is super easy to make and is the perfect gift for parents, grandparents and special people in your child’s life. I made it two years ago with my son’s feet as a gift for my husband.

Then when I was actually making it I figured… his feet are already in the paint, why not make some more?! And I made a few others for his grandma, great aunt and uncle. I personalized them and he presented his gifts on Valentine’s Day.

Here’s what we did…

DIY Father's Day Gift Ideas - footprint I Love Daddy

Footsie Heart Valentine

What you’ll need: 

  • paper plate
  • painter’s tape (to be removed)
  • red washable poster paint (we used Crayola)
  • white construction paper
  • red fine point sharpie (or other pen)
  • damp wash cloth
  • dry wash cloth

What you do: 

1. Place a nice amount of paint onto the paper plate, set aside somewhere the kids cant reach it.

2. Tape the paper to the ground to reduce the chance of it slipping around.

3. Take your child’s bare foot and place it in the paint, right foot first.

4. Make the first half of the heart by placing the child’s foot at an angle facing the toes to the top right corner of the paper and the heel in the center of the paper closer to the bottom

5. Then dip the other foot, the left, into the paint and do the same to the opposite side of the paper placing the left heel inside the right heel and pointing the toes to the left upper corner of the paper.

6. Let the paper dry completely (you can make multiple at once by lining up the construction paper and stamping feet in a line).

7. Once the paint is dry start writing your phrase around the feet in a heart shaped pattern. I used, “I Love _____” and filled in the blank with the person we were making the valentine for.

You can frame your final product and wrap it to present as a cute keepsake or leave unframed and let your child hand it to their loved one. I’ve also seen this done with hand prints as well which would be equally as cute!

Have you made cute DIY valentine’s with your kids this year? I’d love to see what you have! Feel free to place your link in the comments below.

Organizing our Financial Lives

When I shared with you my resolutions for 2012 I mentioned that I wanted to get organized. Now I didn’t mean just one area in my life; I meant organization across the board. And the organization played a roll in the other resolutions I’ve made. Honestly it had something to do with almost every resolution on my list! But the one that came the easiest and the hardest was my resolution to start saving and budgeting. In the second week of the New Year I thought I’d tackle this resolution head on. I had already started a cleaning schedule for the home and was ready for one more challenge.

The first place I went to in an effort to find some sort of system to follow was a message board I’ve belonged to for quite some time. The ladies on there have been there since before the birth of my son and have always had great advice when it came to just about anything that popped up in life. And a few of the ladies suggested I read Dave Ramsey’s Total Money Makeover. They had and it changed their lives for the better! So I grabbed a copy for my e-reader and set to work reading everything he had to say. And as I read I got excited. I was pumped and I KNEW I could follow these easy steps to financial success (no, this is not a paid/sponsored post… I really am this excited!).

The Challenge (or as Dave calls them, Baby Steps)

The first step (Step 1) seemed to be the hardest one to fathom for me. Save $1000 for an emergency fund. And save it fast… within the first month of starting. Saving that much cash in such a short amount of time for our emergency fund seemed impossible. But then I put together our budget for that pay period, found extra cash hidden in different accounts, and started pulling them together.

After I hit the bank accounts I started in on our coins. I grabbed our coin jar and started sorting and rolling. Sure… laugh at me. But the coins in our house and cars equaled $177! Amazing, right?

The next weekend I had a garage sale and added more to our total. And anything that didn’t sale at the garage sale was put up on Craigslist. Any penny I could get from the stuff we no longer used was a step in the right direction and I put it all up for sale online. And guess what? By the end of the first two weeks, I had the emergency fund Dave suggested. I placed the money in an account we never use (to keep us from temptation) and called it done! Boy was that a relief.

Along with saving that emergency fund we also re-evaluated our lives. We needed to cut back.

First I tackled our eating out.

Now I don’t know about you but we had a big problem with this. I love to cook but some nights I was finding every excuse to just have my husband pick something up instead of making dinner because “I didn’t feel like it.” Well, no more! We came up with a reasonable budget for eating out once a week (or saving up the money for a “fancier” dinner once every two weeks) and allotted funds for splurges at lunch or at coffee shops every once in a while. We’ve been doing this for 4 weeks now and I don’t think either of us feel deprived. We prepare our lunches at home and are even making healthier choices with the changes.

Next came our bills. 

We made sure that everything started to get pulled out of our checking account instead of being charged onto the credit card. We didn’t realize how many times we set something up to be auto-paid from a credit card. The fear of putting our debit card number on the web was now being overshadowed by our fear of debt building. We didn’t realize how much was being put on the card and NOT being paid off each month. Little debt turn into big debt and then… it’s a never ending cycle.  

So we are not using our credit cards for ANYTHING.

What if an emergency happens? Well… we have our emergency fund!

Now that we have a budget and aren’t using our credit cards I’ve been able to pay off the first debt of our Debt Snowball (Step 2). Paying off that credit card and saying good riddance was an amazing feeling. And I cannot wait to do it again and again! We’ve lined up our debt using the handy Debt Snowball tool Dave offers and are making every effort we can to save up our extra funds to put towards the next debt on our list. Before we know it we’ll be debt free and onto the next step!

Once we pay off the debt we’ll be moving towards the savings part of the plan. Once we have 6 months savings (step 3) in the bank I’ll be able to breathe a lot easier.

I really love how easy the plan is to follow once I really jumped in and stayed focused. Sure I’m tempted to go out with the girls for a nice night out or go to the movies with my husband when we don’t have the money to do so but I am diligent about making this work. If I want to go out with the girls I’ll save up our restaurant money. And if I want to see a movie I’ll go to a matinee and use our entertainment fund. Sure, we aren’t as sporadic but we’ve been great at becoming resourceful and frugal. If we live this way and get ourselves to a more stable financial place then we’ll be able to do a heck of a lot more later!

Since these are baby steps I don’t want to get further down Dave’s list just yet. But I will keep an update every time we hit another step. I mean, it feels too good not to! And if you’re interested in getting on track and want some financial peace I highly suggest checking out Dave’s books and even listening in to his radio show.

Have you started gaining control of your finances recently or have you always been in control? I’d love to hear any tips you have to share!

This post may contain affiliate links.
By using these links you are supporting the Simmworks Family Blog.

Heart Shaped Crayon Valentines {DIY Tutorial}

Crayon Heart Valentines

I first saw the crayon heart valentines on the Family Fun website. I thought they looked adorable but didn’t have a heart mold so I figured I’d just send the regular store-bought valentines instead since I had a few I purchased on clearance a few years back. Then we went to Target and I saw the heart molds in the dollar section of the store and I couldn’t pass up the opportunity. Plus they were all over Pinterest!

So I went to the store, stocked up on a mold and crayons and headed home to do some experimenting. Before I started I did a little research to see what others were saying about the craft. I try not to just jump into a tutorial without reading about it from a few others first. That can lead to disaster (or just make it harder on me since others have found key tips/tricks on making it easier). Once I got the low-down I headed to the kitchen to soak, unwrap, break and bake! And here’s what I did:

Heart Shaped Crayon Valentines {DIY Tutorial}

What you’ll need:

  • 1 box crayons, unwrapped (or left over broken crayons laying around)
  • 1-2 heart molds, choose your size
  • Construction Paper
  • Alphabet stamps OR printer
  • Adhesive dots

What you do: 

1. Place your crayons in a heat proof dish & preheat oven to 250 degrees.

Crayon Heart Valentines 1

2. Heat up some water and pour warm water on crayons (note: do not use boiling water… crayons might melt).

Crayon Heart Valentines 2

3. Let crayons soak for 30 seconds (see what happens when your water’s too hot?). 

Crayon Heart Valentines 4

4. Unwrap crayons (any that didn’t unwrap easily after soaking are set aside and not used).

Crayon Heart Valentines 3

5. Put crayons in a dish and let kids break them up into small, tiny pieces (or put them in a bag and hammer with a kitchen mallet or meat tenderizer until broken up).

Crayon Heart Valentines 5

6. Place heart molds on a rimmed baking sheet and fill with broken crayon pieces.

Crayon Heart Valentines 6

7. Place tray in oven and bake for 15-18 minutes or until crayons are fully melted. Then carefully take out of oven and set aside to harden.

Crayon Heart Valentines 8

8. Once cooled completely pop crayons out of molds and smooth edges by rubbing against a piece of paper.

Please note: The silicone mold may be stained and should only be used for crafts once you melt crayons in them. They are not food safe after used for crafts. 

9. Now’s the fun part! You can decide what you want to do with the crayons once you’ve baked them. I decided to use scrapbooking paper I already had in the house to create a postcard sized Valentine for my son. You can use this printable here for a square valentine with the writing already on the paper or this printable here for a circle valentine (you just have to add your child’s name).

Crayon Heart Valentines

Or you can do what I did and use an alphabet stamp set to customize the sayings you put on each valentine. I simply adhered the crayon to a square piece of scrapbook paper with a glue dot and than layered that onto a larger postcard size piece of scrapbook paper. Then I stamped the sayings I wanted as well as my son’s name to personalize it. You can also have your child decorate the postcard paper by drawing or coloring on it before you stamp out your sayings. You can find more sayings here (as well as more printable options!).

The possibilities and variations really are endless with this craft. And the kids have a great time helping you make them too. Much more personal then a store-bought valentine and twice as cute!

Does your child love to draw?  

Top 10 Gifts for a Three Year Old

Lining a Baking Pan with Foil {Tips and Tricks}

Find out the easy way for lining a baking pan with foil! Plus learn more tips and tricks in the kitchen. 

One tradition we have in our family is a cookie party after the holidays. Every year on the day before the cookie party we make all of the cookies. So I headed over to my husband’s aunt’s house to help out with the cookie baking. Now by cookie baking, I mean cookie baking. Like 8 different types of cookies. Lots. Of. Cookies.

While making the cookies this year we had an oops. We were melting chocolate and it seized. So we had to figure out something to do with it. And I decided to try and make brownies… or so I thought. The “brownies” I made didn’t turn out so well but the tip I learned while making the brownies… priceless!

My husband’s aunt saw me trying to line the pan with foil and quickly showed me this neat trick. Maybe I’m the last one to know about it but I thought I’d share anyway just in case anyone else didn’t know!

Lining a Baking Pan with Foil

  1. Simply turn over the pan and place the foil on the pan. 
  2. Form the foil to the pan.
  3. Take the foil off and turn the pan around. 
  4. Line the pan and make your brownies!


© A Crafty Spoonful - All Rights Reserved
It is OK to use one of my photos provided a link back and/or proper credit is given. It is NOT ok to copy and paste a whole post including instructions. Please do not remove watermarks or alter images in any way. Please contact me with any questions at danielle@acraftyspoonful.com

.