Recycled Portable Snack Container {How-To}

With a love of coffee and creamer comes a surplus of creamer bottles left over once I’ve had a few morning cups. So taking a spin on recycling a bit further, I removed the wrapper over one of my creamer bottles and cleaned it out very well after it was empty.

What resulted was simple recycled portable snack container. And it’s perfect for little hands!

Here’s how to make a Recycled Portable Snack Container: 

1. Grab an empty creamer container.

2. Rinse and wash thouroughly.

3. Remove outer plastic from bottle.

4. Fill up with your child’s favorite small snack.

5. Enjoy a snack on the go!

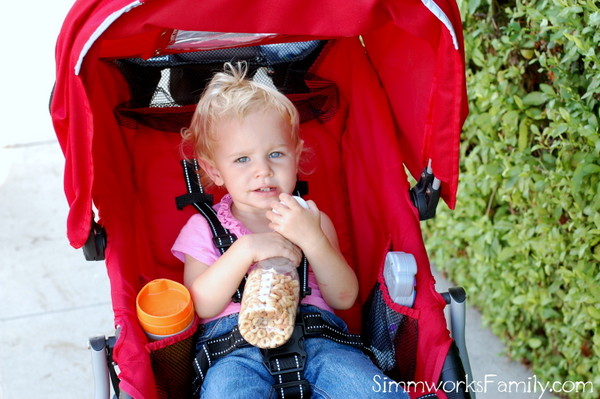
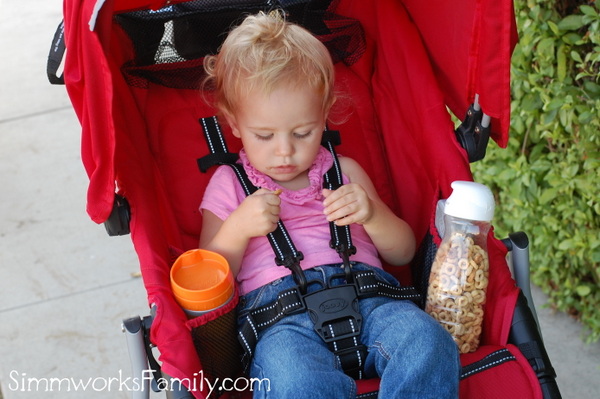
Not only does it fit perfectly in my daughter’s stroller, it also pours out just a few snacks at a time reducing waste and messes. Each time we go out for a run my daughter reaches for her portable snack container so she can enjoy her snack on the go!

What does your child love to snack on? 

How To Turn a Mirror into a Chalkboard {DIY Tutorial}

My baby boy started preschool yesterday.

I still can’t believe he’s old enough! But he’s 3 1/2 and ready to go. He was practically shoving us out the door so he could get to school.

He excitedly grabbed his backpack (filled with a change of clothes and LOTS of dinos) and headed out. But not before I grabbed a few snapshots of him to mark the special day.

The chalkboard I used is something I made. Yup! And it cost me $7 + a can of chalkboard paint. And no, I didn’t use all of the chalkboard paint. There is plenty left for lots more projects. Wanna know how I did it? Here’s how!

How to Turn a Mirror into a Chalkboard

1. Head over to your local furniture store. Check their clearance section to see if they have any cracked mirrors. The one above had a HUGE crack down the center of the mirror and was clearanced at $7. You can’t find frames that inexpensive!

2. Carefully remove the glass by taping the mirror and lightly tapping on the glass with a hammer. Use gloves to remove the glass from the frame.

3. Once the glass is removed, tape the sides of the frame so no paint gets on the wood.

4. Paint a thin coat of chalkboard paint onto the backing of the mirror (ours had a nice piece of chipboard behind the glass)

5. Let dry for 2 hours, or as recommended on the paint can, and reapply another thin coat.

6. Allow paint to dry overnight or until completely cured. Then start coloring!

Thats it! This was such a simple craft that I enjoyed doing. And the possibilities are endless. Peruse yard and estate sales for older mirrors, check out the flea market and thrift shops, etc. Then change up the color of the frames with some spray paint, remove the glass, and start making chalkboards!

DIY No Mess Finger Paint

DIY No Mess Finger Paint

Sometimes having a nice, mess-free craft is fun. And a lot easier on mama! One of the best ways to keep painting mess free is to simply cover up the paint in plastic wrap and let the kids go at it. This no mess finger paint is simple, easy, and, best of all, FUN!

We love that this craft can be done indoors and outdoors so if the weather is bad we have an activity to do that won’t get too crazy. This can also be a great way to teach children about primary colors and what two colors mixed together will make. [Read more…]

Displaying Your Child’s Artwork

Lets face it, our kids love to create. Crafts, art, glitter, paint. It’s all exciting when you’re small.

And sometimes those pieces of artwork, no matter how small, need a place in the home to be displayed. But because of how MUCH artwork can be created, taken home, and demanded to be up, we’ve come up with a few solutions for displaying artwork in a way that isn’t permanent.

So here are a few tips and tricks to displaying your child’s masterpiece.

Framed and Clipped

This is one of my favorite ways to display my kids stuff. All it takes is an empty frame, a butterfly clip and a nail or two. 

Simply hang the empty frame (garage sales are an excellent place to find these on the cheap), add the butterfly clip, and hang whatever artwork your child wants to display. You can easily swap out pictures as frequently as you’d like! And you can even personalize each frame by adding your child’s name inside (or outside) in vinyl letters to create their own space. 


Framed and Matted

We love to make crafts that are specifically for gift giving. One of the first craft projects my son and I made was this adorable footprint heart for Valentine’s Day. To make it extra special and display it in Daddy’s office we framed it in a matted frame to give it more depth. 

We also frame our children’s drawing as well on an “art wall” in our hallway. It helps to use simple frames that we can easily change out the pictures in. Each child gets to choose one piece of art to display all month. It can be a seasonal piece or something they’re proud of.


Framed and Pinned

This frame used to be a mirror. A mirror with a LARGE crack in it. We snagged it at our local furniture store for $7. Such a steal!

Simply put up a few letters to spell out ART and I have a customized large frame to thumb tack any artwork the kids might want to have showcased. Easy peasy!

And if you aren’t lucky enough to score such an awesome deal you can easily put up a large cork board and achieve the same effect.

How do you display your child’s artwork?


DIY Cardboard Seedling Starter {Earth Day Celebration}

In celebration of Earth Day this year I wanted to share a way that you could get the kids involved more in starting your garden. I’ve already posted about releasing butterflies and getting kids involved in gardening so this activity just goes hand-in-hand!

Our family has become quite addicted to gardening over the past year. We were successful in our first attempt this season in our raised bed and are now expanding to the back yard. But since the back yard isn’t quite ready for plants yet we decided to start our seedlings in containers first before putting them in the back yard.

Since we’re a bit frugal we decided to use household items to start our seeds this time around. I grabbed some cardboard, a craft bin we weren’t using, and some left over compost to get started. This method not only proved to be easy but it was a great way to get the kids involved. I can’t wait for them to start seeing the little seedlings sprout!

DIY Cardboard Seedling Starter

What You’ll Need:

  • cardboard tubes
  • shallow container
  • compost or planting mix
  • seeds
  • scissors

What You Do:

1. Cut your cardboard tubes to size. If using paper towel roll cut in 4ths and if using a toilet roll cut in half.

2. Start to fill your container with dirt.

3. Spread the dirt out evenly over the whole container.


4. Using a finger, make a hole 1/4 to 1/2 inch deep in each tube. This will be where the seeds go so read the packaging on the seeds to see how deep you should be planting them.

5. Fill hole with recommended amount of seeds and cover back up.

6. Water well. 

7. Continue to water as directed on the package and allow for adequate sunlight. Depending on the variety of plant your growing, transfer to a larger garden bed when the sprouted plant is large enough (usually 2-3 leaves need to have formed and the plant should be 4-5 inches tall).

Starting from seeds is a great way to reap the benefits of home gardening without the costs of purchasing starter plants from your nursery. Plus, with seeds you get way more than a small plant will yield and you usually end up with multiple plants for a fraction of the cost!

Easter Egg Tips and Tricks: How to Make Egg Decorating Easier

These Easter egg tips and tricks will help make egg decorating with the kids easier! 

This Sunday marks the fourth Easter for my son and the second for my daughter. I’m so excited to share this holiday with them and love watching their joy and excitement as we celebrate the resurrection of Christ with our friends and family.

I try my best to remind them that this holiday isn’t just about chocolate and Easter eggs but sometimes as a parent, I just need to give into the fun and let my kids enjoy themselves. They’re pretty good at it and their excitement becomes contagious.

Easter Egg Tips and Tricks

Easter Egg Tips and Tricks 2

Easter Egg Tips and Tricks

I wanted to pass along some tidbits that I found helpful when it comes to dying Easter eggs. Decorating and dying Easter eggs is probably one of my son’s favorite parts of our Easter celebration and we’ve come across a few great ways to make it easier and more fun for everyone. Some of these tips you might have heard already and others might be new!

Easter Egg Tips and Tricks Oven Eggs

1. Bake eggs in the oven

Are you tired of figuring out the “perfect” way to make hard boiled eggs? Do your shells stick? Do your yolks turn gray? Well, I’ve found the solution to all of your problems! Bake ’em.

That’s right. 

Turn the oven to 325, put the eggs in a mini muffin pan and set the timer to 25 minutes. When the time goes off gently transfer the eggs to an ice/water bath with tongs for 10 minutes and then you’re done. Simple, easy, and fun too!

2. Whisk the Eggs

Putting hard-boiled eggs into a whisk makes egg dying a lot easier for small hands. simply grab a whisk from the kitchen, pop the egg through the wire, and let your child dip away! When they are done with the egg just pop it back out and set it down to dry.

3. Use Natural Dyes

There’s no need to buy commercial dyes when partaking in Easter egg fun. By using a few ingredients that you might already have around the house you can create gorgeous natural dyes for your eggs

A few tips on what you can use and how to dye naturally can be found on Martha Stewart.

4. Get Creative

You don’t just need to use dyes to decorate your eggs! Crayons, glitter, and stickers are great alternatives to dyed eggs. And it can be easier for infants and toddlers to get involved.

You can also use a variety of tools to create different designs on your dyed eggs. Wrap a rubber band around the eggs before dipping, or use some electrical tape to create stripes and designs. You can also use a white crayon to draw pictures and write names on your eggs before you dye them.

For more great tips check out this post on Formula Mom.

Easter Egg Tips and Tricks - use whisk to dye eggs

If you have some tips to making Easter egg decorating more fun I’d love to hear them!

Love these ideas? Here are some more: 

How to Make Dinosaur Party Hats

Find out how easy it is to make a dinosaur party hat with this template and some paper.

When planning my son’s Dinosaur Train birthday party I stumbled upon an Etsy store with printables for everything Dinosaur (you can check them out in detail on her blog). One of the things included in the kit was a dinosaur party hat. 

Since I wanted to make my party unique I opted out of purchasing the kit but I did find a way to make those adorable party hats! I used a template I found from Oh Happy Day for the base of the hat, picked up some cute cardstock from Michaels and got cutting and piecing together. 

Here’s what I came up with! 

This post contains affiliate links. 

Dinosaur Party Hats

What you’ll need:

What you do:

1. Print template onto cardstock (save 1-2 colors for the spikes).

2. Cut out the template by following the solid black lines.

3. Cut out the slit on the template.

4. Roll hat together and place tab into the slit. You may have to bend the top tab a bit to get it to fit. Once the tab is in, lift the top tab again so it doesn’t slide out. 

5. Cut out spikes leaving a 1/4″ space at the bottom of each spike row. 

6. Bend spike row on the bottom at the 1/4″ mark and cut the middle of the spikes to slide into the slot.

7. Tape spikes down from the outside and inside of the hat.

8. Using the X-Acto knife, make a small X on either side of the hat.

9. Place the ribbon or string in each hole and knot on the inside.

10. Decorate the hat more from here or leave as is for the perfect Dinosaur Party hat.

Do you have more ideas to make a party hat perfect?

Love this idea? Here’s some more dino party inspiration: 

Pin this article for later! 

Click the Pin button on the image below to save for later. 


Make DIY Dinosaur Fossils for Your Dinosaur Party

Find out how easy it is to make DIY dinosaur fossils for your next dinosaur birthday party or activity!

When I started planning activities to do at my son’s dinosaur themed 3rd birthday party I knew I had to have something fun that both the boys and girls would like. Since his party was a dinosaur train theme I started scouring the internet for great ideas on crafts my son and I could create together for the party.

After searching around a bit we found a great recipe for do-it-yourself dinosaur fossils! As soon as I showed my son the fossils he was all aboard. And then when I told him he’d have to help make them he quickly ran to grab the measuring cups and flour.

The fossils were a big hit at the party and the kids took turns finding them all over the indoor play place we were at. Then they took all of the fossils to two buckets we had set out and started opening their fossils to reveal tiny plastic dinos inside.

DIY Dinosaur Fossils

What You’ll Need:

  • 1 cup flour
  • 1 cup dirt
  • 1/2 cup sand (play sand works the best)
  • 1 cup water
  • 12 tiny plastic dinosaurs
  • Plastic wrap-lined cookie tray

What you do:

1. Dump the flour, dirt, and sand into a bowl.

2. Pour the water over the dirt mixture.

3. Stir the mixture together until it’s a thick muddy batter-like consistency.

4. Add more dirt, sand, and flour as needed if too liquidy.

5. Let your kids dip in the dinos and coat them well.

5. Place on plastic wrap-lined cookie tray and cover with a little more of the mixture to make sure it’s coated very well. Cover up any parts that may be sticking out.

6. Let the mixture sit out in the sun for a few hours to dry. Once the top side is dry flip each fossil over and let the other side dry completely.

7. Let the kids have fun breaking the fossils apart!

Have you made DIY dinosaur fossils you can break open before? 

Love this idea? Here are some more dino-fun crafts: 

Pin this article for later! 

Click the Pin button on the image below to save for later. 

DIY Cardboard Giraffe Tutorial for Preschoolers

When life gives you toilet paper rolls, make a cardboard giraffe! This simple tutorial shares how you can make your own DIY cardboard giraffe using only a few supplies.

Since I started incorporating Tot School lessons into our weekly schedule I’ve been on the hunt for more and more fun crafts for my kids. I’ve been using Pinterest to keep track of what crafts to make and love being able to choose crafts that pair well with the week’s theme. This week we learned about mammals so I thought this adorable cardboard giraffe would be the perfect craft to make.

My three year old LOVES to paint so whenever I ask him if he wants to do a craft where painting is involved he quickly agrees. I love that this craft not only includes a paint brush to paint but also q-tips to make circles on the cardboard. My son has never used q-tips in his painting and I think this is one fun tool we’ll start incorporating more often! We also used the circles as a counting tool as well. we were able to count each circle we made after we assembled the giraffe. We also got a lot of fun imaginative play out of this craft turned toy.

DIY Cardboard Giraffe

What you’ll need:

  • cardboard tube, paper towel size (about 1′)
  • paint brush
  • yellow paint
  • orange or brown paint
  • q-tips 
  • scissors
  • pipe cleaners (any color)
  • tape or glue
  • stapler
  • black marker

What you do:
1. Have your child paint the cardboard tube with the yellow paint. Make sure it’s completely coated. Let dry. 

2. Once the yellow paint has dried grab the orange paint and some q-tips.

3. Let your child dip the q-tips into the paint and start to dot the yellow cardboard. Don’t be alarmed if they start drawing lines instead of dotting. It’s all fun!

4. Let the orange dots dry. Once the paint is dried cut out four lines on one side of the cardboard. Then shape those four sections into the giraffe’s legs.

5. On the opposite side cut out a large U. The leftover portion of this side of the cardboard will be the neck of the giraffe. Take each open side and curl them into one another. Glue or tape closed.

6. Take the leftover cardboard from the U and roll it into a cylinder.

7. Glue or tape the cylinder closed. Flatten the cylinder and cut a V into one side.

8. Take the pipe cleaners and roll up one side to create the horns of the giraffe. Slide the horns into the cardboard slots and close with glue or tape. Let dry if glued. Bend cylinder at the base of the horns to get them to stick up.

9. Attach the head and horns onto the neck with tape or a stapler. Draw eyes and nose slits on the cylinder to personalize your giraffe.

10. Give your giraffe a name (or allow your child to name it) and start playing. Have fun!

The first thing my son did when we finished his giraffe was to take it out to play in the grass. The giraffe loved eating all of the grass he offered it. If you make your own DIY cardboard giraffe, please make sure to share a photo with us on our Facebook page

Have you made any cardboard animals? Which is your favorite? 

Love this idea? Here are a few more: 

Pin this article for later! 

Click the Pin button on the image below to save for later. 

Gardening with Kids

Gardening With Kids

Since we started our garden in November we’ve been trying to find more and more ways to get the kids involved in tending to it.

I’ve found that by including them in the process they’re not only more willing to actually eat what we harvest, they also are less tempted to start playing in the garden with trucks, balls, dinos and airplanes.

Those get left in the sand box where they belong! Below are a few ways to get your kids involved in the yard whether it be tending to an edible garden or picking the weeds in the flower bed.

[Read more…]


© A Crafty Spoonful - All Rights Reserved
It is OK to use one of my photos provided a link back and/or proper credit is given. It is NOT ok to copy and paste a whole post including instructions. Please do not remove watermarks or alter images in any way. Please contact me with any questions at danielle@acraftyspoonful.com

.