Peppermint Holiday Ornaments

Peppermint Holiday Ornaments - easy to make and fun to display!

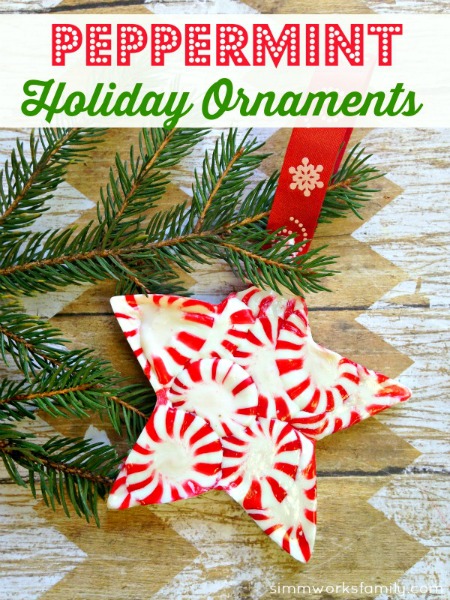
Are you looking for a festive and frugal ornament idea? Then why not give these melted peppermint holiday ornaments a try?

Using just a few crafting supplies, you can make your own, perfect for decorating your tree or for gift giving. Here is how you can get started crafting a set for yourself! [Read more…]

15 Santa Crafts

15 Santa Crafts - fun santa crafts to do during the holidays with or without the kids

‘Tis the season, for SANTA CRAFTS! I love love love doing Christmas crafts, so of course I have been on the look out for some cute Santa crafts, and boy did I find some. Below is a list of the CUTEST Santa crafts! I mean who would have thought, Santa hat chair covers?

Well obviously someone thought of it, and they super cute! I want them in my kitchen, like right now! From gifts to décor this list has it all! Enjoy and be sure to tell be below which ones you plan to try! I am thinking Santa hat chair covers, followed my Santa suit hand towels!

Merry Christmas and happy crafting!

 15 Santa Crafts

  1. Salt Dough Santa Ornament 
  2. Santa Treat Box (PICTURED)
  3. Santa Hat and Beard (PICTURED)
  4. Santa Stocking Holder (PICTURED)
  5. Santa Belly Jar (PICTURED)
  6. Santa Slime
  7. Santa Wreath
  8. Santa Footprints
  9. Santa Hat Decor
  10. Santa Gift Jar
  11. Santa Suit Hand Towels
  12. Santa Gift Bow
  13. Christmas Countdown Santa Printable
  14. Santa Hat Chair Covers
  15. Rudolph and Santa Ornaments

DIY Cricut Christmas Leaf Wreath Tutorial

DIY Cricut Christmas Leaf Wreath Tutorial

December is finally here and that means Christmas is literally weeks away. I love to decorate my home using my Cricut machine and being able to add such personality into my project is always a plus.

Today I’m sharing this DIY Cricut Christmas Leaf Wreath tutorial using a variety of Glittered Paper and Christmas Paper. Not only is it super easy to make, but it’s also one of the free designs that can be found in Cricut’s design space.

Hang it on a door, a wall or even the fridge and watch your guests stop and ask where it came from. This project was affordable and best of all so easy to make it’s even great to get the kids involved. Hope you really love this tutorial and will venture off to make your very own. It’s perfect for any place in the house! [Read more…]

Fall Harvest Table Centerpieces

review affiliate link disclaimer

Fall Harvest Table Centerpieces

It is Thanksgiving weekend and in just a few days we’ll be sitting around the table at my brother-in-laws house enjoying a wonderful meal with family. But that doesn’t mean I don’t create fall harvest table centerpieces at home as well.

I love creating a festive feel in the home and enjoy coming up with fun ideas to share the holidays with my family. I always look to the table centerpiece and mantel as my creative outlet to explore fun ideas during the change in seasons.  [Read more…]

Quick and Easy DIY Bats {Simple Cricut Vinyl Projects}

Quick and Easy DIY Bats - Simple Cricut Vinyl Projects

When I was asked to test out the new Cricut Explore I don’t think I waited a few seconds before responding back with a resounding YES. One thing I love about the Cricut Explore is how simple and easy it is to use.

Making simple Cricut vinyl projects like these bats makes holiday decorating a breeze. I simply look up the images I want to cut out in the design space and add them to my template. Then I load the machine and off I go!

[Read more…]

DIY Birdhouses – Turning Inspiration into Reality

Easy DIY Birdhouses for Kids

About a year ago we started our house search by heading out to a few model home tours. We were trying to gauge how much we’d be able to get with our budget but we were also looking for home decor ideas as well once we did move into another home.

While at one of the model homes we saw some adorable birdhouses on posts that I knew I wanted to replicate once we found our home. So I grabbed a photo, showed to my husband, and he got to work using our new Arrow Fastener staple gun we received for review to finish everything off.

DIY Birdhouses inspiration

While our birdhouses aren’t on posts, my husband just added some platforms on our fence for our pumpkins for Halloween. After building the birdhouses with the kids (my son loves helping out in any way he can) we perched them on top of a few of the platforms.

This was a great project that we got the kids involved with and we can’t wait to figure out what the next project will be.

Our master plan? To make various birdhouses in different designs to go on the rest of the platforms once Halloween has passed. What do you think?

Easy DIY Birdhouses for Kids - birdhouses on the fence

DIY Birdhouses

What you’ll need: 

  • 3 boards of 6′ x 8″ cedar fence board (dog eared top is ok)
  • 1 – 1/2″  wooden dowel
  • 1 roll 10″ aluminum flashing
  • Snips for cutting metal
  • wood glue
  • 1″ or bigger brad nails/or an Arrow electric brad nailer
  • table saw (makes it easier for some cuts, but only required for making shingles)
  • A couple of packages of wooden shims (for shingles if no table saw)
  • jig saw
  • 2 1/4″ hole saw and a drill
  • Arrow T50 stapler
  • T50 9/16″ Arrow staples
  • T50 3/8″ Arrow staples
  • Behr paint stain samples (in colors of your choice)
  • foam brushes
  • chip brushes

What you do: 

Easy DIY Birdhouses for Kids - measuring and cutting

1. FRONT/BACK: Use the provided templates below as a guide. Take one of the fence boards and lay it down flat on a table. Start at the bottom of the board, use a ruler and pencil and sketch out the shape of the front of the bird house on the board.

At the top of the sketch, cut the board straight across so you have a piece that only needs the angles cut out to complete. Take this cut piece and lay it on top of the remaining longer piece.

Clamp or temporarily screw the pieces together so that you can cut out the front and back pieces in one shot. Use the jig saw and follow the lines. You should now have the profile of your bird house cut.

Easy DIY Birdhouses for Kids - tip cutting wood

SIDES: Now cut two simple rectangles to form the sides and connect the front and back pieces. The profile of the bird house will determine the height of the side. The width should be about 4″. This width will allow your roof to overhang the sides later.

ROOF: Take a fence board and measure 8″ from the end. It generally will look better if you make this cut with an angle on it so you get a nice tight peak. It does not have to be exact. Take your jig saw and set it to about 30 degrees for template 1 and 25 degrees for template 2. Make the cut. Set aside the piece you just cut and return to the left over board. From the cut end with the angle on it, measure 9 1/4″. Return the saw back to 0 degrees and make the cut.

DETAIL: Template 2 has a simple cut out affixed to the front for some extra dimension. Just trace out the design on another piece and cut it out with the jig saw. To make the small roof detail on this piece, use the same technique for making the roof. The width on these pieces is only 1″. Adjust the length to what you feel looks best. Template 1 has some trim applied. It is approximately 1/2″ X 1/4″ wide. A table saw was used to make these, but you could use the jig saw to carefully rip a 1/4″ (x 24″) off the edge of a fence board to end up with 1/4″ x 3/4″ pieces.

SHINGLES: Optionally you can go the extra mile and cut out approximately 60 shingles.

  • Option 1- If you don’t have a table saw you might consider using a pack of wooden leveling shims and cutting them down.
  • Option 2- Using the table saw rip three pieces the full length of the board to 1 1/2″ wide. Next, take the three pieces you ripped and turn them on their side (the short edge should be down on the table). Adjust the blade so that it is about 1/4″ away from the fence. Run the pieces through so that you are splitting them in half. You then have 6 – 1/4″ x 1 1/2″ strips. Stack then together and start cutting them into 2 1/2″ x 1 1/2″ “tiles.” If you don’t have a table saw you might consider using a pack of wooden leveling shims and cutting them down.

Birdhouse Template #1

Birdhouse Template #2

Easy DIY Birdhouses for Kids - measuring

2. Assemble birdhouse pieces with wood glue and brad nailer

Easy DIY Birdhouses for Kids - assemble and sand

3. Sand birdhouse smooth

Easy DIY Birdhouses for Kids - drill circle opening

4. Using hole saw, drill hole for opening

Easy DIY Birdhouses for Kids - stain tipEasy DIY Birdhouses for Kids - stain birdhouses

5. Using Behr paint stain samples, let kids stain the houses. Use different stains for the trim to allow it to pop.

TIP: To save a little money and play with multiple colors check out the Behr paint stain samples at the Home Depot (this is the only place we’ve found them so far). You can have them tinted to any Behr paint stain color. And you don’t have to pay $15+ for a quart of stain! We do the same thing with small paint samples for other wood craft projects.

Easy DIY Birdhouses for Kids - measuring shingles

6. Gauge the length of the shingles and trim you want to use and cut to size. (shingles and trim are whatever you prefer – our shingles were 1 1/2″ x 2 1/2″)

Easy DIY Birdhouses for Kids - staple shinglesEasy DIY Birdhouses for Kids - hammering staples

7. Using Arrow Fastener stapler, staple shingles to roof of birdhouse from the bottom up. Use a hammer to assure staples are flush with wood.

Easy DIY Birdhouses for Kids - painting shingles

8. Paint shingles in a contrasting color stain.

Easy DIY Birdhouses for Kids - add metal peakEasy DIY Birdhouses for Kids - hammer metal straight

9. Measure and cut aluminum flashing to size to cover peak of houses. Secure with Arrow stapler and hammer into shape.

Easy DIY Birdhouses for Kids on the fence

10. Drill a 1/2″ hole under the large hole for dowel perch. Add wood glue to one end of the dowel and put into hole. Once dry and secure, place birdhouses onto platforms and wait for birds!

Do your kids love building with wood?

Candy Corn Inspired Tablescape + a Starburst Wrapper Napkin Ring Tutorial

This shop featuring a Candy Corn Inspired Tablescape plus a Starburst Wrapper Napkin Ring Tutorial has been compensated by #CollectiveBias, Inc. and its advertiser. All opinions are mine alone. #SweetOrTreat 

Candy Corn Inspired Tablescape + a Starburst Wrapper Napkin Ring Tutorial

Fall is FINALLY in the air (it was actually 65 this morning when I dropped the kids off!) and that means I’m ready to bust out the Fall and Halloween decor to get the house ready for the kick off of the holiday season.

It doesn’t matter that it’s still 80 degrees in the afternoon. It’s time to push Summer aside and welcome Fall with open arms.

Last year I made these candy corn candles so this year I wanted to create a full tablescape inspired by them. [Read more…]

Back to School Organization with Sight Word Ideas

Check out these sight word ideas for back to school organization. A great way to help kids get organized and learn their sight words! 

Back to School Organization with Sight Word Ideas - organize your homework area and help your child recognize sight words

With my son going into Kindergarten in two weeks exactly, I wanted to spruce up the homework station I created for him to be more kid-friendly. Since he’ll be learning a few sight words this year I thought I’d help him out by labeling all of the organizational bins I have in his homework station with the name of what’s in the bin.

I didn’t want anything too boring like a printed label though. I wanted bright signs that would grab my son’s attention so I headed over to Staples to grab some fine point and extra fine point Sharpie markers.

If you know me you know I can’t resist a good sale on school and office supplies. So when I was our Sunday paper with my husband and ran across the Staples ad I got excited when I saw that Sharpie markers were on sale! I couldn’t stock up fast enough.

Back to School Organization with Sight Word Ideas - supplies

After a quick shopping trip, I had all I needed to start organizing my son’s homework station.

When shopping around Staples I found some great items to help me with my project. Here’s what I ended up picking up:

  • 12 Sharpie® Fine Point Permanent Markers 
  • 12 Sharpie® Ultra Fine Point Permanent Markers 
  • Sharpie highlighters
  • Book rings
  • Index cards

Back to School Organization with Sight Word Ideas - cut index cards

Once I had all of my supplies I got to work! Wanting to keep things simple so that my son could help me, I simply cut the index cards in half and used each half as a label.

Then I wrote down the name of what was in each bucket in his homework station so that I could label them.

Back to School Organization with Sight Word Ideas - make labels

Once I had all of the labels written out I let my son hole punch the labels and put the book rings through the hooks.

Then I grabbed the bins with holes and let him clip them on. Once those were up we taped the labels to the bins without holes.

Back to School Organization with Sight Word Ideas - punch holes in cards

The whole project took less than 30 minutes and already my son is asking me what each bin says. He can’t wait for kindergarten (and neither can I)!

I just know that this next year will bring a lot of change. I’m just glad I can provide him a space to do projects, create, and work on homework with me near by.

With the help of awesome deals at Staples, our Homework Station is now 100% complete for the school year! And my son will start learning a few new sight words.

Back to School Organization with Sight Word Ideas - labeled bins

Do you use sight words around the house for your child?

Love this post? Find more back to school ideas: 

Pin this article for later! 

Click the Pin button on the image below to save for later. 

How to Create a DIY Homework Station for Less

Creating a DIY homework station isn’t hard. In fact, you don’t have to spend a lot of money to do it! This post featuring a DIY homework station is brought to you by Dollar Tree.

How to Create a DIY Homework Station for Less

With my son starting kindergarten in September and the horror stories I’ve heard of the piles of homework that now get sent home with kindergartners I thought it’d be a good idea to create an easy DIY homework station for him to do his work and projects.

Since we now have an office in the new house I made sure to include a desk space in there for him to share with me and his father. Then we got to organizing and finding storage. [Read more…]

DIY Pencil Holder

DIY Pencil Holder

Summer is right around the corner! And what does that mean? School is coming to an end for another year. Why not do something special for your child’s teacher this year and let your child create an awesome gift to give to them on the last day of school?

This pencil holder is not only easy to make but versatile as well. You can easily exchange the craft sticks for pencils, crayons, etc. Whatever you have extras of at home. And the holder doesn’t have to just be for pencils! You can even include a little treat or a gift card for your child’s special teacher.

While we were making this craft together my son worked on his colors, letters, and sorting! So not only was it fun to make, it was educational too! What teacher wouldn’t love to hear that? [Read more…]


© A Crafty Spoonful - All Rights Reserved
It is OK to use one of my photos provided a link back and/or proper credit is given. It is NOT ok to copy and paste a whole post including instructions. Please do not remove watermarks or alter images in any way. Please contact me with any questions at danielle@acraftyspoonful.com

.