Tissue Paper Jack-O-Lantern Preschool Craft

Tissue Paper Jack-O-Lantern

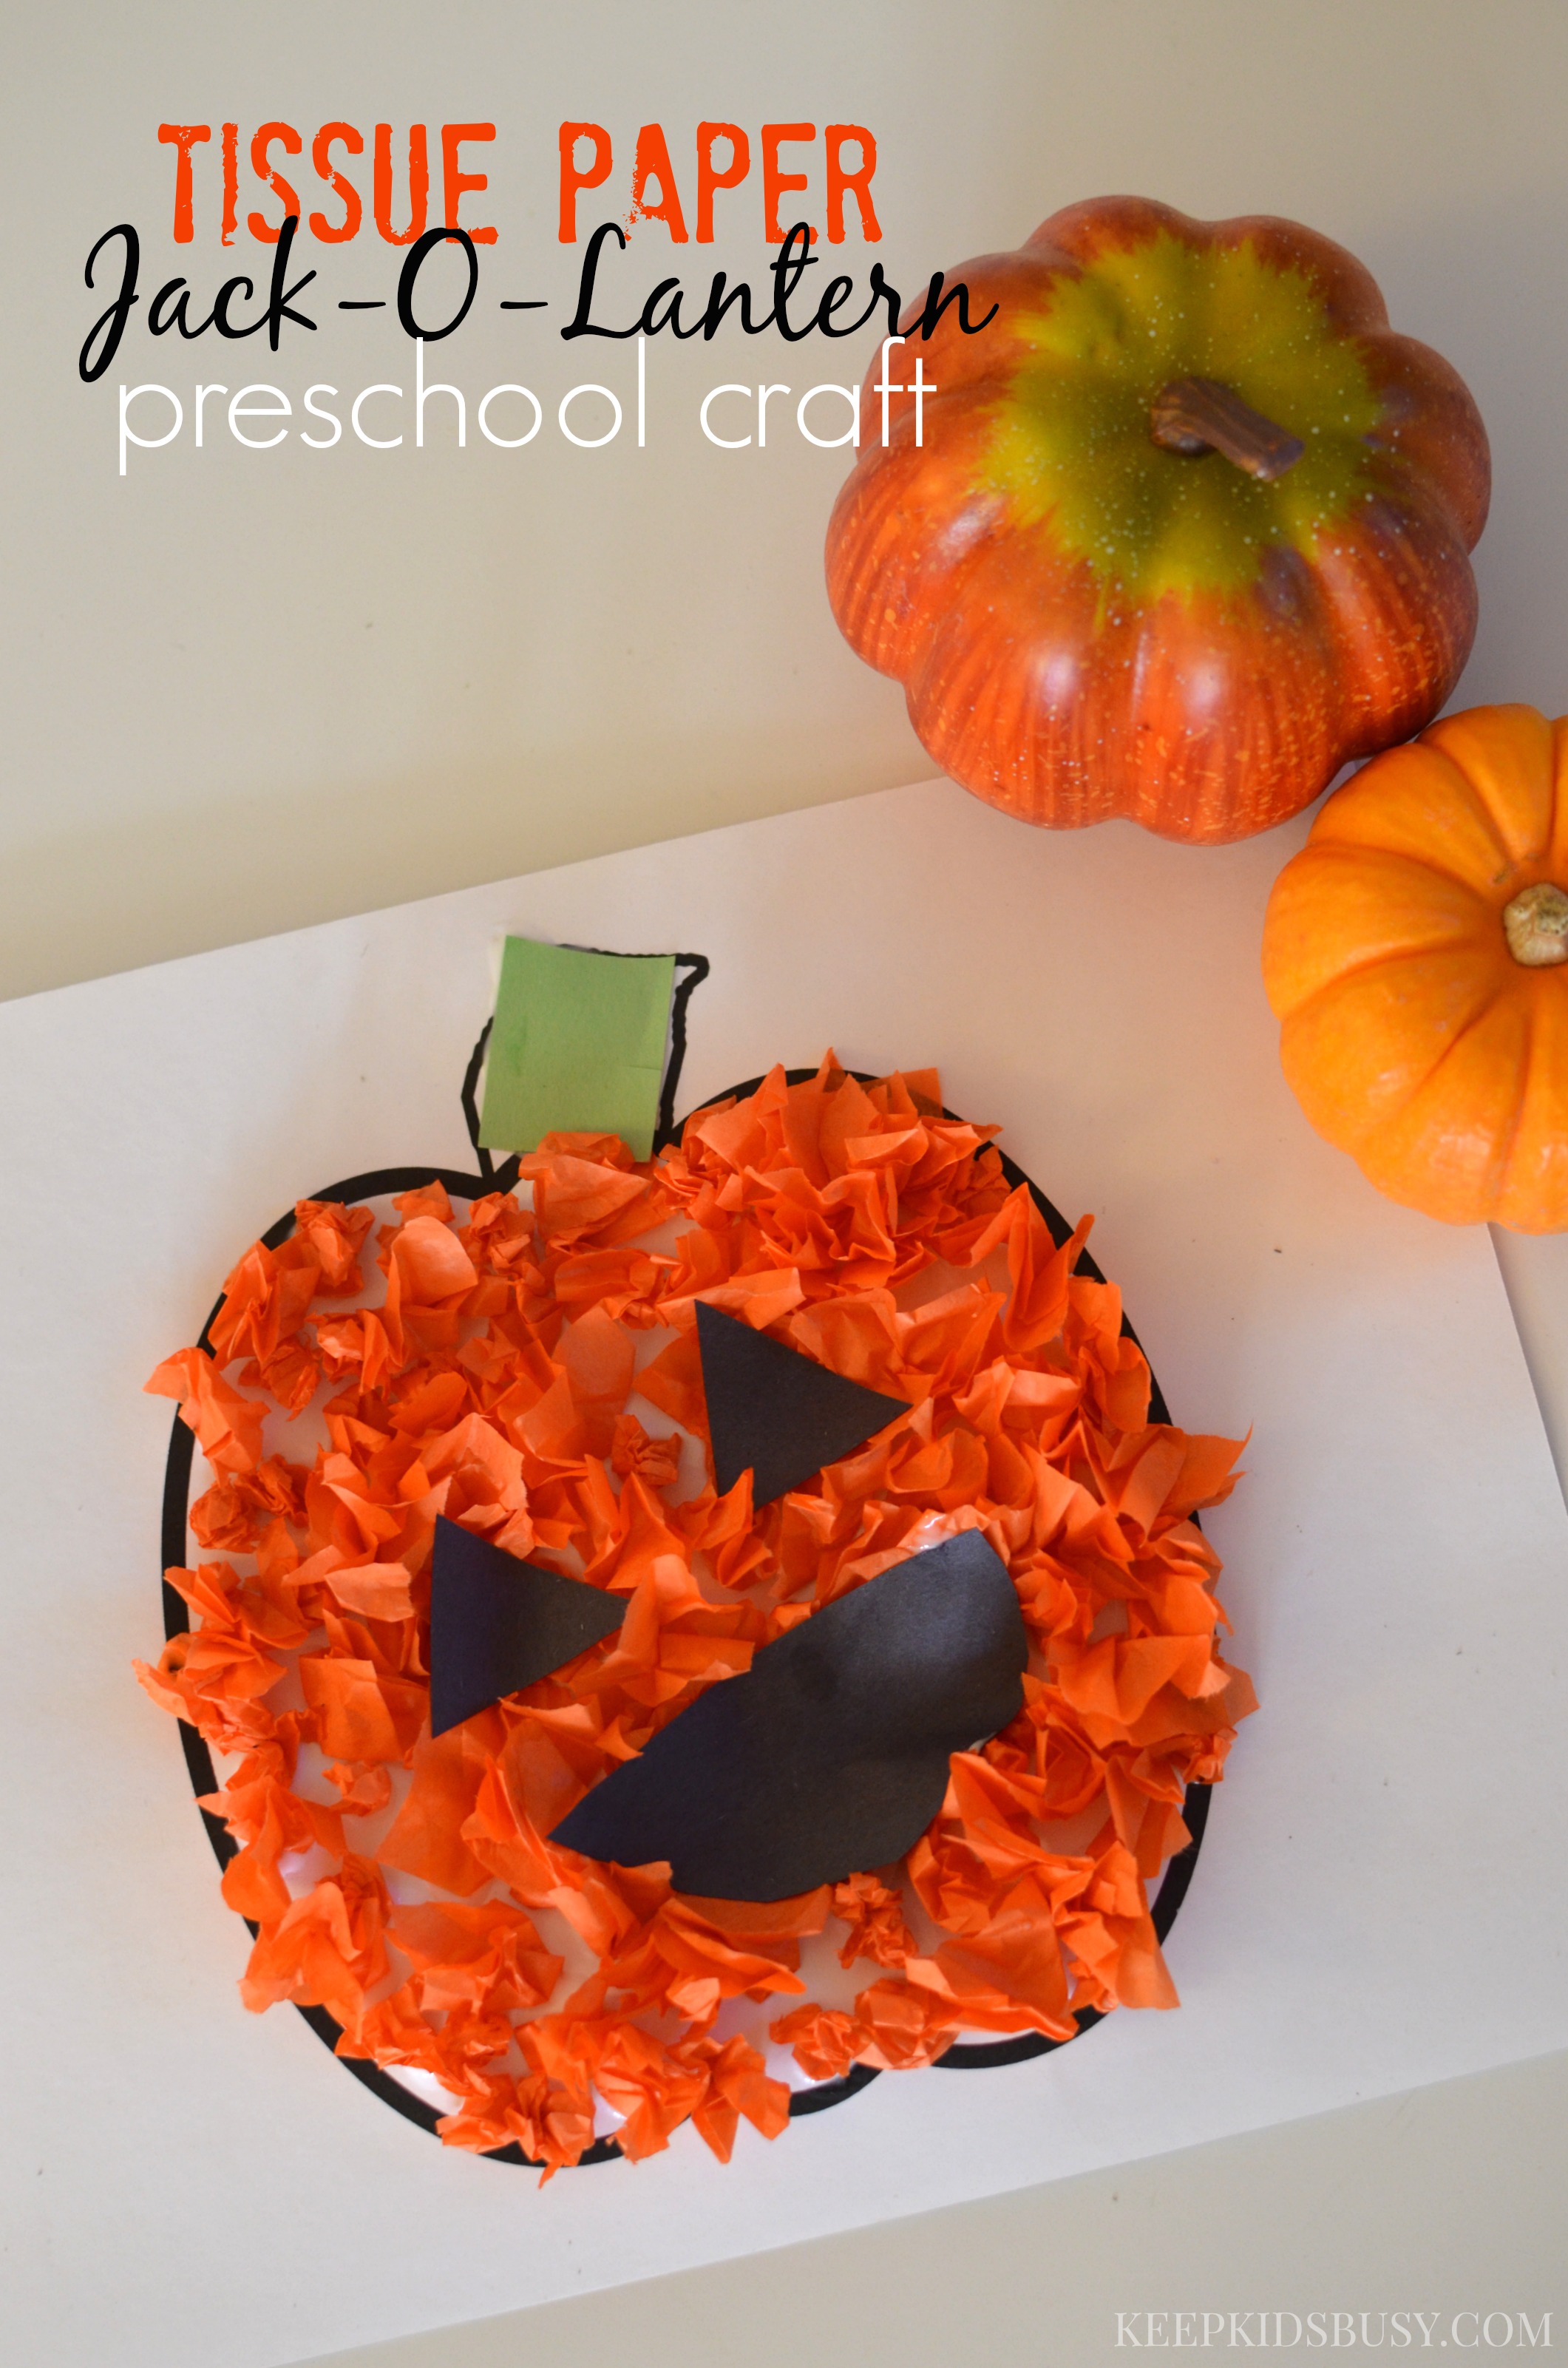
With Halloween right around the corner, these tissue paper jack-o-lanterns are a fun and easy project to do with any preschooler. It combines quite a few different skills including cutting, staying in the lines, and gluing the paper down.

This craft is very similar to the paper plate pumpkin we made. We’ve been working on fine motor skills and the steps taken to make this craft definitely helped her practice those skills. Plus, the kids love crafting with glue!


TISSUE PAPER JACK-O-LANTERN
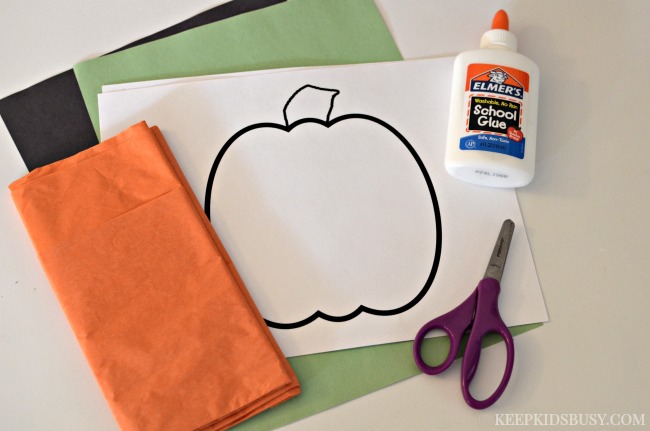
What you’ll need: 

  • Pumpkin template
  • orange tissue paper
  • 1 sheet black paper
  • 1 sheet green paper (or a scrap)
  • scissors
  • glue

WHAT YOU DO:

1. Cut one piece of tissue paper into 1″ squares. Set aside.

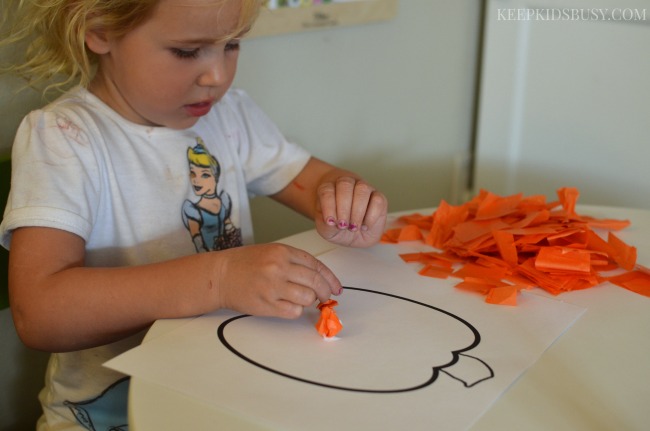
2. Grab the glue and squeeze little dots a few at a time in clusters.

3. Ball up tissue paper and place on a glue dot. Repeat steps 2 and 3 until whole pumpkin is covered with orange tissue paper.

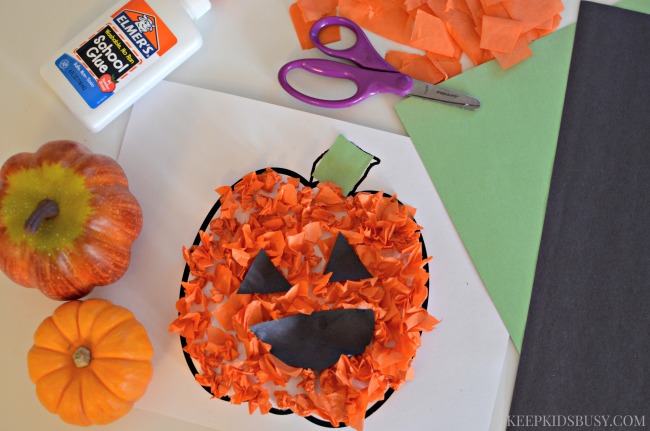
4. Cut out eyes and a mouth for the jack-o-lantern out of black paper and glue to top of pumpkin to create your jack-o-lantern.

5. Cut out a stem for the jack-o-lantern out of the green paper and glue on.

Tissue Paper Jack-O-Lantern Preschool Craft

My daughter had a blast with this craft and loved practicing her cutting skills, gluing the paper in the lines, and learning what the difference between a pumpkin and a jack-o-lantern are.

She’s already asking what her next craft will be. I guess I better start brainstorming!

HOW DO YOU WORK ON FINE MOTOR SKILLS?

10 Best Kids Costumes to Make On A Budget

So you want to make your child’s costume this year but you don’t want to spend a whole lot? Don’t worry! We have you covered with these 10 best kid costumes to make on a budget! 

Making your child’s costume does not have to be a daunting task. In fact, I’ve made at least one homemade or semi-homemade costume for each of my kids every year. Now that doesn’t mean that they always end up wearing it, but it does mean that I’ve had at least 8 years experience in DIY halloween costumes for kids. And I’ve found that the less expensive costumes tend to end up being the easiest and more fun costumes of the lot! 

Below are a few great tutorials on the 10 best kid costumes I’ve found including two of our top costumes for my oldest. But I’ve also included a link to the other DIY homemade costumes we’ve done in years past at the end of this post in case you don’t see something you want below. 

The biggest thing to remember when tackling a DIY costume is to keep it simple. If you don’t sew regularly, don’t choose something you’ll have to sew! That’s why they created no sew glue. And if you don’t have a huge budget, or no budget at all, rest assured that there are a ton of different supplies you can find right inside your home (or closet) already! Ok, enough of that… here are some awesome DIY kid costumes for you to check out! 

Now to get my kids to actually decide on a costume idea without changing it 10 times after I already start in on it…

10 Best Kids Costumes to Make On A Budget

DIY Dinosaur Costume from Simmworks Family

DIY Inexpensive Octopus Costume from Simmworks Family

DIY Star Wars Costumes – Jedi and Princess Leia from Mission to Save

Dr. Seuss Cat in the Hat & Thing 1 and Thing 2 Costumes from Mission to Save

Football Themed Family Costumes from Bare Feet on the Dashboard

Easy Greek Goddess Costume from Uncommon Designs

Easy $3 Medusa Costume from SlapDash Mom

DIY Peacock Tutu Tutorial from 365 Days of Crafts

Mermaid Costume (with a No-Sew Version) from Creative Green Living

No-Sew Pirate Costume from Artsy Momma

What are the best kids costumes you’ve seen recently? 

Like this post? Read more! 

Pin this article for later! 

Click the Pin button on the image below to save for later. 

Leftover Halloween Candy Blondies

This post featuring Leftover Halloween Candy Blondies originally appeared on our site on November 6th, 2012

Leftover Halloween Candy Blondies

With Halloween past us, the one thing I needed to do was get rid of all of the leftover Halloween candy. Especially the ones I loved… anything containing chocolate. So we went with a simple plan. We were going to turn our chocolate treasure into new, yummy treats to share with our friends and family.

This year we had not one but two trick-or-treaters and let me tell you that two adorable children in costumes are magnets for the good stuff. Yes, look at our score of yummy chocolate candies! 

So I had to act fast and turn the above into something I could giveaway as a homemade goodie bound to attract attention and hungry mouths no longer wanting holiday candy. Good thing our extended family loves sweets! It took less than 2 days for the whole batch of blondies to be completely demolished. A few crumbs left in their place. And oh were they worth it!

If you’ve never heard of or made blondies before, think of them as the brownies’ distant cousin. Still ooey gooey but without the cocoa. You can basically put just about anything into a blondie. They’re a great catch all for any ingredients you have on hand and want to combine. We stuck with the Snickers, Reeses peanut butter cups, and Baby Ruths for these blondies. The m & ms are earmarked for cookies and the rest will be taken to work by my husband.

If you have any leftover candy in your cupboards or on your countertop you should definitely try to make these delicious bars of gooey goodness. 

Leftover Halloween Candy Blondies

Leftover Halloween Candy Blondies

Ingredients

  • 1 cup butter, almost melted
  • 1 cup brown sugar
  • 1 egg
  • 1 teaspoon vanilla
  • 1 pinch salt
  • 1 cup flour
  • 1 cup diced candy bars

Candy Blondies Ingredients

 Instructions

1. Preheat the oven to 350. Grease an 8×8 baking pan. Cut up candy bars.

2. Cream the butter and brown sugar until light and fluffy

Candy Blondies sugar and butter

3. Add in the egg and beat until well combined.

4. Add vanilla and salt and mix again.

5. Take bowl off stand mixer. Fold in flour until just combined.

6. Fold in candy bar pieces until just combined.

7. Spread mixture into pan and cook for 20-25 minutes or until crust is golden brown.

8. Let cool in pan for 5 minutes.

9. Turn onto a wire rack and let cool completely before digging in.

10. Cut into squares and serve.

Makes 16 servings

If you’re like me and cant wait to dig in, grab a small piece from the edge and enjoy it’s yummy gooeyness while everything’s still warm and hasn’t set. You’ll be glad you did. Then enjoy the rest when it’s cooled completely to enjoy the full effect of the melded flavors and crisp edges.

Do you have a great recipe for leftover Halloween candy?

I’d love to hear it!

Fall Festivities + Firsts in October

© Danielle Simmons

October in one word was exhausting. But a good kind of exhausting. Not only was it filled with the fun planning and executing of the Fall Festival but it was also filled with our traditions as well. My favorite? Bates Nut Farm. And the only reason why I love it? The photos.

I know if I go 1/2 an hour earlier than they open, we can get our photos taken, pumpkins picked out, and we can check out as soon as they open. Then we let the kids have fun on 1-2 rides (hay ride, corn maze, or the inflatables), grab some treats from the store, and head back home. This time we let the kids check out the animals too.

I have to admit that I almost didn’t want to go this year. But my husband said we had to. Because it’s Norah’s first Halloween and she needed her pumpkin pictures. Yeah, I was definitely glad he made a point to schedule it into our busy October weekends as I edited the photos. I already want enlargements of a few, including the one of all three of them in the field. What do you think?

© Danielle Simmons © Danielle Simmons

What I love most about our trips to the pumpkin patch is the sheer excitement our kids exude as they run from one end of the patch to the other. They love exploring the grounds, finding all of the smashed big pumpkins, and seeing the guts everywhere. Then Ethan rushes to find his perfect pumpkin while Molly takes her time picking the perfect one. And Norah. Norah just loved being able to get on the ground and climb on and around them, patting them as she went. She loved the hollow thud they gave as she pounded on them and stood up on them.

© Danielle Simmons

Every year Ethan asks us if we can get a huge pumpkin. And we’ve been able to appease him with a few smaller ones instead. But I’m thinking one year we may need to give in and get a huge pumpkin for him. Just one year, right? As long as he guts and carves it. This year he opened up, gutted, and carved his own pumpkin from start to finish so I think he may be ready next year. We’ll see!

© Danielle Simmons © Danielle Simmons © Danielle Simmons

I’m sure I’d get a lot of use out of it. The chickens sure do love the guts and seeds we pulled out of the two we carved. Now we went home with plans to carve three. For each kid. But because it was so late when we ended up carving, we only got through two before we were done. We had plans to carve Norah’s on Halloween but it just didn’t happen. She’s none the wiser and I’m sure had more fun trying to “help” her siblings by pulling the guts down every time she could get her hands on them.

© Danielle Simmons

Costumes this year were easy. I found a Batman shirt at Target after we went to Bates and was able to order a mask right there in the store off Amazon. I also figured out the easy way to add things to the kids Christmas lists while we were in the toy aisles. Talk about convinient!

When I first asked Ethan what he wanted to be he told me a Minecraft spider. So I saved two square boxes with plans to paint and glue up a storm until I had a Minecraft spider costume. And Molly decided she wanted to be a fairy and use what she had in her dress up box already. Then both changed their minds. During the same Target run, I picked up a creeper sweatshirt for Ethan and some green pants (he always needs pants) and a Minecraft shirt as a back up costume because, well, I know him. And I’m glad I did because after I put some hours into crafting his costume he ultimately decided it was too hot and wanted to wear his sweatshirt and pants.

Molly went through three different costume changes the Friday before Halloween getting ready for her school party. She wanted to be a fairy, then she wanted to be a butterfly (I already had the costume) then she wanted to be a ballerina (again). Then 5 minutes before we needed to leave for school she decided she wanted to be Sheriff Callie. Um… I’m good but I’m not that good! She ended up wearing the fairy wings she already had with a dress we grabbed at… you guess it, Target. Later that day she weaseled a full fairy outfit out of her Aunt Louise. I’m assuming they got the pieces from Dollar Tree and she couldn’t be happier with them come Halloween night.

Simmworks Halloween 2015 © Danielle Simmons

“Say Cheese”

Halloween 2015 Outtakes © Danielle Simmons

Someone wasn’t interested in photos. She wanted to go trick or treating already!

We walked down the street by our house and hit about 6 houses before both kids wanted to turn back and go home. But Aunt Helen wanted to check out the decorated house she saw while driving over to our house so we went to one more. Molly was NOT pleased with the decor. I think Ethan liked it.

© Danielle Simmons © Danielle Simmons© Danielle Simmons

I was able to get them to go to 1-2 more homes on the other side of the street as we headed home but once we reached our house, Ethan was done. Molly helped pass out treats to the kids coming up to out house and then decided she wanted to go out one more time. Sans wings. So my husband grabbed the wagon, I grabbed Norah, and we left Grandma Ann to pass out candy again while Ethan was inside playing Minecraft.

We got another street covered and came back home. Passed out candy some more. Molly ate more candy. Then she decided to go out one last time with me. I left Norah and the wagon with Daddy and we headed out in another direction. This time it was a bit later and there weren’t as many people around so she scored big at just about every house we went to.

The next morning Ethan had no candy left and Molly had plenty. I’m sure he’ll be able to convince her to share more with him come tomorrow. Oh, and just to prove I did make him his Minecraft spider, here’s a photo of him after school on Friday with everything assembled.

Minecraft Spider © Danielle Simmons

I’m sure November will be just as crazy but for now I’m enjoying a little peace and quiet. Happy Halloween!

How was your October?

Last Minute DIY Octopus Costume

This easy DIY octopus costume is made with fun finds at our local dollar store. Total cost of the project? $5!! And it came together in less than 30 minutes. 

DIY Octopus Costume - a quick and easy costume you can make for as little as $5 with the help of Dollar Tree

Two weeks ago my family and I were invited to take a peek at Sea World San Diego’s Halloween Spooktacular. Since the invite suggested having our kids dress up in their favorite sea-inspired costumes I knew I would have to get creative.

So the night before the event – yeah, I know… last minute – we headed out in search of supplies for a cool sea costume for my son and daughter. After snagging an Ariel costume at another store for my daughter we headed over to Dollar Tree to see if anything caught our eye.

While there we saw many fun things to use in our costume in the toy aisle, we eventually settled on a simple and easy DIY octopus costume made out of a Dollar Tree shirt and Dollar Tree fuzzy socks. We walked out of the store only paying $5! How awesome is that?

Here’s how we did it:

DIY Octopus Costume at Sea World

DIY Octopus Costume

What you need:

  • 1 Dollar Tree shirt (any color)
  • 4 pair Dollar Tree fuzzy socks (any color/pattern)
  • Black and White felt for eyeballs
  • wash cloths or microfiber shop towels
  • needle & thread

DIY Octopus Costume Dollar Tree suppliesDIY Octopus Costume suppliesWhat you do: 

1. Grab the socks and stuff one washcloth/towel into each sock.

DIY Octopus Costume stuff socks with towels

2. Cut out felt eye balls and sew pupil onto whites. Then sew the eyes onto the shirt 1/2 way down (you can put the shirt on your child and see where the eyes would best fit).

DIY Octopus Costume cut out felt eyes and sew onto shirt

3. Sew stuffed legs onto the bottom hem of the shirt. Make sure to reinforce your stitches by going over them twice so the legs don’t fly off after a night of fun trick or treating!

DIY Octopus Costume sew legs onto bottom of shirt

That’s it! Now your octopus costume is complete! How easy was that? And it takes under an hour to make. If you have sewing skills and prefer to use a sewing machine it’d be even faster!

Too bad my sewing machine is hidden beneath boxes still in the garage… maybe next year!

If your little one would prefer a hat to complete the costume or would like to be a squid instead, consider picking up a beanie hat at Dollar Tree or sewing a felt squid hat in the same color as the shirt.

DIY Octopus Costume

What will your little one be dressed up as for Halloween?

Love this idea? Here’s some more: 

Pin this article for later! 

Click the Pin button on the image below to save for later.

Mom’s Night In: Halloween Inspired Book Club Party

Mom's Night In Halloween Style

Sitting back with friends enjoying delicious glass of wine and some yummy goodies is one of the best ways, I find, to unwind and relax after a long week. There’s something about the conversation with friends and laughter that follows that warms my heart and leaves me feeling relaxed. As I mentioned previously, I hosted a girls night in recently. We hadn’t done a book club get together and it was about time we started up again!

By the way… you don’t actually HAVE to finish (or even start) the book to attend book club. It’s more of an excuse to get out and do something with friends instead of staying at home. But I have found that it’s very motivating to at least try and finish a book before the next meeting. Even when that means reading during nap time, or right before bed while my husband reads my kids stories.

This time of year is perfect for Halloween-inspired books, so if you’re looking for a great book club suggestion, check out the various lists of Halloween books perfect for adults to indulge in and scare the crap out of you.

Mom's Night In Halloween Inspired Book Club with Woodbridge wine

I may have alluded to the fact that wine is a staple at every book club meet up. While it’s not necessary, it does make the night a bit more fun! Especially as we chat about the happenings around us as well as discuss the books we’ve (tried to) read. I love having both a red and a white on hand to satisfy everyone. I personally love this cabernet sauvignon!

And paired with the wine is the delicious food. I opted to make some “Bloody Fingers” in the form of steak and brie sandwiches with a drizzle of Sriracha sauce on a puff pastry. Literally that simple. 4 ingredients and they pair so well with the cabernet sauvignon. Also served was an artichoke spinach dip (recipe coming soon!) and for a little dessert, the chocolate peanut butter ball monsters I made. It was the perfect amount of food for our little group!

Mom's Night In Halloween Inspired Book Club bloody fingers steak & brie sandwiches

“Bloody Fingers” Steak and Brie Bites

  • 1 sheet puff pastry
  • 1 steak, cooked and sliced thinly
  • 1 wheel of brie cheese
  • Sriracha sauce

Defrost puff pastry. Preheat oven to 400 degrees. Line a cooking sheet with parchment paper. Grab one sheet of puff pastry and unroll/unfold. Using a knife, cut into half length-wise and thirds on the fold lines. Then cut each third into half. You should have 12 rectangles. put rectangles on baking sheet and bake for 15 minutes.

Once finished, carefully pull baked puff pastry apart into two pieces. Top each piece with steak, a slice of brie, and drizzle with Sriracha sauce. Enjoy with a glass of wine!

Mom's Night In Halloween Inspired Book Club chocolate peanut butter ballsMom's Night In Halloween Inspired Book Club dip

I also got a little festive with my chalk markers and the plastic wine glasses I picked up at the dollar store around the corner from our house. Non breakable and easy to decorate! The best part? The designs wiped right off with a baby wipe.

My girlfriends told me that next time they want to decorate their glasses so I plan on making it a thing now to put out the chalk markers and let the guests doodle on their glasses to mark which one is which.

The food spread was simple, wine yummy, and friends amazing. Definitely a night I needed!

Mom's Night In Halloween Inspired Book Club wine glasses

Mom's Night In Halloween Inspired Book Club food spread

What’s the last book you’ve read while enjoying a glass of wine?

Chocolate Peanut Butter Ball Monsters

This shop featuring a delicious recipe for chocolate peanut butter ball monsters has been compensated by Collective Bias, Inc. and its advertiser. All opinions are mine alone. #SpreadTheMagic #CollectiveBias

Chocolate Peanut Butter Ball Monsters

Sometimes I just get the urge to bake and create. Nevermind that I’m completely busy and have a very clingy 8 month old (how did that happen??) at my feet or on my hip all day, I can still find time for simple treats. Especially when that involves gifting them to friends. I don’t know why but after having a baby I feel as if my social life goes down the drain.

Oh, wait! Yes, I do know why. It’s because I can’t go anywhere past 7pm because the littlest needs her mama cuddles. And I’m totally cool with that. These moments won’t last for long and I’m enjoying them every single night. But that doesn’t mean that I can shake things up and invite the girls over to my place for a girls night in! And a girls night in means treats.

These Chocolate Peanut Butter Ball Monsters are an awesome sweet treat to serve at a Halloween themed party. Not only are they super easy to make (you’re looking at the ingredients below), they taste amazing! Like Heaven in ball form. And? This Peter Pan’s NEW Simply Ground peanut butter gives it the perfect amount of crunch with every bite! Why? Because you have the smoothness of a creamy peanut butter with a hint of crunch. I also needed a container to send leftovers home with the girls so I upcycled the peanut butter container into a cute gift box. Easy peasy!

Chocolate Peanut Butter Ball Monsters ingredients

Chocolate Peanut Butter Ball Monsters

  • 1 jar Peter Pan Simply Ground peanut butter
  • 1/3 cup unsalted butter, room temperature
  • 1/4 teaspoon salt
  • 1/2 teaspoon pure vanilla extract
  • 2 cups powdered sugar
  • green candy melts

Line two baking sheets with parchment paper.

Place the peanut butter, butter, and salt in a microwaveable bowl, and heat in the microwave for about one minute or until just soft (check and stir the ingredients every 20-30 seconds). Stir in the vanilla extract and confectioners sugar and mix until it has the consistency of a stiff dough (add more sugar if necessary).

Roll the dough into 1 inch round balls. Place on the cookie sheets and refrigerate until firm (several hours or even overnight). You can also place the peanut butter balls in the freezer and freeze until firm (this makes them a LOT easier to dip in the melted chocolate).

Melt the candy melts in the microwave in a microwave safe bowl for 30 seconds. Stir and melt again another 30 seconds. Repeat until melts are completely melted. Dip the balls, one at a time, in the melted chocolate, making sure the entire ball is coated with chocolate. Then, with two spoons or a dipping fork, remove the peanut butter ball from the melted chocolate, allowing any excess chocolate to drip back into the bowl. Place the chocolate covered balls back on the baking sheet. Add a monster eye or two to the balls.

When all the balls have been dipped in the chocolate, place in the fridge until the chocolate has set. Once set, add more decorations to the balls if you’d like. I choose to add hair to a few of mine using black icing. Once done, serve and enjoy. Store leftovers in an airtight container for up to two weeks. They can also be frozen but probably won’t last that long.

You can taste a little crunch in each bite!

Chocolate Peanut Butter Ball Monsters simply ground

Chocolate Peanut Butter Ball Monsters with eyes

Upcycled Peanut Butter Container Treat Boxes

Once you’ve made your monsters, let them chill out in the fridge until your guests arrive. In the meantime you can make some treat boxes for the guests to bring some chocolate peanut butter ball monsters home. 

1. Grab that empty container (or two) of Peter Pan Simply Ground peanut butter and wash it well with hot water and soap. Using a scraper (or a sponge) take the label off completely and throw it away. You should have a perfectly cleaned, clear jar to work with. LOVE the wide mouth of this container for easy cleaning (and scooping out the PB).

Chocolate Peanut Butter Ball Monsters empty pb canister

2. Now you just grab some sticker paper OR duct tape in whatever pattern compliments your themed treat. we had some fun sticker paper we picked up at the dollar store a few weeks ago as well as some Halloween themed stickers so we used those.

3. Measure out how wide the strip of sticker paper or duct tape needs to be to wrap around the jar. If you’re using an 8.5×11 sheet of sticker paper, it won’t completely wrap around the jar but that’s ok, it’s nice to get a little peek at what’s inside. Cut the strip after measuring and adhere to the jar.

4. Then grab some twine, stickers, labels, or other decoration and decorate the top of the jar. I simply used the lid as a stencil to cut out a round piece of sticker paper to adhere to the top. Then I cut down one of the stickers to fit and whala!

Chocolate Peanut Butter Ball Monsters treat containerMy little peanut butter monsters have the perfect home to travel with my friends. And I don’t have to stare at peanut butter balls all week every time I open up the fridge. I don’t know about you but my willpower this time of year is pretty low so I like to send home as many treats with my friends as possible. Makes it easier on all of us!

Except I still have a few jars of Peter Pan’s NEW Simply Ground peanut butter in my cupboard. Did you know that it contains no artificial colors, flavors, or preservatives. And? No need to stir! Plus it comes in a wide mouth jar that makes snacking so much easier. Just open and dip right in! I want to grab a spoon right now.

Check out this coupon for a little savings when you pick a few jars up yourself from Walmart. You can find them in the bread aisle with the other peanut butter.

peter pan peanut butter at walmart

Chocolate Peanut Butter Ball Monsters in a treat cup

Chocolate Peanut Butter Ball Monsters container

 Do you send leftovers home with your guests after a get together?

DIY Dinosaur Hoodie

DIY Dinosaur Hoodie

Last Halloween when I was busy figuring out costumes for the kids to wear I got a request from my son for a dinosaur costume. Since I know he doesn’t like big, full body costumes I thought that trying my hand at a DIY dinosaur hoodie would be easier for him to wear. Well a few months later and the hoodie is getting great use… as a fabulous addition to our dress up closet! And it’ll be the perfect thing to wear to The Good Dinosaur movie when it comes out on November 25th! 

Not only is this hoodie easy to make, it’s almost no-sew! With only a small bit of sewing needed (thanks to the wonderful product that is No Sew), even the amateur crafter can pull off this simple costume. All you need are some matching pants and some socks to cover your shoes and you have the perfect DIY costume for Halloween.

DIY Dinosaur Hoodie side profile

DIY Dinosaur Hoodie

What you need:

  • zip up hoodie jacket
  • adhesive felt in different colors (for spikes, eyes, and belly)
  • 1 piece regular felt (for tail) + more for stuffing tail
  • No Sew adhesive for fabric
  • needle and thread

What you do:

  1. Cut out 8 triangle shapes for spikes.
  2. Cut out a circle in one color felt. Cut that circle in half and adhere to either side of zipper on belly of jacket. Cut out zig zag pattern for decoration for belly in different colors and adhere to half circles.
  3. Cut out eyes using one color for the eye lid, one color for the eyeball, and one color for the pupil.
  4. Take felt for tail and create a cone. Using No Sew adhesive, glue cone in shape so that it stays. Trim away any additional felt.
  5. Stuff tail cone with additional felt and use No Sew to close cone opening.
  6. Using needle and thread, adhere cone tail to bottom back of jacket to secure in place.
  7. Add spikes to the hoodie of the jacket by taking two triangles, removing the adhesive backing, and placing together on the seam of the hoodie.
  8. Make sure about 1/2 an inch is attached to the jacket hoodie with the rest adhering to the other triangle. Use No Sew if additional adhesion is needed. Repeat with other three spikes.
  9. Adhere eyes to side of hood to give the illusion of dino eyes when the jacket is on.
  10. Let No Sew dry completely before letting your child wear the jacket.

Diy Dinosaur Hoodie 2

What themed hoodie would you love to create for Halloween?

THE GOOD DINOSAUR opens in theatres everywhere on November 25th!

Like THE GOOD DINOSAUR on Facebook | Follow @THEGOODDINOSAUR on Twitter | Visit the official THE GOOD DINOSAUR website

A little sneak peek at the movie:

Last Minute DIY Mummy Maternity Costume

Last Minute DIY Mummy Maternity Costume

This time last year I was pregnant with my third child. And just like with the first two pregnancies, I wanted to do something fun for Halloween. With my first pregnance I was an oven with a bun inside. Pretty cute if I do say so myself! And with my second pregnancy I made a skeleton shirt with a skeleton baby. This pregnancy I wanted to get a little craftier and came up with this mummy mommy costume. It was the perfect way to celebrate the holiday while still staying comfortable.

Since it’s a shirt, I could pair it with my maternity jeans, leggings, or anything else depending on the weather. So when we headed to Mickey’s Not So Scary Halloween Party I didn’t have any part of my costume getting in the way. And when I helped out at my son’s school Halloween carnival, I was still able to run around and help the kids out at the various booths.

This costume took me all of 30 mintues to throw together but I’m sure with a little more time (and material) I could have really decked it out. Here’s how you put together this mummy mommy costume:

Last Minute DIY Mummy Maternity Costume

What you’ll need:

  • white t-shirt (long or short sleeved)
  • white tights (or an extra white t-shirt)
  • black felt
  • large sized googly eyes
  • fabric marker
  • hot glue gun

What you do: 

1. Cut tights into long strips.

2. Layer strips over the t-shirt in a random pattern. Make sure the edges are at the seam of either side of the shirt.

3. Cut out a piece of black felt in the form of a football a little larger than the width of the googly eyes.

4. Hot glue googly eyes to the middle of the black felt and set aside.

5. Glue strips onto the shirt by adhering the edges to the seam of the shirt. Overlap edges to create a more layered look.

6. Put t-shirt on and grab the black felt googly eyes. Figure out the best position on your belly to put them and mark the center spot with a fabric marker.

7. Take t-shirt off. Glue black felt googly eyes to the spot you marked.

8. Add more strips if needed and glue in place.

That’s it! Simple. Easy. And cute!

What was your go-to maternity Halloween costume?

Quick and Easy DIY Bats {Simple Cricut Vinyl Projects}

Quick and Easy DIY Bats - Simple Cricut Vinyl Projects

When I was asked to test out the new Cricut Explore I don’t think I waited a few seconds before responding back with a resounding YES. One thing I love about the Cricut Explore is how simple and easy it is to use.

Making simple Cricut vinyl projects like these bats makes holiday decorating a breeze. I simply look up the images I want to cut out in the design space and add them to my template. Then I load the machine and off I go!

[Read more…]


© A Crafty Spoonful - All Rights Reserved
It is OK to use one of my photos provided a link back and/or proper credit is given. It is NOT ok to copy and paste a whole post including instructions. Please do not remove watermarks or alter images in any way. Please contact me with any questions at danielle@acraftyspoonful.com

.