9 Ways the Nintendo 2DS XL Saves The Day

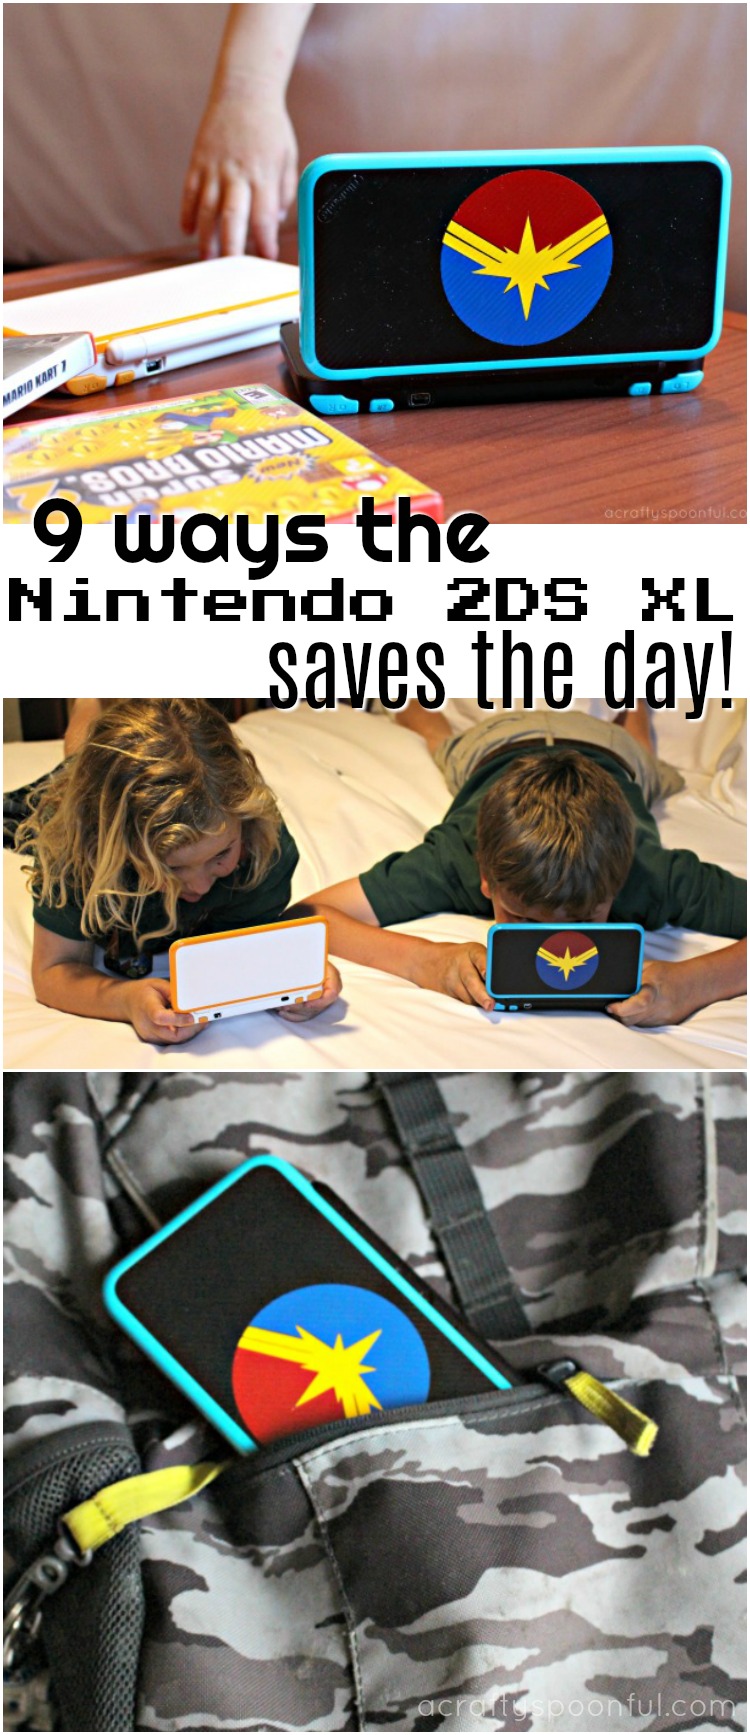
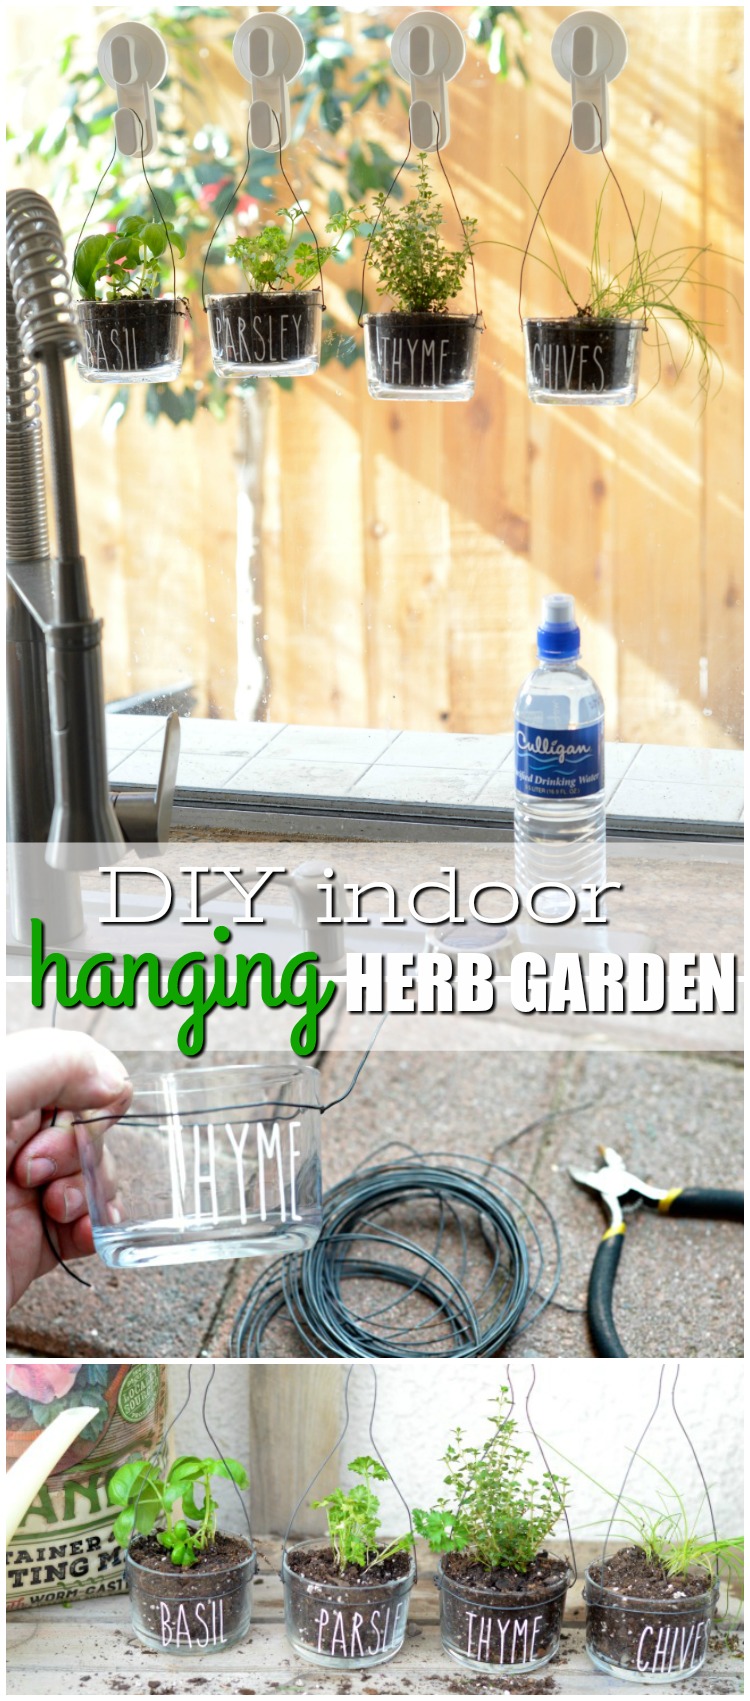
Did you know that the Nintendo 2DS can save the day when given the right circumstances? Thanks to Nintendo for sending my two older kids each a 2DS XL of their own to test out! 

We’re huge Nintendo fans here. Both my husband and I grew up with the original Mario Bros and Duck Hunt and advanced to Game Boys shortly after (my husband still has his!). We continued to follow the line in our separate ways until we started dating and I bought him a GameCube.

Now that our kids are of gaming age, they’ve been introduced first to the Wii and then the Switch. Now it’s time to move from family-based games (our criteria for being allowed to play on the devices is that it’s a family event) and into individual player games. But we didn’t want to quite take away the family feel from the experience.

With the Nintendo 2DS XL, online play is available with compatible games. Some games may offer local multiplayer or co-op play. So that means the kids can play together still with some games and on their own with others as they choose. This has saved us many a time on various occasions… read on to find out how the Nintendo 2DS XL has saved the day!

9 Ways the Nintendo 2DS Saves The Day

1. Waiting at a restaurant – While we do not allow the kids to play on devices while at the dinner table, we do let them bring their devices in if we know that we’ll be waiting for a table once we arrive.

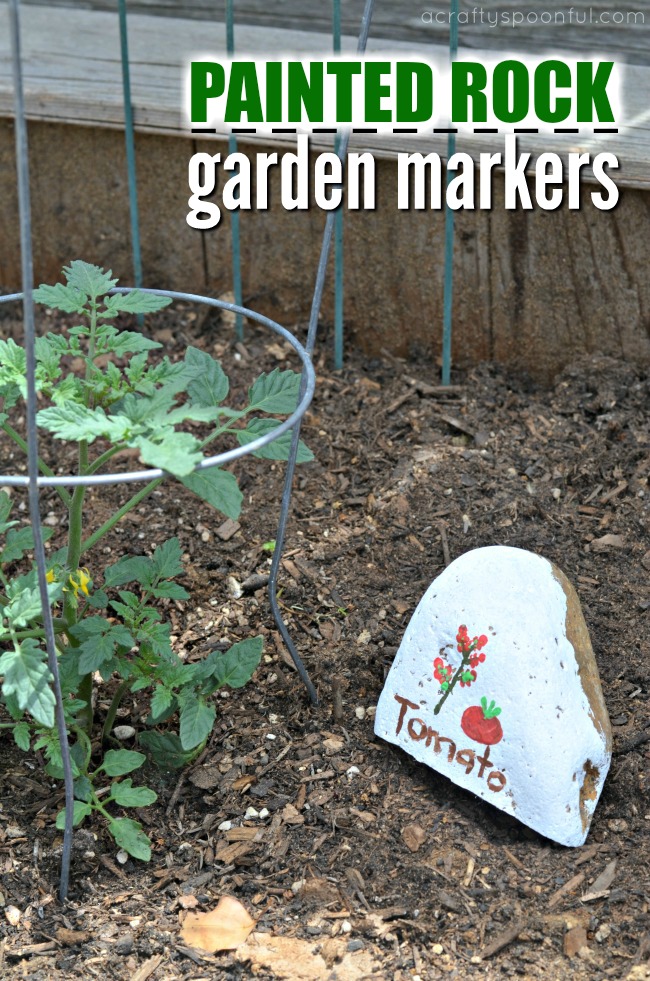
2. On long car rides – There’s only so many times one can find iSpy on a long car ride. When each of the older two have their 2DS devices handy, they can either play their own games or play each other to pass the time quicker.

3. At an adult event – On occasion, we’ve had to take our children to an event where no other children are present (like family weddings). By giving them a fun activity that they can do together, it keeps them entertained and gives them something to talk to the adults about too when approached.

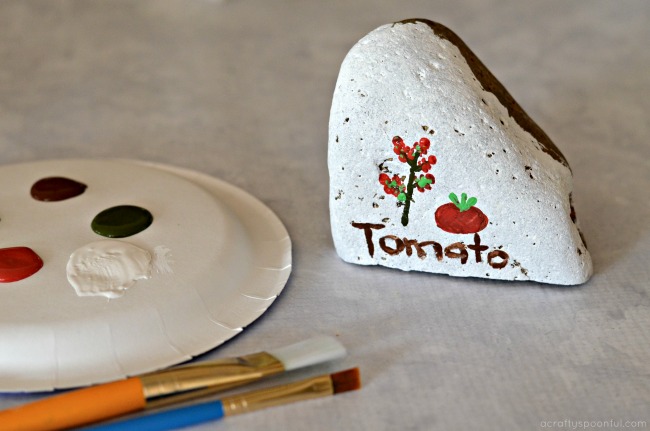
4. Waiting in line – Whether we’re at Comic-Con waiting to get into Hall H or at a theme park waiting to get on a ride, having the 2DS handy to pass the time makes everyone’s lives easier!

5. At meetings – As the PTG president for our kids’ school, I have to attend our monthly PTG meetings and bring the kids with me. Once they’ve completed their homework, they can play together quietly while I run the meetings.

6. On an airplane – Similar to car travel, plane travel leaves kids a bit… cramped. So giving them an array of things to do while on the plane can help fight boredom and breakdowns.

7. In hotels – when we travel, there’s some downtime in the hotel at times that can be pretty boring for the kids. By allowing them to bring their 2DS systems, they can enjoy some game time before we take off on our next adventure.

8. At Grandma’s House – Grandma doesn’t have any game consoles. So when the kids go over for the afternoon, or for an overnight stay when Mom and Dad go out, packing the 2DS’s is a must.

9. When the internet goes out – Yes, I know this is bad, but this past weekend we had zero internet access. And while we don’t allow the kids a lot of screen time, having zero screen time was  getting to them and us too. So we were thankful when we grabbed their 2DS XL devices and watched as they had fun racing away with Mario Kart.

Nintendo 2DS XL Games and Entertainment

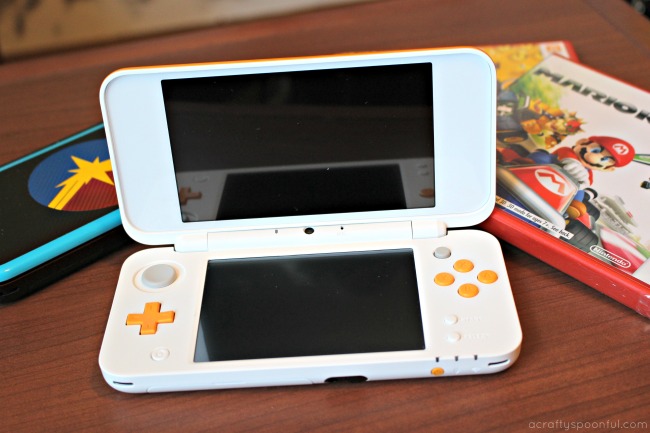
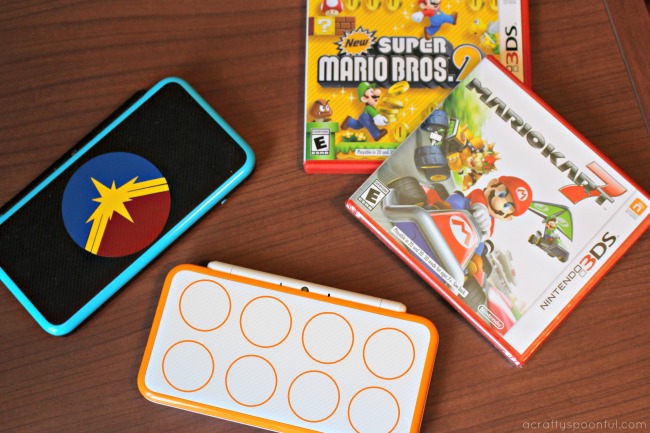
Nintendo 3DS games will work on multiple systems, including New Nintendo 3DS XL, Nintendo 3DS, New Nintendo 2DS XL, and Nintendo 2DS. You can also play games from older systems like Nintendo DS and Nintendo DSi, so it’s easy to upgrade to a new system without losing your game library.

Plus, in addition to games, you can surf the web with the built-in browser and watch your favorite videos and shows on YouTube™, HuluPlus, or Netflix right on your system.

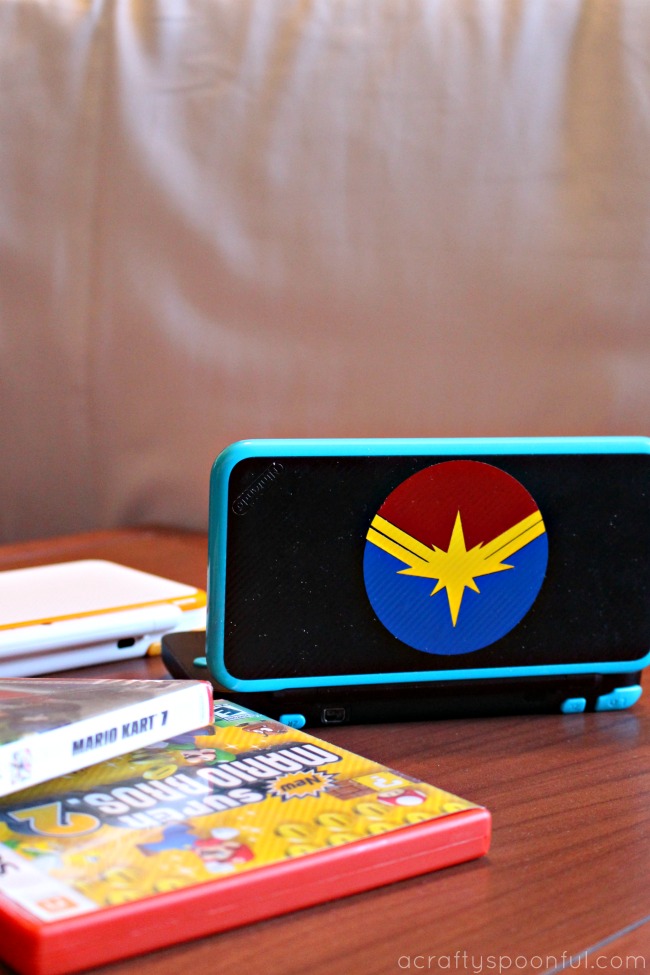
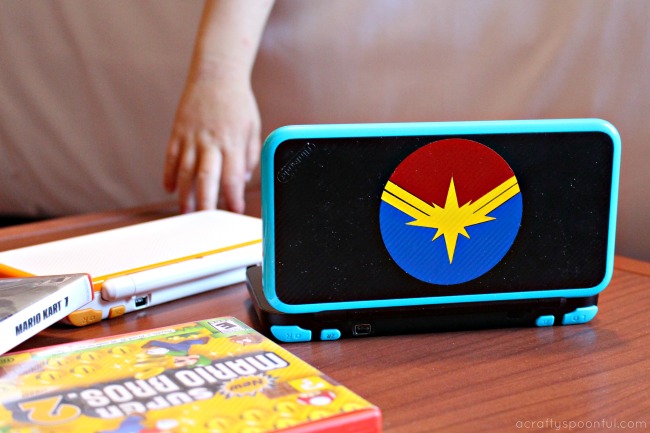
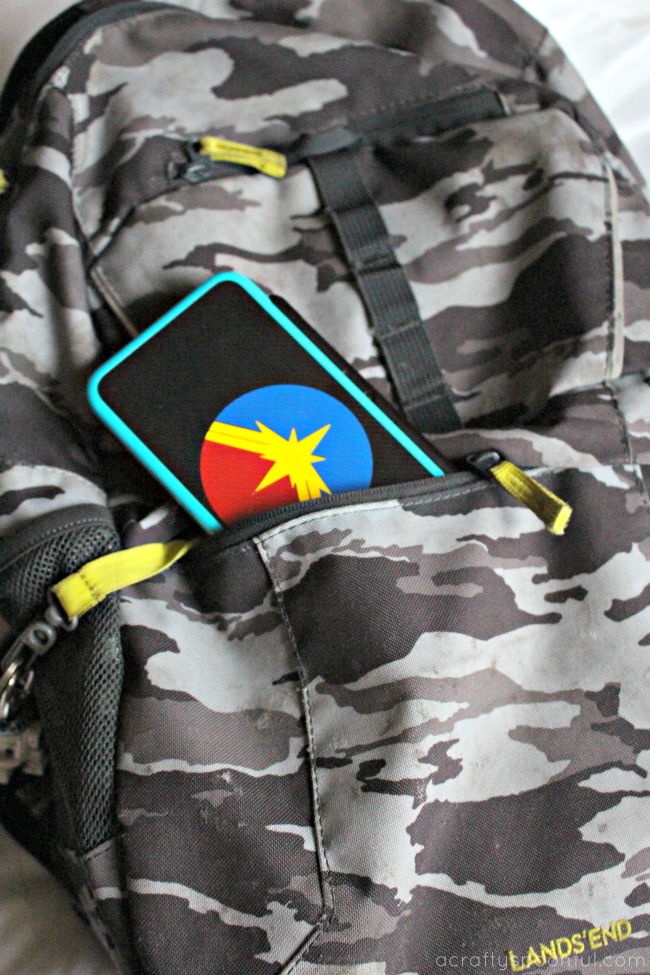
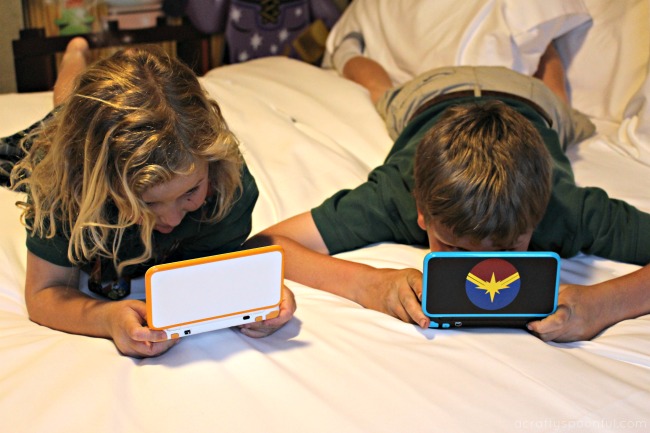
Speaking of favorite shows – check out the fun skin my son asked me to create for his new 2DS. If you’ve seen the new Marvel Avengers Infinity War, you know where this symbol comes from. And stay tuned because next week we’ll be offering this skin download for free! You can also go simple and decorate your 2DS XL like a LEGO brick like my daughter did! Simple circle designs cut out in vinyl gave us this easy look.

What was your first Nintendo device? What was your kid’s?

Like this post? Check out these other related posts:

Clean Time for Screen Time

Surviving a Long Road Trip with Kids

Should I Take My 8-Year-Old To Infinity War?

Pin this article for later! 

Click the Pin button on the image below to save for later. 

Getting Crafty in the Garden: Painting Rocks for Garden Markers

Kids helping in the garden this Spring? Why not use these painted rocks for garden markers! This craft is super easy to make and you can just use supplies you have around the house.


One thing I love about this time of year is all of the green and new growth sprouting about everywhere! And that means that our garden goes from sad and lackluster to full of life within a few short weeks. With that new life comes a bit of confusion for the kids with what plant is growing what type of fruit, herb, or vegetable. So we had a little fun and used painted rocks for garden markers to distinguish each plant from one another. 

Now there’s no real huge planning that goes into these painted rock garden markers. We simply used a base color that would make our illustrations stand out, and I let the kids paint each of the plants that we were growing. They had fun choosing the colors and making different types of veggies and herbs on their rocks. 

I think the most fun was when they tried to trace my penciled in names with paint to make each name stand out a bit more. The concentration my littlest had in her eyes (and brow) was quite humorous. 

If you’re planning out your spring garden, or are already growing, these are a great addition to share with kids and guests alike what you’re growing this season. Here’s how to make these painted rocks for garden markers: 

Painted Rocks for Garden Markers

What you’ll need: 

  • good sized rocks
  • paint in a variety of colors based on what you’re growing
  • a variety of brush types, cotton balls, and/or cotton swabs

What you do: 

1. Using either a brush or cotton ball, layer the base color on the rock so that the illustrations you paint will stand out. We used a white base but any light color will due. 

2. Once the base coat is dry, now it’s time to paint the objects you’re growing. As you can obviously see from the rock above, my daughter was painting strawberries. Remember, it’s ok if the artwork is a bit… abstract… in the next step we’ll make things a bit clear. 

3. With a pencil, write out the names of each of the plants onto the rock. Then let your child trace the written names with their paint brush to make the name of the plant stand out. 

4. Once your painted rock is completely dry, set it outside next to your plant and enjoy! 

With Spring upon us, we’ve planted a variety of different seeds and plants in our garden. Here’s what my preschooler helped plant: 

  • Cherry Tomatoes
  • Bell Peppers
  • Radishes (from seed)
  • Carrots (from seed)
  • Cucumber (from seed)
  • Snap Peas (from seed)
  • Mint
  • Sage
  • Basil
  • Parsley
  • Thyme

And the big kids help by watering, weeding, and keeping an eye on the bugs that are in our garden beds

Looking to get your kids more involved in the garden? You’ll love these tips! 

DIY Indoor Herb Garden Ideas

Using Ladybugs in the Garden

Tips for Gardening with Kids

Kid Friendly Ideas to Get Your Kids In The Garden

Pin this article for later! 

Click the Pin button on the image below to save for later. 

DIY Indoor Herb Garden Ideas: Easy to Make Indoor Hanging Herb Garden

This DIY Indoor Hanging Herb Garden is the perfect way to bring the garden indoors! Plus you’ll have fresh herbs for whatever you’re whipping up for dinner. This post was sponsored by Culligan Water as part of an Integrated Program for Influence Central and all opinions expressed in my post are my own.

Water is the one thing that makes the world go round. And filtered water is something we can’t live without. As a busy mom of 3, I am constantly filling up water bottles at our fridge or turning on the tap to make dinner. And all of that water usage had me thinking… are we drinking the best water we could be drinking? The answer was no. And I’ll tell you why… while we had an under the sink water filter, it wasn’t pulling out everything it could be to ensure that our water was safe to drink. 

We live in Southern California. We’re known for our droughts and lack of water. So any water we do have is usually brought in from another source. Our source? The Colorado River. Since our water comes from so far away, it has quite a journey to reach us. and that means there’s more chance of contaminants leaching into our water supply. Being able to ensure that we get those contaminants out of our drinking water was goal #1 for me. The second goal? How our water affected not only drinking but other water usages like showering, our garden, and our pets. 

Luckily we were asked to check out Culligan’s Water Filtration System. We just had the ClearLink PRO installed in our home.

Stay tuned for a follow-up post sharing how Culligan has positively impacted our daily usage of water. As of now, while we’re still testing the system, we thought it’d be fun to share how we can bring the garden indoors and add a bit greener to the meals we’re making with the help of a DIY indoor hanging herb garden. Here’s how!

Changing How We See Water

We knew our home needed a few updates to our water filtration system. We previously used an under-the-sink filter for our tap water as well as another filter in our fridge for the water that came out of the fridge door. But one in-home consultation with a Culligan expert showed that even these filters we had in place weren’t taking out everything we wanted to keep out. With water playing such a crucial role in our daily life – being used in the food we make, the water we (and our pets) drink, and what we use to water our own edible garden – a few changes to our water filtration system was a must. 

Culligan’s goal is to provide water that its customers can trust and offer the best possible customer service experience out there. With over 80 years of water quality and service industry experience, they strive to help individuals identify their water issues right in their home – whether that be hard water, water filtration or taste of their water. After our in-home consultation, our new Culligan Water Filtration System was installed. And with the push of a button right by our sink, fresh and filtered water comes right out of our faucet. The system is so easy to use that even the kids can get their own filtered water from the sink. We also had a filtered water line run to our fridge as well. 

Now that our system is in place, we’ve been enjoying the perks of filtered water. We’ll be sharing our full journey from start to stop in our next post featuring Culligan so stay tuned. Now for our tutorial on this easy to make DIY Indoor Hanging Herb Garden! 

Easy to Make Indoor Hanging Herb Garden

What you’ll need: 

  • Glass containers
  • Wire
  • Wire cutters
  • Window hooks
  • Labels
  • Small rocks
  • Soil
  • 4″ herbs OR seeds
  • Water

What you do: 

1. Wrap the wire around your container to form a circle. Connect the wire to itself tightly so that your container is secure in the wire. Don’t cut the wire just yet.

2. Make an arch with the wire over the glass container. 

3. Once you have the arch length you want, cut the wire leaving about 1 inch to attach it to the other side. 

4. Once you’ve secured the arch to the other side of the wire circle, make sure the wire is still securely around the glass container and can be lifted safely without the container falling out. 

5. Fill the bottom of the containers with about 1/2 an inch of small rock to provide drainage. 

6. Top the rocks with soil up to about 1 inch from the top of the container and dig a well for the herbs. Add some filtered water to the bottom of the dirt well.  

7. Add the herbs to the container on top of the water and make sure the roots are buried/covered. 

8. Sprinkle a bit of vegetable food on the surface of the dirt by the herbs and then water again with filtered water. 

9. Place the window hooks in the window where you want the containers to hang. Find a place that will get sunlight during the day. 

10. Hang the herbs up in the window and watch them grow! Snip off what you need for meals in the kitchen as you cook. 

Water plays an important part in our everyday lives. Being able to have the kids go to the sink and fill up their water bottles, or fill up a watering can, and know that the water they’re drinking and using is water we can trust means a lot to our family. And now we can say that every day is a “Good Water Day” with Culligan! Stay tuned for our next post where we go in-depth into our experience with Culligan Water

How are you making healthy touches in the kitchen? 

Love this idea? Check out these other garden-related posts! 

Pin this article for later! 

Click the Pin button on the image below to save for later. 

The Perfect Easter Egg Hunt Ideas for Toddlers in Playgroups

Check out these perfect Easter Egg Hunt Ideas for toddlers when you’re planning an egg hunt for your playgroup. We’ve been planning playgroup egg hunts for years and have nearly perfected the art of the perfect playgroup egg hunt! And we’re sharing all of our tips today! 

I am not sure if you know this about me but I actually ran a playgroup of moms and kids for about 5+ years. I jumped in when my good friend moved out of the area and needed someone to take over her playgroup. Because I had such a great experience when my youngest was an infant and had built true friendships, it was a win-win situation for me. Sadly, with work and life (and our kids going to school) we no longer have playdates regularly but we still get to see each other on occasion. 

From this experience, I have a lot of knowledge of all things playdate. And planning the perfect playdate becomes an art form after a while. That includes holiday-based playdates. With Easter right around the corner, I thought it’d be the perfect time for me to share how to plan the perfect Easter egg hunt for toddlers and preschoolers. These ideas are great when paired with an active local playgroup in your area or a good group of friends and kids. 

Easter Egg Hunt Ideas for Toddlers

In a playgroup setting, it can be really fun to gather friends for a classic Easter egg hunt. Especially for toddlers and preschoolers. Not only is it smaller than, say, a community gathering, there’s also more control over the overall experience for your little one. We’re sharing some of our top tips for planning and executing a seamless Easter egg hunt for toddlers. 

Planning the Perfect Easter Egg Hunt 

1. Choosing the right location – The perfect location for an Easter egg hunt is just as important as the planning of the hunt itself. You want to consider the age group you’re planning for and the level of difficulty they’ll need to make the event fun. Here are a few things to consider: 

  • Is the event space easily accessible for parents? Does it have close parking for parents of multiple children or parents of infants? 
  • Does the event space have a large amount of grass to run around on? 
  • Are there taller hiding areas for older kids in your group? Are there areas other than the ground you can hide eggs in or around? 
  • Are there restrooms close to the event space? It may not sound like a big deal but for potty training toddlers, having access to a bathroom is ideal. 

2. Getting the invite out – Planning an event, like an Easter egg hunt, can be very easy if you use services available to you. When I ran my playgroup, I used Meetup.com to faciliate the playdate scheduling and RSVPs. But you can use something as simple as SignUp.com or even evite to set up your event. When you are creating your invitation, make sure to be very clear on a few things: 

  • Ask each parent to bring at least 10 filled plastic eggs per child they’re bringing. That way each child will collect the number of eggs their parent brought (no one is left out!).
  • Be clear on any specifications of what can and cannot go in the plastic eggs. If you know a child with an allergy will be attending, look for non-food options to stuff your eggs with. Some great ideas for this would be stickers, age-appropriate toys like finger puppets, erasers, sticky hands, and age-appropriate jewelry.
  • If you are enjoying snacks before or after the hunt, ask each parent to contribute a dish to the event. And just like with the eggs, consider allergies when preparing dishes for the group. 

3. Setting up the event – As the host, try to arrive at your event about 30 minutes prior to the event starting. That way you can scout out where the best spots for hiding eggs are and can secure a bench or area for your playgroup to create a home base. 

  • It’s helpful to bring a trash bag or two just in case the area doesn’t have accessible trash cans. That way you can take out anything you brought in with you. 
  • If you’re serving food, don’t forget the wipes! 
  • Create a station at your home base for parents to dump in the pre-filled eggs they brought with them so that once everyone arrives, you can hide the eggs while the kids are enjoying their time playing together or sharing a snack. 

4. Starting the egg hunt – Once all of the parents have arrived, it’s time to get the egg hunt started! 

  • Enlist one or two parents to help you start hiding the eggs while the kids are distracted. 
  • Once all of the eggs are hidden, come back  to the kids and make sure each has a basket or bag to collect their eggs. 
  • Instruct the kids to only collect the number of eggs they brought with them. Once they are done collecting that number, have them come back to home base for some fun revealing what’s in their eggs. 

Since each child is collecting the same number of eggs that they’ve brought, you don’t need to worry about starting one age group before the next. The toddlers can take their time collecting eggs (or picking dandelions like my kids do) while the older kids race ahead. 

Easter Egg Hunt Snack Ideas 

If you’re looking for ways to spice up your Easter egg hunt, here are few cute recipes and snack ideas to serve at your Easter egg hunt: 

Peeps Rice Crispy Treats

Easter Basket Cupcakes

Easter Egg Cups

Want more Easter fun? Here are some posts we think you’ll enjoy! 

Inexpensive Easter Basket Ideas for Kids

3 Ways To Dye Easter Eggs with Toddlers and Preschoolers

How to Make Confetti Eggs

Pin this article for later! 

Click the Pin button on the image below to save for later. 

Easy DIY Hair Bow Holder + Simple Girls Bedroom Decor Ideas with Leesa Sleep

This post is sponsored by BabbleBoxx.com on behalf of Leesa. Are you looking for fun ways to spruce up your girls’ room? Transfering from little girl room to big girl room? We’re sharing simple bedroom decor ideas on a budget and are sharing a fun and easy DIY hair bow holder to store all of your girl’s bows.

A few weeks ago the girls came to us and asked if they could get a bunk bed so that they could sleep in the same room together. We had just transitioned our youngest from our bed to her own bed at 3 years old and while she loved the idea of being in her own room, she missed the comfort of knowing someone else was sleeping with her in the room. So after much deliberation, we decided to make over our middle child’s room to fit her growing personality (hers was the only room we hadn’t made over since moving to our new home 3+ years ago). And this included a new bunk bed. 

We did a bit of research and decided on a twin over twin model with dressers underneath the bottom bunk. Not only would this provide extra support under the bottom bunk but also give us the opportunity to eliminate a large piece of furniture from the room – the dresser! Win-win, right? Now for the important part of a good night’s sleep – the mattresses my girls would sleep on. We consider a mattress an investment not only for our home but our health as well. having the support needed for a good night’s rest is crucial for growing children. So when Leesa reached out to see if we’d like to use their mattresses for our new room, we were more than excited to try them out. Plus, not only are they committed to a good night sleep, they also provide community outreach and give back through two different give-back programs. 

Driven by the mission to provide “A Better Place To Sleep for Everybody”, Leesa donates one mattress to a shelter for every ten they sell through their One-ten program (over 22,000 mattresses donated so far!). Leesa also plants one tree for every mattress sold and donates 1% of each employee’s time to volunteer for local causes.

The Best Bed in a Box

When our mattresses and pillows arrived, my husband was a bit skeptical. How in the world would a full mattress fit in this box? It was fun to find out exactly how the rolled up mattress expanded once put into place and opened. And even more cool to feel the difference in the mattress after an hour of being open vs. a whole day of being opened. Since I lay down with my youngest as she drifts off into sleep on the bottom bunk, I get to experience the comfort of Leesa each night. And with the adjustable and reversible hybrid pillow Leesa sent out, I relax in comfort as the girls fall asleep each night. 

The adjustable and reversible hybrid pillow has down-like quilted pockets on one side and a cooling side on the other. It’s adjustable and reversable depending on how our night is going. If I accidentally fall asleep in the bed with my daughter (oops!), and I get too warm, I can flip over the pillow for a more cool slumber. There’s also a pillow insert inside that sits between the quilted pocket and the cool layer that can be removed with a simple zip to change the support level to fit how one sleeps. Plus it’s a good cuddle pillow! 

But I can’t focus all of my attention on the awesome pillow I stole from the kids. Let’s get to the mattress! Leesa’s patented Universal Adaptive FeelTM is designed for all types of sleepers and features 3 premium foam layers including a 2-inch AvenaTM foam top layer for cooling and breathability, 2-inch memory foam middle layer for body contouring and pressure relief and 6-inch dense core support foam for durability and structure for sleepers of all sizes. All of this equals the support and comfort one needs for a restful sleep. And the proof is in my Fitbit tracker tracking how much more rest I receive when I accidentally fall asleep in the girls bed vs. going back to my own bed. It may be time to upgrade our own mattress too! 

Easy DIY Hair Bow Holder Tutorial

Along with the new bunk bed came a complete overhaul of our daughter’s room. That included new paint on the walls (including a fun diamond design you would have seen featured on my IG stories), and a fun little inspirational wall that included an updated DIY hair bow holder that fit the current room’s personality and my daughters larger bows. We’re sharing how to recreate our DIY hair bow holder in this simple tutorial that takes less than 30 minutes to make! The best part is that I was able to involve my daughter in making this and she did all of the measuring/cutting while I took care of the hot glue. 

DIY Hair Bow Holder

What You’ll Need: 

  • 16″ x 20″ Blank Artist Canvas with Wooden Frame
  • Assorted Ribbon
  • Measuring Tape
  • Hot Glue Gun
  • Pencil
  • Bows

What You Do: 

1. Grab the ribbon, a few bows, and a measuring tape to plan out how far apart you want the ribbon from each other. Use the bows as a guide to how much room is needed in between each bow. We measured 2 inches in from each side of the canvas and then 3 inches in between each ribbon strand. 

2. Turn the canvas over and mark where each of the ribbons should go on either side of the length of the canvas. 

3. Gather the ribbon in the colors you want to use for the project. Cut each color to about 21 inches in length. Make sure that this length wraps around the canvas and back over the frame to be glued into place. 

4. Using hot glue, attach the ribbon to the back frame of the canvas and wrap around to the top. Attach the top of the ribbon in the same way making sure that the ribbon isn’t twisted in the front. 

5. Repeat until all of the ribbon is secure and add your bows! 

See how easy that was! Now for a few alternative ways you can spice up your DIY hair bow holder: 

  • Paint the canvas a coordinating color (you can see what our daughter’s old painted bow holder looked like here)
  • Wrap the canvas in fabric and secure with hot glue before adding the ribbon
  • Add small hooks to the bottom of the canvas frame to hang hair ties and headbands

In addition to adding the DIY hair bow holder, we included a small mirror, an inspirational quote, and a small wooden unit to hold my daughter’s prized possessions: her Shopkins figurines. Having the figurines high up ensures that her little sister can’t reach them. Good thinking, right? Too bad she’s already tried to drag the step stool out to grab one or two. Oh well… I can try! Stay tuned for the full bedroom makeover post! We have more in store for you. 

Save on Your Girls Bedroom Decor Ideas with Leesa Sleep

Leesa is available online or at the Leesa Dream Gallery in SoHo NYC and Virginia Beach. And you can now try before you buy at over 80 West Elm stores nationwide. Try the mattress in your own home for 100 nights (risk-free!) with free shipping, always. And don’t forget to use code ACRAFYSPOONFUL for $100 Off your Leesa Mattress purchase.  Leesa is available in the US, UK, Canada, and Germany. They’re also continuing to expand their offerings to include: The Leesa Pillow, Blanket, Sheets, Foundation, and Frame. 

Looking for more kids bedroom ideas? 

Check out these posts you’ll love: 

5 Ways To Help Children Get Their Bedroom Organized

Shared Bedroom Ideas for Brother and Sister

DIY Lego Side Table

Pin this article for later! 

Click the Pin button on the image below to save for later. 

Inexpensive Easter Basket Ideas for Kids

These inexpensive Easter basket ideas for kids won’t break the bank! We take a simple approach to Easter baskets in our family and are sharing our tips and tricks with you. 

Easter is right around the corner and if you’re like me you’ve been racking your brain trying to think of great things to put in your child’s Easter basket. We always try and keep it simple. We definitely don’t want Easter turning into Christmas or a birthday where we shower our children with more than a few gifts. And we want our children to learn that not every holiday is a huge gift-giving event. 

We’ve always used the same guidelines each year since our son was born… simple. The Easter Bunny will only bring what will fit in the Easter baskets (except for the eggs filled with treats that he hides everywhere). These Easter basket ideas for kids are not only simple but ones you can pick up at your local stores. 

This year is no different. I went to a few different places to score the awesome loot found in my kids Easter baskets this year but didn’t spend more than $25 per basket and were purchased at Target (both the Easter section and $1 section) & See’s Candies. Plus, many of these things hold dual purpose and can be used over and over again. 

Here are our Easter Basket Gift Ideas for Kids:

inexpensive Easter ideas for kids

Easter Basket Ideas for Boys

  • Mini LEGO packs – found at the LEGO store and at Target or other retailers (pictured)
  • chalk (pictured)
  • sunglasses (pictured)
  • bug catcher gear (pictured)
  • See’s mini chocolate bunny & duck lollipop (pictured)
  • DVDs
  • wristwatch
  • jump rope
  • bubbles (we LOVE Gymboree bubbles!)
  • Hot Wheels cars

Inexpensive Easter ideas for kids

Easter Basket Ideas for Girls

  • Mini LEGO packs – found at the LEGO store and at Target or other retailers (pictured)
  • chalk (pictured)
  • sunglasses (pictured)
  • hair ties (pictured)
  • lip gloss (pictured)
  • wristwatch (pictured)
  • bug catcher gear (pictured)
  • See’s mini chocolate bunny & lollipop (pictured)
  • DVDs

Inexpensive Easter ideas for preschoolers

We’ll be stuffing fun stickers, temporary tattoos and See’s jelly beans in the plastic Easter eggs as well to hide for our family Easter egg hunt before brunch as well. And since they just saw Peter Rabbit in theaters, we added some fun Peter Rabbit plush toys we found on Amazon here. 

What do you add to your child’s Easter basket?

Love these Easter basket ideas for kids? Here are a few other fun Easter posts to read: 

Pin this article for later! 

Click the Pin button on the image below to save for later. 

Chicken Parmesan Bites – The Perfect Toddler-Approved Meal

These chicken parmesan bites are the perfect toddler-approved meal for busy weeknights! They come together in less than 30 minutes and pair perfectly with spaghetti and marinara sauce and vegetables. 

I have been trying to come up with healthy, fun dinners that my preschooler would be more interested in. Lately, all the kids want are carbs and sweets so turning a typical chicken dish into more kid-friendly meals is my goal. I’m pretty sure I’ve succeeded in that goal with the help of some inspiration from Lady and The Tramp. 

A craving for chicken parmesan hit when we were watching Lady enjoy a big bowl of pasta with Tramp and it hit me! Why not turn chicken parmesan into chicken parmesan bites!? Put a side of noodles and sauce on the plate and I had a meal that all of the kids would enjoy. Including the preschooler. Right? Right!

So the next night as we were watching Lady and the Tramp again for the 3rd time since receiving it to review, I plated up these delicious chicken parmesan bites for the kids to enjoy with a side of spaghetti noodles topped with marinara sauce and a scoop of broccoli florets. I placed the plates of dinner in front of the kids and they went to town! And the best part? I used only 2 chicken breasts to feed the whole family dinner. Isn’t that awesome? And budget friendly! Plus the kids will love helping put this meal together. 

Chicken Parmesan Bites 

  • 2 chicken breasts, cut into 1″ pieces
  • 4 tablespoons 1% milk
  • 1/2 cup all-purpose flour
  • 1 egg white
  • 1 cup Italian-Style Breadcrumbs
  • 1/2 cup freshly grated Parmesan cheese
  • 2 tablespoons olive oil
  • 2 teaspoons table salt
  • 1 teaspoon black pepper

Place chicken breast pieces in a bowl and cover with milk. Let soak for a few minutes while prepping the other ingredients. Place 1/2 cup of flour into a gallon size zippered plastic bags. Measure out 1 cup of breadcrumbs and place into a container with salt and pepper. Grate 1/2 cup parmesan cheese into the same container, stir to combine and set aside. Place egg white in a small bowl.

Take chicken and place in bag with flour. Shake vigorously until the chicken is well coated. Put coated chicken in the bowl with egg white and stir to coat chicken. Place bread crumb mixture in the bag you just used for flour. Put chicken back in the bag and shake again coating the chicken with breadcrumbs.

Heat oil in a skillet on medium-high heat. Add coated chicken to the pan and cook until golden brown, about 15 minutes. When chicken is cooked thoroughly remove from pan and serve with spaghetti and marinara sauce. Add some steamed veggies or a nice salad to make this a complete meal.

How are you getting your little one involved in different foods? 

Make sure to pick up your own copy of The Walt Disney Signature Collection Lady and The Tramp now available on Blu-ray and enjoy your own pasta experiences with the family! 

For some fun activities to do with the kids, click on the button below:

Love this recipe? Try these other toddler-friendly meals, tips, and ideas!

Pin this article for later! 

Click the Pin button on the image below to save for later. 

Irish Soda Bread Biscuits Recipe

This Irish Soda Bread Biscuits recipe is sure to hit all of the right spots when you pair it with a delicious cup of tea or coffee morning, noon, or night! This Irish Soda Bread Biscuits recipe is easy and quick. Perfect for those times you can’t make a full loaf of Irish Soda Bread for the family.

Irish Soda Bread Biscuits

I love a good breakfast scone. Perfect to pair with coffee or tea and fills me up! With St. Patrick’s Day around the corner I thought I’d take one of my family’s favorite quick bread recipes for Irish Soda Bread and turn it into a mini version to appease the kids. And these unique biscuits really hit the spot.

This Irish soda bread biscuit recipe is not only simple but can be made with ingredients found right in the pantry. And the results are just heavenly! Flakey, soft, and delicious. Especially with a schmear of butter. If you’re looking to start your day off with the luck of the Irish then this biscuit is for you!

Making Irish Soda Bread Biscuits with Kids

By taking our favorite soda bread recipe and turning it into biscuits, I’ve been able to teach the kids how to make quick breads and tips for adapting recipes based on our needs. It’s a great way to introduce kids to bread baking before jumping into yeast recipes. 

Another great part about sharing the baking experience with our kids is that we get to spend quality time together. I’ve found that I can talk about a number of different topics when we’re in the kitchen together that they may not have been as receptive to if we were talking in the car or around the dinner table. 

When the kids are doing something with their hands, they seem to keep the conversation going without any real prompting. It’s a beautiful thing! I find that these types of recipes are good for all ages. From toddlers to teens, you can’t go wrong with an irish soda bread biscuit recipe. 

If you’re looking for a good Irish Soda Bread recipe to try after these biscuits, check out Alea’s Irish Soda Bread recipe

Irish Soda Bread Biscuits Printable Recipe

Irish Soda Bread Biscuits

  • 2 cups white whole wheat flour
  • 2 teaspoons sugar
  • 1 teaspoon salt
  • 3/4 teaspoon baking soda
  • 2 tablespoons cold butter (diced)
  • 1/2 cup raisins
  • 3/4 cup buttermilk (see note if you don't have buttermilk)
  1. Preheat the oven to 375. If using stoneware, place stoneware in the oven while it’s heating up.
  2. Combine flour, sugar, baking soda and salt in a bowl. Work in butter by hand. Make sure to use your fingers to mix it into the dry ingredients.
  3. Add in the raisins and buttermilk and combine together with your hands. Pat out the dough and form into a disk about 1 inch thick.
  4. Divide the disk into 6 equal pieces and roll into 2-inch rounds. Bake at 375 degrees for 15 to 18 minutes.

If you do not have buttermilk, grab some low-fat milk and vinegar (I use apple cider vinegar). Combine 3/4 cup milk with 1 teaspoon vinegar. Stir and let sit for 5 minutes.

Irish Soda Bread Biscuits Video Tutorial

Want to see these made instead of just reading about it? Check out this Irish Soda Bread Biscuits video we posted on Facebook: 

This post was first featured on this site on Feb 10, 2013.

More St. Patrick’s Day Celebration Ideas

Looking for more St. Patrick’s Day fun? Check out these activities and recipes! 

DIY Shamrock Shirt

Rainbow Cupcakes

Vanilla Mint Sugar Scrub

Delicious Quick Bread Recipes

These recipes are easy to throw together and are the perfect pairing to any cup of coffee or tea.

Apple Cheddar Quick Bread

Vanilla Chai Banana Bread

4-Ingredient Beer Bread

Recipes to Make With Kids

Get the kids in the kitchen with these fun recipes they’ll enjoy!

Apple Cider Donuts

M&M Monster Cookie Bars

Candy Apple Bars


Pin this article for later! 

Click the Pin button on the image below to save for later. 


Disney On Ice presents Follow Your Heart in San Diego Jan. 25-28

Follow your heart straight to adventure with Disney On Ice! Families will make unforgettable memories with Mickey, Minnie and all your Disney friends when the new ice show Disney On Ice presents Follow Your Heart arrives in San Diego! The ice skating extravaganza features the beloved stories & characters from the smash hit animated movies Disney•Pixar’s Finding Dory and Inside Out for the first time in a live production, with performances playing the Valley View Casino Center from January 25–28, 2018.

Just keep swimming with Dory, Nemo, Marlin and new pal Hank from Disney•Pixar’s Finding Dory as they embark on a life-changing excursion to find her parents and discover the true meaning of family. Cheer with Joy, Sadness, and the rest of the Emotions from Disney•Pixar’s Inside Out as they help Riley find the confidence to win the big hockey game.

Venture to wintery world of Arendelle where Olaf and Kristoff help reunite royal sisters Anna and Elsa from Disney’s Frozen and learn love is the most powerful magic of all. See Cinderella, Rapunzel, Tiana and the Disney Princesses make their dreams come true through their virtues of bravery, kindness and perseverance. And celebrate true friendship with Buzz Lightyear, Woody and the Toy Story gang.

Disney On Ice presents Follow Your Heart

Showtimes:

Thursday, January 25 – Sunday, January 28, 2018

  • Thursday, January 25 7:00 PM
  • Friday, January 26 7:00 PM
  • Saturday, January 27 11:00 AM, 3:00 PM & 7:00 PM
  • Sunday, January 28 1:00 PM & 5:00 PM

Location: 

Valley View Casino Center – 3500 Sports Arena Blvd., San Diego, CA 92110

Tickets: 

Ticket prices start at just $15 each!
Discount Opening Night tickets available for only $12 (not valid for premium seating levels)

All seats are reserved; tickets are available for purchase online at AXS.com, charge by phone at
888-9AXS-TIX or visit the Valley View Casino Center Box Office.
*tickets prices are subject to change; additional venue/ticketing fees may apply

Which Disney character are you most looking forward to seeing?

*** This Giveaway is Closed ***

Congrats to Allison R.!

Don’t forget to check Disney on Ice out online on Facebook and twitter too!!

Open to US only, 18+. Must be able to attend this event in San Diego on January 25. This giveaway ends January 19, 2018 at 11:59EST. Tickets are valid for weekday performances only (Thursday at 7pm).

Mandatory Entry
Please comment* below with your (or your child’s) favorite Disney character and/or why you’re excited for Disney on Ice.

Bonus Entries

These entries are NOT required, they just give you a few extra chances to win, do one two, or them all, it’s up to you. Please leave a separate comment for each entry you complete. Please note that your COMMENT is your entry, not the action you perform.

1. Do you Like us on Facebook – leave a comment and let us know!
2. Follow us on Instagram and leave a comment with your Instagram url so we can follow back!
3. Follow us on Pinterest and leave a comment with your Pinterest url.
4. Follow us on Twitter and leave a comment with your Twitter user name.
5. Tweet this and leave a comment with your tweet URL. (you may do this twice a day with at least 2 hours in between each tweet, please leave a comment each time)

Enter to win a 4pack of tickets to Disney on Ice Follow Your Heart in #SanDiego from @ACraftySpoonful! https://acraftyspoonful.com/disney-on-ice-follow-your-heart/ Ends 1/19

Thank you and good luck!

*Important: By completing any entry in our giveaways, you agree to ALL of our giveaway terms and conditions. Comments such as “Thank you for the giveaway” “I want to win” etc will not be counted as the mandatory entry and will be deleted along with all corresponding bonus entries. Please be aware that comments are moderated and may not appear right away. Make sure you use a valid email address so we may notify you if you’ve won! Giveaway winners will receive their tickets through the mail directly. Winner must provide mailing address to receive these tickets.

Disclaimer: I received tickets in exchange for promotion of this show. All opinions are my own.

Robot Valentine Snack Idea

Looking for a great Valentine’s Day treat? How cute is this robot valentine snack idea! And so easy to make!

Robot Valentine Snack Idea - a simple and easy snack for any valentines party

Today I’m sharing how to make a cute robot valentine snack that’s perfect for a classroom Valentine’s Day party! Not only is it candy-free but it’s also something fun for the kids.

With a few simple supplies you can pick up from the store, and 30 minutes to assemble, these snacks are sure to be a hit. We’ll be pairing them with chocolate covered strawberries and fruit for my son’s class party on Valentine’s Day.

I was able to pick up just about everything at Target and assembled them all within 1/2 an hour. I printed out a simple valentine message and punched out a heart around the message. If you’re passing these out as valentines you can simply add your child’s name to the bottom of the message. The kids are sure to love these treats on Valentine’s Day.

Robot Valentine Snack

What you need:

  • juice boxes
  • mini raisins (I opted for the yogurt covered raisins and regular)
  • fruit rope
  • applesauce
  • glue dots or adhesive roller
  • plastic spoons
  • washi tape
  • sharpie
  • valentines (optional)

What you’ll do:

1. Using the glue dots, secure two raisin boxes to the bottom of the juice box. The raisins will be the feet and the juice box is the body.

2. Place the applesauce cup upside down onto the top of the juice box and secure with glue dots and/or washi tape (whatever allows it to stay on top). This will be the robot’s head.

3. Add a fruit rope to either side to create the arms

3. Add a fruit rope to either side with glue dots to create the arms.

4. Tape a plastic spoon to the back of the robot body with washi tape.

5. Draw a face on the applesauce to add a little character to your robot valentine snack. Or glue on googly eyes and draw on a mouth.

Enjoy!

What’s your favorite Valentine’s Day treat?

This post was originally featured on Keep Kids Busy on February 2, 2015. 

Want to make your own valentines? Design them in PicMonkey by using this tutorial

Pinterest Inspiration


© A Crafty Spoonful - All Rights Reserved
It is OK to use one of my photos provided a link back and/or proper credit is given. It is NOT ok to copy and paste a whole post including instructions. Please do not remove watermarks or alter images in any way. Please contact me with any questions at danielle@acraftyspoonful.com

.