Back to School Lunch Ideas and Tips

Back to School Lunch Ideas and Tips

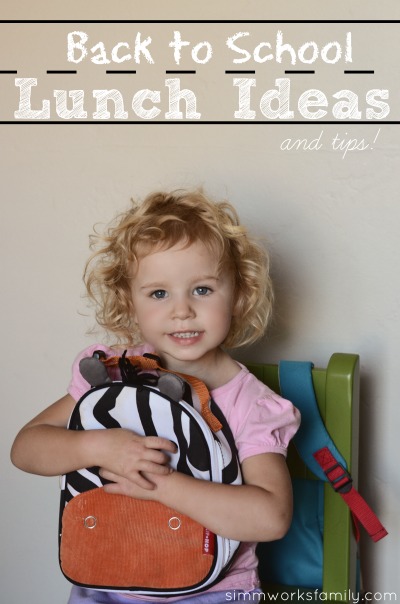
Ever start thinking of school lunches and wonder what the heck you’re going to pack? Well here are some great back to school lunch ideas and a few tips that might help you out!

My son isn’t quite ready for kindergarten yet but will be there next year and we’ve already exhausted a few great ideas for toddler lunches at home. So I’m trying to gather a bunch of ideas and tips so that when I am packing his lunch I can pack something that he’ll enjoy and actually eat. Good thing I have a whole year to figure this stuff out, right?

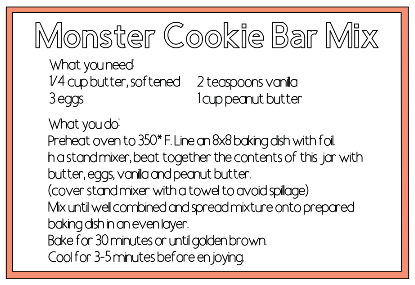
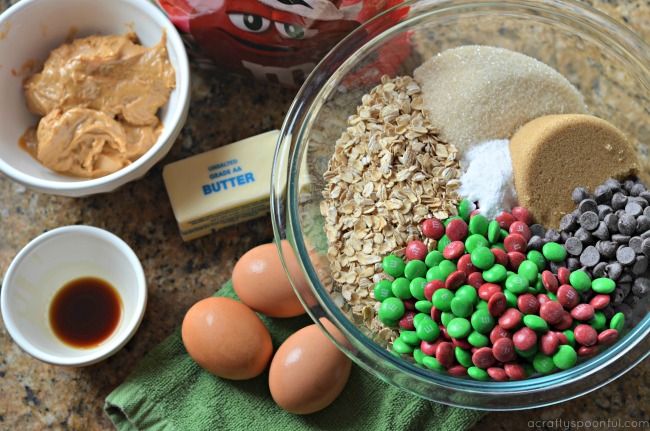
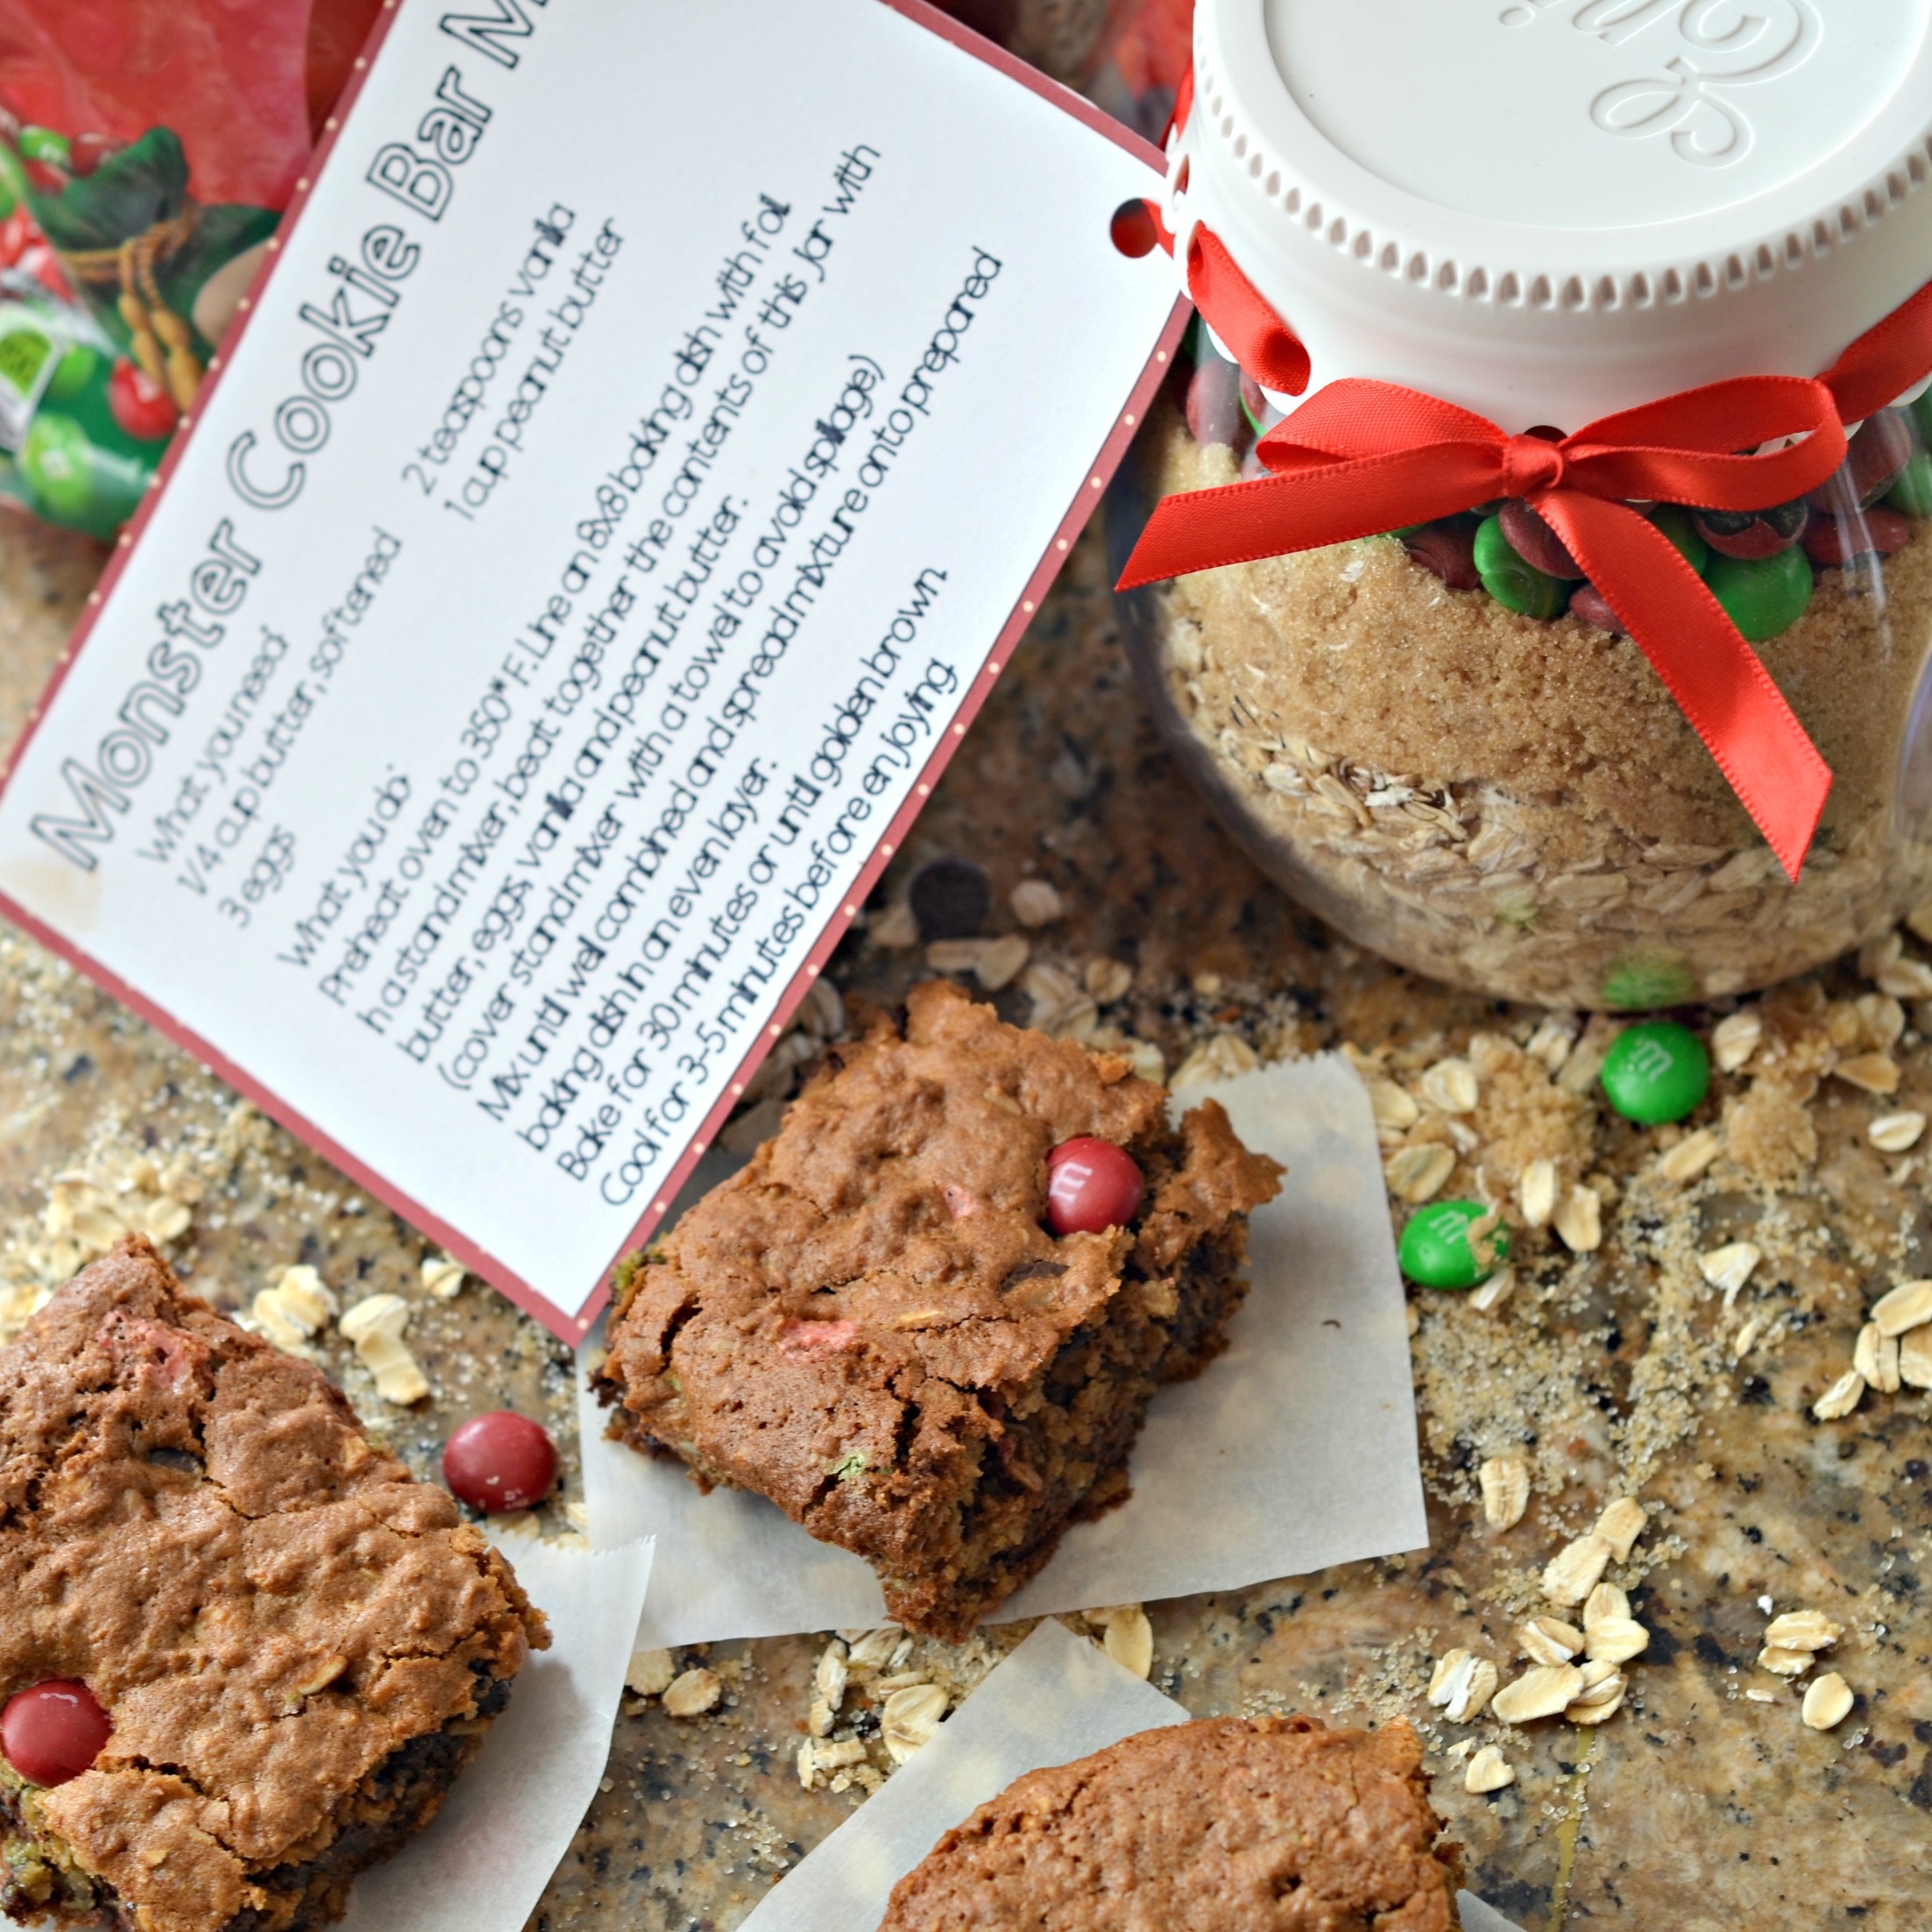
Ok, I’m not going to spend the whole year working on this. But I did start practicing by packing lunches for us to take with us on his days off preschool. When we’re heading out to the zoo, playing at the park, or heading to the beach, I’ve been able to pack lunches for him and his sister that they both enjoy. And here’s what I found… (some of the links included are affiliate links to Amazon) [Read more…]

No Bake Halloween Treats Snack Bar With 50/50 Bar Floats

This no bake Halloween treats snack bar with 50/50 bar float recipe is an easy way to whip up some Halloween fun with friends!

Halloween Dessert Bar With 5050 Bar Floats, No Bake Halloween Treats Snack Bar

We’re in the final countdown to Halloween night and we’re planning a frighteningly spooky time with friends and family as we pass out treats to the trick-or-treaters. To keep everyone pepped up and ready for the busy night, I’ve created a delicious Halloween snack bar that includes a few of my family’s favorite treats: OREOs and Fanta orange soda.

To make our spread more festive, I created some mummy snack wraps and pumpkin drink wraps. It was so simple to make these up in PicMonkey and they were a great addition to our snack bar. Plus the mummy OREO 2-packs will be great to add to my kids lunches leading up to Halloween or to pass out to my son’s class as a treat for their Halloween party.

Halloween Dessert Bar With 5050 Bar Floats treat labels

How to Make Snack Wraps in PicMonkey

If you aren’t familiar with PicMonkey, it’s so easy to create little printables to use for parties and special occasions. For these treat wraps I simply used the design option and chose the Facebook cover canvas to make my wraps. They’re the perfect size to wrap around an OREO 2-pack or a Fanta orange 12oz bottle.

Once I have the canvas I choose a canvas color for the wrap. For the pumpkins, I simply used a solid color, but for the mummies, I went into the Themes and chose a canvas design from the Demons theme (apparitions). But there are so many different options!!

I then added various basic shapes to create my design. There are a lot of shapes to use in the Halloween themes as well if you just want to use one of the pre-made overlays.

Don’t have time to DIY your own treat wrap? Download mine!

Pumpkin Drink Wrap | Mummy Snack Wrap

Halloween Dessert Bar With 5050 Bar Floats oreo mummies, No Bake Halloween Treats Snack Bar

No Bake Halloween Treats Snack Bar

With delicious Oreos and some 50/50 Bar Floats available, we have the perfect snack bar spread for our guests to enjoy. I also made some delicious Oreo balls that I decorated as pumpkins however I’m sad to report that they didn’t make it over the weekend between the kids and the husband. The leftovers were NOT pretty and I didn’t want to share the delicious clumps of OREO balls that were left over.

However I will leave you with a link to the recipe here. Simply dip in orange candy melts or white chocolate with orange food dye and top with a mini chocolate chip for a simple and easy sweet treat.

Halloween Snack Bar With 5050 Bar Floats set up, No Bake Halloween Treats Snack Bar

And now for this deliciously creamy 50/50 bar float recipe!

Halloween Dessert Bar With 5050 Bar Floats vanilla ice creamHalloween Dessert Bar With 5050 Bar Floats pouring sodaHalloween Dessert Bar With 50:50 Bar Floats fanta orange soda

50/50 Bar Float

  • 8 or 12 ounce Fanta orange soda
  • Vanilla Ice Cream
  • Whipped Cream (optional)
  • Sprinkles (optional)

Grab a large cup and fill up with vanilla ice cream.

Pour over an 8 ounce can of Fanta orange soda (or 1/2 a bottle of 12 ounce Fanta orange soda) slowly in stages. Once the delicious bubbles go down again, add more soda.

Top with whipping cream and sprinkles, add a straw, and serve to friends and family alongside some delicious OREOs!

Halloween Snack Bar With 5050 Bar Floats - a delicious treat, No Bake Halloween Treats Snack Bar

Halloween Dessert Bar With 5050 Bar Floats jack o lanterns

What are your favorite no bake Halloween treats?

Like this post? Read more!

Pin this article for later! 

Click the Pin button on the image below to save for later. 

This post was originally published on October 14th, 2015

Corn on the Cob with Herb Butter

BBQ corn on the cob with herb butter

Is there an item of food that just screams summer to you? For me, it’s corn on the cob. Every year my mouth starts to water as I think of the delicious ears of corn we’ll be eating come summer. And now we’ve taken it a notch higher with this corn on the cob with herb butter.

It’s so easy to just throw some corn husks into a pot, soak them, and then grill them up while grilling our favorite kabobs or steaks. And we don’t even have to bother with plates because the husks provide a great handle as we eat the corn.

The kids share our love of corn on the cob and as soon as they see in the store they start jumping up and down asking if they can put some in the cart.

Here’s the best way we’ve found to make the perfect barbecued corn and the best way to take the flavor up a notch… with herb butter!corn on the cob with herb butter - soak cornCorn on the Cob with Herb Butter

What you’ll need: 

What you do: 

1. Rinse off corn. If there are many layers of husk, remove a few of the outer layers. Make sure to leave most of the layers on the corn.

2. Soak the corn in a large pot of water for at least 15- 30 minutes.

3. Shake off excess water and hrow the ears of corn on the grill with whatever else you’re grilling.

corn on the cob with herb butter - cooked on the barbecue4. Grill the corn on medium heat (about 350) and rotate corn so that it’s charred evenly on each side.

5. Once the corn has been seared, remove from direct heat and place on indirect heat – like the top shelf of your grill. Allow to cook for 15 more minutes.

6. Using an oven mit, remove the corn and set on a tray to serve.corn on the cob with herb butter roasted corn7. When you’re ready to eat, peel back the husks and remove all silk from the corn. Discard the silk.

8. Slather with herb butter and enjoy!

corn on the cob with herb butter ready to eatThe corn will be hot so you may want to let it cool down a bit before letting the kids go crazy. My kids can hardly contain themselves once we take the corn off the grill.

Can you tell she loves it?

corn on the cob with herb butter eating

 What’s your favorite summer food?

The Perfect Herb Butter for Corn on the Cob

Herb Butter for Corn

I love the chance to spice up any food or side dish we’re going to serve at a party and after enjoying a deliciously barbecued ear of corn from the fair I knew we could make more of our favorite summer food.

With the 4th of July coming up I decided to throw together an herb butter to go with the corn we were bringing with us to the party.

What better than a tasty, flavorful butter to slather all over the hot, barbecued corn? So good! And so easy too. Herb butter for corn on the cob is not only tasty but very easy to whip up!Herb Butter for Corn ingredientsHerb Butter for Corn

What you’ll need: 

  • 2 sticks unsalted butter, softened
  • 1 tablespoon sage
  • 1 tablespoon thyme
  • 2 tablespoons basil
  • salt and pepper

Herb Butter for Corn mix

What you do: 

Mix together the herbs and salt & pepper with the butter until well blended.

Place butter in a dish and chill until ready to serve.

Slather onto a deliciously hot piece of corn and enjoy!

corn on the cob with herb butter ready to eat

 How do you spice up your favorite side dishes?

Kid Friendly Baked Caprese Chicken With Fresh Herbs from the Garden

This post was sponsored by Culligan Water as part of an Integrated Program for Influence Central and all opinions expressed in my post are my own.

This baked caprese chicken is full of fresh flavor straight from the garden! And our 3-year-old helped prepare the dish from start to finish. Read on to find out how you can get your kids interested in dinner again!

Remember a few weeks ago when we were talking all things herbs and I showed how we made an indoor hanging herb garden? Well, our herbs reacted so well to our new Culligan Water filtration system that we’ve been able to utilize fresh herbs in the recipes we’ve been making.

Since my youngest has become obsessed with all things gardening, I thought it’d be fun to have her help me make a meal from start to finish wiht a few of the fun things we’re growing in both our hanging herb garden and outside raised beds. And this baked caprese chicken dish includes so many wonderful elements from what we’ve grown so far. 

Speaking of elements, we couldn’t be happier with our experience with the Culligan Water system. It’s gone above and beyond our expectations so far. 

One of the best parts about our new Culligan Water filtration system is the fact that it’s so easy to utilize. Not only can the kids go to the sink to get filtered water to drink, they can fill up the watering cans and water the garden so that our plants are getting the full benefits of Culligan Water as well.

And the plants aren’t the only ones perking up with the new reverse osmosis water filtration system! The kids are actually going over and filling up their reusable water bottles and cups throughout the day without hesitation. No more asking for juice or complaining that there’s only water in the house to drink. When I asked them about it, they said that the water tastes better now. I’ll take that as a win in my book!

I haven’t even gotten to the details of the water softening system and its effects on our soap usage! Did you know that by using a water softening system, you don’t have to use as much soap in your washer (dish or laundry)? Even in the shower? And without the harsh effects of the hard water we have here in San Diego, the girls’ skin seems to be seeing a benefit to having the new system in place.

Did you know that Culligan Water is a world leader in innovative water filtration systems not only in homes but in offices as well? We’ve found that Culligan Water is able to provide water solutions for our whole home by identifying the water issues we have. Those include everything from hard water to the taste of our water.

We’re lucky that Culligan Water’s goal is to provide the best possible customer service experience and have experienced this first hand! In addition to leaving users with water we can trust, they also ensure customers can provide the best in our homes for ourselves and loved ones.

With Culligan Water products every day is a “good water day.” Now let’s get to that delicious baked caprese chicken recipe!

Kid Friendly Baked Caprese Chicken Printable Recipe

Baked Caprese Chicken

  • 2 chicken breasts, cut in half
  • 1/2 cup fresh mozzarella
  • 6 hothouse tomatoes, sliced
  • 9-12 leaves fresh basil
  • 1 tsp salt
  • 1/2 tsp pepper
  • 1-2 tbsp olive oil
  1. Lay chicken breast pieces in an oven safe dish and preheat oven to 400 degrees.
  2. Let your kids layer the salt and pepper, cheese, tomatoes, and basil over chicken.
  3. Bake chicken for 25 minutes or until bubbly and slightly golden on the top and chicken fully cooked.

Want to learn more about how you can be a bit more water wise?

Here are some more water-wise resources!

DIY Indoor Herb Garden

Water Conservation Tips: What Can You Do? 

Adding Desert Plants to Your Garden

Pin this article for later! 

Click the Pin button on the image below to save for later. 

Chicken Parmesan Bites – The Perfect Toddler-Approved Meal

These chicken parmesan bites are the perfect toddler-approved meal for busy weeknights! They come together in less than 30 minutes and pair perfectly with spaghetti and marinara sauce and vegetables. 

I have been trying to come up with healthy, fun dinners that my preschooler would be more interested in. Lately, all the kids want are carbs and sweets so turning a typical chicken dish into more kid-friendly meals is my goal. I’m pretty sure I’ve succeeded in that goal with the help of some inspiration from Lady and The Tramp. 

A craving for chicken parmesan hit when we were watching Lady enjoy a big bowl of pasta with Tramp and it hit me! Why not turn chicken parmesan into chicken parmesan bites!? Put a side of noodles and sauce on the plate and I had a meal that all of the kids would enjoy. Including the preschooler. Right? Right!

So the next night as we were watching Lady and the Tramp again for the 3rd time since receiving it to review, I plated up these delicious chicken parmesan bites for the kids to enjoy with a side of spaghetti noodles topped with marinara sauce and a scoop of broccoli florets. I placed the plates of dinner in front of the kids and they went to town! And the best part? I used only 2 chicken breasts to feed the whole family dinner. Isn’t that awesome? And budget friendly! Plus the kids will love helping put this meal together. 

Chicken Parmesan Bites 

  • 2 chicken breasts, cut into 1″ pieces
  • 4 tablespoons 1% milk
  • 1/2 cup all-purpose flour
  • 1 egg white
  • 1 cup Italian-Style Breadcrumbs
  • 1/2 cup freshly grated Parmesan cheese
  • 2 tablespoons olive oil
  • 2 teaspoons table salt
  • 1 teaspoon black pepper

Place chicken breast pieces in a bowl and cover with milk. Let soak for a few minutes while prepping the other ingredients. Place 1/2 cup of flour into a gallon size zippered plastic bags. Measure out 1 cup of breadcrumbs and place into a container with salt and pepper. Grate 1/2 cup parmesan cheese into the same container, stir to combine and set aside. Place egg white in a small bowl.

Take chicken and place in bag with flour. Shake vigorously until the chicken is well coated. Put coated chicken in the bowl with egg white and stir to coat chicken. Place bread crumb mixture in the bag you just used for flour. Put chicken back in the bag and shake again coating the chicken with breadcrumbs.

Heat oil in a skillet on medium-high heat. Add coated chicken to the pan and cook until golden brown, about 15 minutes. When chicken is cooked thoroughly remove from pan and serve with spaghetti and marinara sauce. Add some steamed veggies or a nice salad to make this a complete meal.

How are you getting your little one involved in different foods? 

Make sure to pick up your own copy of The Walt Disney Signature Collection Lady and The Tramp now available on Blu-ray and enjoy your own pasta experiences with the family! 

For some fun activities to do with the kids, click on the button below:

Love this recipe? Try these other toddler-friendly meals, tips, and ideas!

Pin this article for later! 

Click the Pin button on the image below to save for later. 

Irish Soda Bread Biscuits Recipe

This Irish Soda Bread Biscuits recipe is sure to hit all of the right spots when you pair it with a delicious cup of tea or coffee morning, noon, or night! This Irish Soda Bread Biscuits recipe is easy and quick. Perfect for those times you can’t make a full loaf of Irish Soda Bread for the family.

Irish Soda Bread Biscuits

I love a good breakfast scone. Perfect to pair with coffee or tea and fills me up! With St. Patrick’s Day around the corner I thought I’d take one of my family’s favorite quick bread recipes for Irish Soda Bread and turn it into a mini version to appease the kids. And these unique biscuits really hit the spot.

This Irish soda bread biscuit recipe is not only simple but can be made with ingredients found right in the pantry. And the results are just heavenly! Flakey, soft, and delicious. Especially with a schmear of butter. If you’re looking to start your day off with the luck of the Irish then this biscuit is for you!

Making Irish Soda Bread Biscuits with Kids

By taking our favorite soda bread recipe and turning it into biscuits, I’ve been able to teach the kids how to make quick breads and tips for adapting recipes based on our needs. It’s a great way to introduce kids to bread baking before jumping into yeast recipes. 

Another great part about sharing the baking experience with our kids is that we get to spend quality time together. I’ve found that I can talk about a number of different topics when we’re in the kitchen together that they may not have been as receptive to if we were talking in the car or around the dinner table. 

When the kids are doing something with their hands, they seem to keep the conversation going without any real prompting. It’s a beautiful thing! I find that these types of recipes are good for all ages. From toddlers to teens, you can’t go wrong with an irish soda bread biscuit recipe. 

If you’re looking for a good Irish Soda Bread recipe to try after these biscuits, check out Alea’s Irish Soda Bread recipe

Irish Soda Bread Biscuits Printable Recipe

Irish Soda Bread Biscuits

  • 2 cups white whole wheat flour
  • 2 teaspoons sugar
  • 1 teaspoon salt
  • 3/4 teaspoon baking soda
  • 2 tablespoons cold butter (diced)
  • 1/2 cup raisins
  • 3/4 cup buttermilk (see note if you don't have buttermilk)
  1. Preheat the oven to 375. If using stoneware, place stoneware in the oven while it’s heating up.
  2. Combine flour, sugar, baking soda and salt in a bowl. Work in butter by hand. Make sure to use your fingers to mix it into the dry ingredients.
  3. Add in the raisins and buttermilk and combine together with your hands. Pat out the dough and form into a disk about 1 inch thick.
  4. Divide the disk into 6 equal pieces and roll into 2-inch rounds. Bake at 375 degrees for 15 to 18 minutes.

If you do not have buttermilk, grab some low-fat milk and vinegar (I use apple cider vinegar). Combine 3/4 cup milk with 1 teaspoon vinegar. Stir and let sit for 5 minutes.

Irish Soda Bread Biscuits Video Tutorial

Want to see these made instead of just reading about it? Check out this Irish Soda Bread Biscuits video we posted on Facebook: 

This post was first featured on this site on Feb 10, 2013.

More St. Patrick’s Day Celebration Ideas

Looking for more St. Patrick’s Day fun? Check out these activities and recipes! 

DIY Shamrock Shirt

Rainbow Cupcakes

Vanilla Mint Sugar Scrub

Delicious Quick Bread Recipes

These recipes are easy to throw together and are the perfect pairing to any cup of coffee or tea.

Apple Cheddar Quick Bread

Vanilla Chai Banana Bread

4-Ingredient Beer Bread

Recipes to Make With Kids

Get the kids in the kitchen with these fun recipes they’ll enjoy!

Apple Cider Donuts

M&M Monster Cookie Bars

Candy Apple Bars


Pin this article for later! 

Click the Pin button on the image below to save for later. 


Robot Valentine Snack Idea

Looking for a great Valentine’s Day treat? How cute is this robot valentine snack idea! And so easy to make!

Robot Valentine Snack Idea - a simple and easy snack for any valentines party

Today I’m sharing how to make a cute robot valentine snack that’s perfect for a classroom Valentine’s Day party! Not only is it candy-free but it’s also something fun for the kids.

With a few simple supplies you can pick up from the store, and 30 minutes to assemble, these snacks are sure to be a hit. We’ll be pairing them with chocolate covered strawberries and fruit for my son’s class party on Valentine’s Day.

I was able to pick up just about everything at Target and assembled them all within 1/2 an hour. I printed out a simple valentine message and punched out a heart around the message. If you’re passing these out as valentines you can simply add your child’s name to the bottom of the message. The kids are sure to love these treats on Valentine’s Day.

Robot Valentine Snack

What you need:

  • juice boxes
  • mini raisins (I opted for the yogurt covered raisins and regular)
  • fruit rope
  • applesauce
  • glue dots or adhesive roller
  • plastic spoons
  • washi tape
  • sharpie
  • valentines (optional)

What you’ll do:

1. Using the glue dots, secure two raisin boxes to the bottom of the juice box. The raisins will be the feet and the juice box is the body.

2. Place the applesauce cup upside down onto the top of the juice box and secure with glue dots and/or washi tape (whatever allows it to stay on top). This will be the robot’s head.

3. Add a fruit rope to either side to create the arms

3. Add a fruit rope to either side with glue dots to create the arms.

4. Tape a plastic spoon to the back of the robot body with washi tape.

5. Draw a face on the applesauce to add a little character to your robot valentine snack. Or glue on googly eyes and draw on a mouth.

Enjoy!

What’s your favorite Valentine’s Day treat?

This post was originally featured on Keep Kids Busy on February 2, 2015. 

Want to make your own valentines? Design them in PicMonkey by using this tutorial

Pinterest Inspiration

Creamy Chicken Jalapeno Popper Dip: The Perfect New Year’s Eve Appetizer

This creamy chicken jalapeno popper dip is the perfect appetizer for New Year’s Eve and is sure to be a crowd pleaser! This is a sponsored post. 

Creamy Chicken Jalapeno Popper Dip - the perfect NYE appetizer

I think I’m on a high. Still recovering from the Christmas cheer that spread throughout my house, family in town celebrating, and a fun weekend of even more celebrating in my near future. And, of course, smack dab in the middle of all of that is New Year’s Eve. The biggest party of the year, right?

We normally head over to my brother in laws house with appetizers and sparkling grape juice in hand for a kid-friendly NYE party where we celebrate ringing in the new year on GMT. We’re home by 6-7pm and the kids feel like they’ve gotten to celebrate the big countdown with their family and friends. But then my husband and I can enjoy a nice quiet meal together as we ring in the new year while the kids snooze.

Creamy Chicken Jalapeno Popper Dip

I try and keep things simple by making a few appetizers to enjoy instead of a large meal. I bring a larger version of the appetizer to the party while I save a small version for us to heat up later. We can munch together and watch the festivities on tv as we remember what happened in the years past. It’s a great way to connect. But it’s also a great way to try out fun recipes I haven’t had a chance to try out in the previous year. And this creamy chicken jalapeno popper dip recipe is one of them! The kids loved that I paired it with their favorite sparkling grape juice.

I first saw a variation of this recipe on my friend Melissa’s site and knew I wanted to try it. But I wanted to see if I could mix those flavors with my favorite “crack dip” recipe. Adding chicken to this dish not only took it up a notch but made it more acceptable as a replacement for dinner. I’ll enjoy mine with celery while the husband dipped in with crackers and tortilla chips!

Creamy Chicken Jalapeno Popper Dip ingredientsCreamy Chicken Jalapeno Popper Dip ingredients to mixCreamy Chicken Jalapeno Popper Dip - deliciously cheesy with a hint of spice

Creamy Chicken Jalapeno Popper Dip

  • 2 8 ounce packages Kraft Philadelphia Cream Cheese, softened
  • 1/2 cup mayonnaise
  • 1 4 ounce can chopped green chiles, drained
  • 2 diced jalapeño peppers, seeds removed
  • 1 cup Mexican style Kraft Natural Shredded Cheese
  • 1 cup Mozzarella Kraft Natural Shredded Cheese
  • 1-1 1/2 cups diced cooked chicken
  • 1/2 cup Panko breadcrumbs
  • ½ cup grated Parmesan cheese

Preheat the oven to 375˚ F.  In a medium bowl, combine the cream cheese, mayonnaise, green chiles, jalapeños, chicken, and shredded cheeses.  Mix thoroughly with a spoon or spatula until smooth and evenly combined.  Spread the mixture into a baking dish (approximately 9 x 9-inches).

In a second bowl, combine the Panko and Parmesan and stir until combined.   Sprinkle over the cream cheese mixture in the baking dish.  Bake for 25 minutes or until the mixture is hot and the topping is golden. Broil on high for 30 seconds if it’s not as toasty on top as you’d like.

Serve warm with crackers, tortilla chips, baguette slices, vegetables, etc. as desired.

Creamy Chicken Jalapeno Popper Dip with chips and crackers

What do you munch on during the NYE celebration? 

Love this recipe? Here are a few more you might like: 

Pin this article for later! 

Click the Pin button on the image below to save for later. 

The Best No Flour Monster Cookie Bars + A Cookie Bar Mix Gift Idea

We’ve whipped up these deliciously satisfying No-Flour Monster Cookie Bars and are sharing how you can create your own Monster Cookie Bar Mix to gift to friends this holiday season. This shop has been compensated by Collective Bias, Inc. and its advertiser, Mars Wrigley Confectionery US, LLC. All opinions are mine alone. #SimplySweetness #CollectiveBias

Holiday baking season has arrived! And you know what that means? Lots and lots and LOTS of dishes in our home. Because when we bake, we bake. I’m sure I’ve mentioned it before but the kids LOVE to help out in the kitchen. And when Christmas rolls around, we stock up on all of our baking necessities (like the big Red & Green Holiday 52 oz. Bag of M&M’S® from Sam’s Club). We wouldn’t want to run out mid-holiday baking. 

One thing I love about baking during the holidays is that it’s an inexpensive way to share our love with others. We don’t necessarily have the budget to purchase a gift for everyone we know so we can make fun little platters filled with goodies for others to enjoy. And one of my new favorite gifts to make are these fun cookie bar mixes so others can make our favorite recipes at home. That way we can whip up a batch to share with them now and provide them with a mix to make them later. Hey, who knows? Maybe they’ll even use the kit to make some holiday goodies for their loved ones! 

Red & Green Holiday 52oz. Bag of M&M’S® are a festive and colorful treat to bring into your baking, decorating and every aspect of your holiday celebrations. The Stand-Up Pack will keep your M&M’S® fresh and ready-to-go in an easy resealable package. Heck, if I wasn’t baking with them, I’d probably give these bags as gifts! What says, “I love you,” better than a big bag of M&M’S®, right? 

But for now we’ll stick with gifting some delicious cookie bars and mixes.

No Flour Monster Cookie Bars

  • 1 cup sugar
  • 1 cup brown sugar
  • 1/4 cup unsalted butter, softened
  • 3 large eggs
  • 1 cup peanut butter
  • 2 teaspoons vanilla extract
  • 2 teaspoons baking soda
  • 1/2 teaspoon salt
  • 4 cups Old Fashioned oats
  • 1 cup M&M'S®
  • 1 cup chocolate chips
  1. Pre-heat the oven to 350°F. Line a 13×9-inch metal baking pan with foil.

  2. Add all of the ingredients into the bowl of a stand mixer fitted with the paddle attachment,

  3. Cover bowl with dish towel and mix on lowest setting. Once mixed up a bit, increase speed and mix until all of the ingredients are combined. 

  4. Spread mixture onto prepared baking pan and bake for 30 minutes or until golden brown. 

  5. Take out of the oven and let cool for 5 minutes then transfer foil and bars to a cooling rack. Cut into squares and enjoy! 

Remember how I said you could GIFT these bad boys to your friends and family in a fun mix? Well here’s how! 

Monster Cookie Bars Mix

What you’ll need: 

  • 4 cups old fashioned oats
  • 1 cup brown sugar, packed
  • 1 cup white sugar
  • 2 teaspoons baking soda
  • 1/2 teaspoon salt
  • 1 cup M&M’S®
  • 1 cup chocolate chips
  • 1 32 oz jar with lid
  • ribbon
  • hole punch

What you do: 

Layer each ingredient in the order it’s shown above into a 32oz plastic or glass jar with lid

Place lid on jar and close tight. 

Print out Monster Cookie Bar Mix printable and cut out and attach to jar with ribbon.

Gift to the ones you love! 

Click on image to download printable

You can find the big Red & Green Holiday 52 oz. Bag of M&M’S® in the candy aisle of your local Sam’s Club. And while you’re there, stock up on the rest of your holiday baking items! That’ll save you a few trips in the long run. 

And right now you can sign up for a free Ibotta account and earn $2 off with the purchase of a 52 oz bag of Red and Green M&M’S®. Offer valid from 11/1/17 until 12/25/17. 

Don’t forget to check out more awesome ideas you can make with M&M’S® by checking them out on Facebook, Pinterest, Instagram, and Twitter

Love this recipe? Check out these delicious bites: 

Pin this article for later! 

Click the Pin button on the image below to save for later. 


© A Crafty Spoonful - All Rights Reserved
It is OK to use one of my photos provided a link back and/or proper credit is given. It is NOT ok to copy and paste a whole post including instructions. Please do not remove watermarks or alter images in any way. Please contact me with any questions at danielle@acraftyspoonful.com

.