DIY Moana Bangle Bracelet

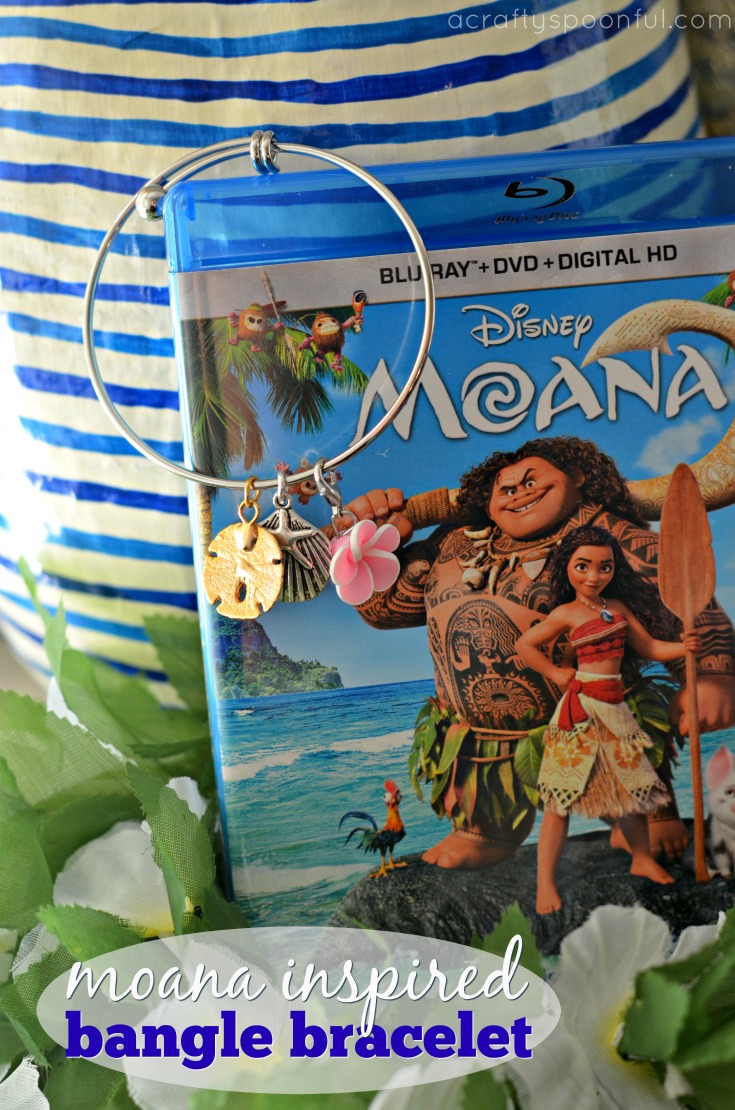
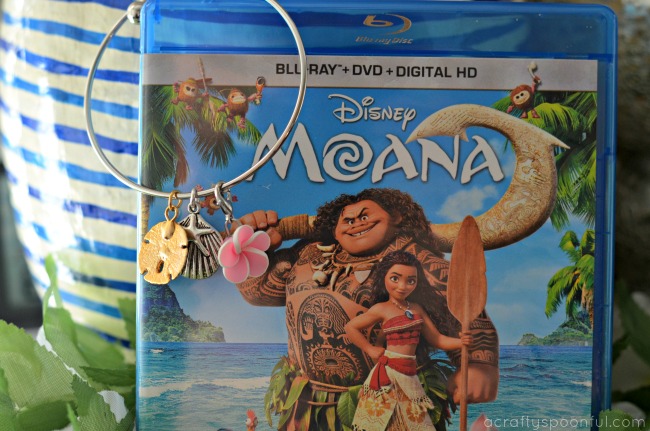
This DIY Moana bangle bracelet is a fun and easy craft the kids can do. Let them personalize their bracelets with their own choice of Moana-inspired charms and wear it proudly as they sing along. 

Who else has a HUGE Moana fan at home? While you’re in luck. Moana is coming out on DVD next Tuesday!! We received an early copy for review and my girls have been playing it non-stop since it came in the mail. And the 6-year old asked to buy the soundtrack. How cute is that? Don’t worry, dear daughter, already done! 

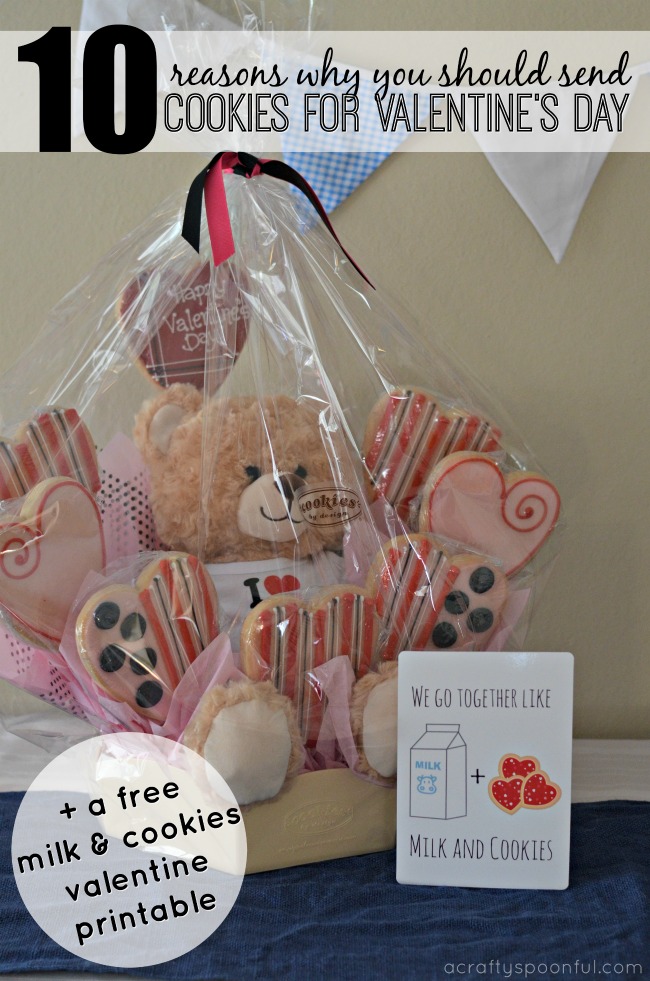
To celebrate the release of Moana on DVD on March 7th, we’ve made a fun DIY Moana bangle bracelet for each of the girls. I purchased bulk charms and bracelets from Amazon so they could make a few and then let them choose a few special charms during a visit to Michaels. Surprisingly Norah wanted the exact same charm Molly did so they went with plumeria flowers. But you could find something more suited to your likes for the “star” charm. 

This post contains affiliate links. 

Moana Bangle Bracelet

What you’ll need: 

What you do: 

Take charms and loop over hook edge of the bracelet. Circle around and up to add to the bracelet. 

Add as many or as few as you’d like to create the look you want! 

That’s it! How simple is that? Oh, and if you want to pre-order a copy of Moana, grab it here

What’s your favorite part in Moana? 

Here are some fun activities to do with the kids while you’re making your bracelets:

Download Moana Island Crafts

Looking for more fun? Check out these awesome posts:  

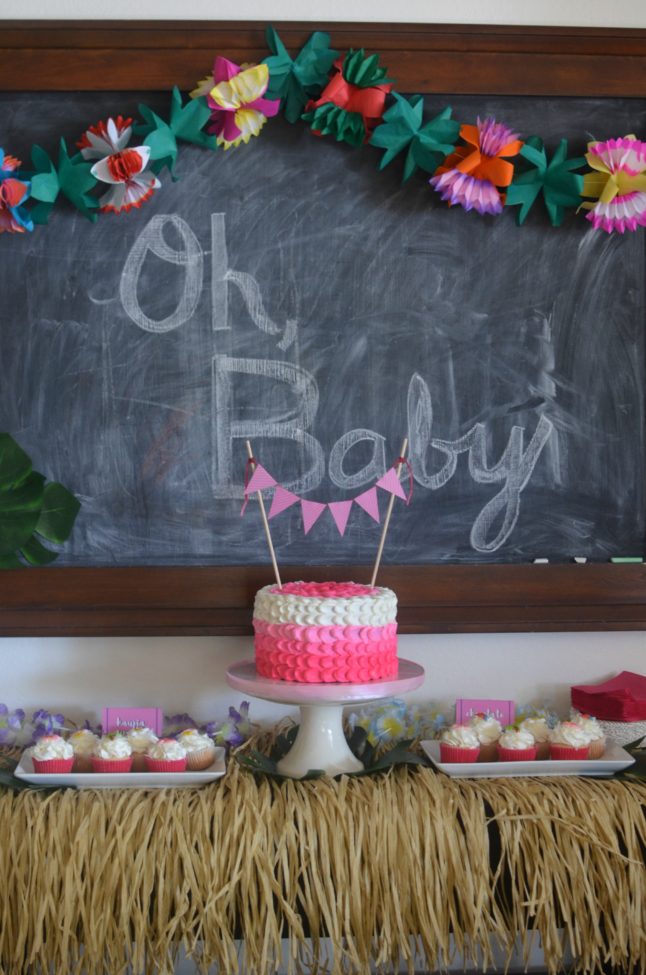
Aloha Hawaiian-Themed Baby Shower

Kakamora Ornaments

Easy Mardi Gras Masks for Kids

Can anyone else believe how fast this year is going? It’s already Mardi Gras and Lent is right around the corner. Now we don’t do huge celebrations for Mardi Gras but we do love letting the kids get involved with some masks and beads. And while the big kids get to celebrate Mardi Gras at school with some Mardi Gras bingo, the little one and I stayed home and made some masks. 

These mardi gras masks for kids are super easy to make and take only a few supplies to put together. Don’t have paint? Use colored construction paper or felt and trace your child’s hand to cut out. Don’t have a paper straw? Use a dowel, stick, or unsharpened pencil for the holder instead! Crafting with the kids means using what we have on hand to have a little fun. 

Here’s how we made these:

Mardi Gras Masks for Kids

What you’ll need: 

  • white construction paper
  • purple and green paint (can also use gold)
  • hole punch
  • scissors
  • paper straw (or unsharpened pencil)
  • feathers and pom pomps
  • tape
  • glue

What you do: 

1. Paint your child’s hand with one of the two colors you’ve selected. Take your construction paper and put it long ways in front of your child. Have them put their handprint on the paper. Clean off your hand. 

2. Repeat with the second color and second hand. Make sure that the second hand print butts up against the first (you can overlap as well). 

3. Let hands dry. 

4. Cut out dried handprints. 

5. Using a hole punch, punch a hole for the eyes on either side. Then line holes up with eyes and cut out bigger eye holes. 

6. Tape straw and feathers to back of mask and glue pom poms onto front of mask. Let dry. 

Enjoy! 

Do you celebrate Mardi Gras? 

Tips to Keep Teen Drivers Safe + a New Teen Driver Kit

Have a new teen driver? We’ve put together a new teen driver kit with help from our sponsor, Mercury Insurance, to help keep teen drivers safe on the road.

This past week one of my youngest siblings passed her driving test and will be on the road with her license. And with the stats I’ve been seeing lately, that scares me! The National Highway Traffic Safety Administration reports that 2,524 teen drivers and passengers were killed and 177,000 were injured in 2013. And with mobile technology and the use of mobile apps steadily increasing, distracted driving accidents are also on the rise.

To commemorate this milestone, though, I’m hoping to share some tools with her that will help keep her as safe as possible. That’s why I put together a new teen driver kit for her to utilize when she’s on the road. Complete with items like a hands-free phone stand, mobile charger, and other items that may come in handy (jumper cables!), I hope she feels more confident on the road when she’s driving alone. 

In addition to my new teen driver kit, I have the help of our sponsor, Mercury Insurance, and their Drive Safe Challenge. The Drive Safe Challenge is an interactive website that provides teens with safe driving and vehicle tips, as well as gives parents tools to help encourage responsible driving behavior. 

The site features:

They don’t just want to help teens, they also want to educate them (and their parents) about the dangers and responsibilities that come with getting a driver’s license. Apply the brakes on the leading cause of death for teenagers and share what you learn from the Drive Safe Challenge website with a new teen driver you know.

What To Include: New Teen Driver Kit

  • storage container (to hold everything)
  • booster cables
  • drink cup 
  • microfiber towels
  • portable charger (for any device)
  • flashlight
  • cleaning wipes
  • phone car mount (hands free!)

Make sure to print out a copy of the Mercury Insurance driving contract parents and teens can sign to set the rules of the road and outline the circumstances under which driving privileges would be lost. It makes the perfect addition to this kit! 

Do you know a new teen driver who’s about to hit the road? 

10 Reasons Why You Should Send Cookies for Valentines Day + A Printable Cookies and Milk Valentine

This post featuring a free milk and cookies valentine printable plus 10 reasons why you should send cookies for Valentine’s Day is sponsored by Cookie’s by Design. 

When my husband and I were first dating, I started to send him a Cookie’s by Design cookie bouquet for Valentine’s Day. It was a special way for me to show him my love and a little less embarrassing than a flower bouquet for a man. At the beginning of our relationship, it was just a cute mug cookie bouquet (we still have some of those mugs!). But as the years went by the bouquets increased in size as our relationship grew. 

With 3 kids at home, that mug bouquet just won’t cut it. Because when my husband brings his gift home from work, 3 eager eyes watch him as he puts down the bouquet. He can’t help himself from sharing with them! And I don’t blame them for wanting in on some of that goodness! 

Even though there are flowers and chocolates and so many other ways to show your loved ones you care on Valentine’s Day, the one way we show each other how we care is through cookies! Here are a few reasons why you should send cookies for Valentine’s Day too! 

10 Reasons Why You Should Send Cookies for Valentines Day

1. Cookies are delicious. We all know this. But Cookie’s By Design cookies are baked fresh AND hand decorated. 

2. You can share with friends (or your kids)!

3. Each basket is made to order and can be personalized with messages or images printed right on the cookies.

4. You can’t eat flowers. But you can eat cookies. 

5. Cookie’s by Design cookie bouquets come in so many different varieties and designs. They even launched handcrafted cookie gift baskets featuring Build-A-Bear Workshop teddy bears. Perfect for the kids! 

6. They deliver right to your door. Cookie’s By Design creations are always hand delivered and handled with care.

7. You can even get them delivered as early as the same day. Cookie’s By Design offers same-day gift delivery on most of their hand decorated cookie bouquets. 

8. You can also pick them up locally at your closest Cookie’s By Design location (for those who procrastinated).

9. These cookie bouquets don’t wilt.  

10. Once the cookies are gone, the Build-A-Bear Workshop teddy bears last for years to come. 

Did you order your Cookie’s By Design Valentine’s Day cookie bouquet? Pair it with this cute printable valentine that you can print out on a 5×7 card to make your gift complete!

Cookie’s By Design is the original cookie bouquet company and they offer custom-designed, hand-decorated cookie arrangements, gift baskets, cookie cakes and cookie trays for every occasion.

Last-minute gift givers can still wow their sweetie with ready-made Build-A- Bear Workshop baskets available at most Cookie’s By Design locations. The new baskets are available to order now at all Cookies by Design locations and online at cookiesbydesign.com and baskets can be hand-delivered the same day or customized and delivered within a day.

You can connect with Cookie’s By Design online, on Facebook, and Instagram @cookiesbydesign

Do you have any Valentine’s Day traditions? 

Homemade Valentines Day Gifts

Homemade Valentines Day Gifts

I love receiving homemade gifts. There’s something about knowing that someone thought of you enough to make a gift for you that touches my heart. Now don’t get me wrong – I love any and all gifts! But homemade is always special.

If you’re looking for some homemade valentines day gifts then look no further. Below are some great ideas to get you started on gifts to make friends and family to celebrate the day of love.
[Read more…]

How to Create a Wishing Star Wand + Pinnochio on DVD

review affiliate link disclaimer

My daughter is obsessed with all things wands, swards, and sticks. Anything she can swing around and bop people on the head with (gently of course), she loves. And with our recent obsession with Pinocchio since it came out on Blu-Ray, it was the perfect way to commemorate the movie.

As we were planning for a family movie night, I decided to let the kids make their own wands customized to their likes and needs. It really was a simple craft and the kids had a great time doing it! With the help of mom and a glue gun to finish everything off.

So if you’re little princess loves wands as much as mine do, I highly suggest trying your hand at making a wishing star wand. It’s simple, easy, and takes less than 5 minutes!

How to Create a Wishing Star Wand

What you’ll need:

  • wooden dowels, cut to size (we purchased 48″ dowels and cut them in thirds)
  • felt, any color
  • ribbon, any color
  • glue gun

What you do: 

1. Cut out felt into the size and shape you want for the top of your wand. Cut out coordinating ribbon in the amount and length you prefer.

2. Do a dry run before gluing everything together to make sure the felt pieces fit together on the top of the wand.

3. Tie the ribbon onto the top of the stick and secure with the hot glue.

3a. Make sure to go all around the dowel so that the ribbon doesn’t slip down.

4. Now it’s time to glue down the felt pieces. Start with a small dab on one side of the dowel and adhere the first felt piece.

5. Then add a few dabs of hot glue to the other end of the dowel and the felt piece already adhered. Place the second felt piece on top covering the top of the dowel completely and sandwiching the ribbon in between the two felt pieces.

 
6. Hand the wand over to your favorite princess and watch them play! 

See how easy that was?

What type of wand would you make?

Disney’s timeless tale Pinocchio, considered one of the greatest animated films ever made with two Academy Awards, joins the Walt Disney Signature Collection. Now it will delight a whole new generation of dreamers with its masterful animation, unforgettable characters and award-winning music.

The movie which inspired the world to wish upon a star, arrives for the first time on Digital HD and Disney Movies Anywhere on Jan. 10, and on Blu-ray™ and DVD on Jan. 31 with hours of new and classic bonus features.

Popcorn Valentine’s Day Printable + 7 More FREE Valentine Printables

This popcorn valentine’s day printable makes putting together valentines for the class easy and fun! 

popcorn-valentines-day-printable-a-quick-and-easy-gluten-free-valentine-snack

One of my favorite holidays is Valentine’s Day. I love seeing my kids excited about sharing little treats and goodies with their friends and enjoy celebrating what we love about one another on this day. What I also love doing is brainstorming with each kid and deciding what type of valentine they want to create. 

Now we’ve been making our own Valentine’s Day printables since my oldest was in preschool so it’s a tradition to share what we make every year. And this year is the first year my son has requested a food instead of a theme. We were shopping at Target and went down the snack aisle and he saw a large bag of individual popcorns. He asked if he could pass that out this year and I couldn’t say no. 

So we got home and I put together this simple printable using PicMonkey. Then I printed two sheets out for his 12 classmates and let him do the rest! 

popcorn-valentines-day-printable-popcorn-and-easy-printable


Popcorn Valentine’s Day Printable

What you’ll need: 

TO DOWNLOAD PRINTABLE CLICK HERE

What you do: 

1. Cut out printables. Make sure your child writes his or her name on each printable. 

popcorn-valentines-day-printable-punch-hole-in-top-of-bag-and-printable

2. Align printable with corner of popcorn bag and use hole punch to make a hole in both printable and top of bag (be careful not to puncture the sealed bag so you don’t accidentally open it).  

popcorn-valentines-day-printable-attach-ribbon-and-tie-together

3. String a piece of ribbon through the hole, cut off and tie! Curl the ends of the ribbon and you’re done! 

popcorn-valentines-day-printable-a-delicious-sweet-treat-for-valentines-day

What does your kid loving as a Valentine? 

Looking for more Valentine’s Day printables? Look no further! Check out our printables from the years past: 

I Dig You, Valentine Minecraft Printable

Tic-Tac-Toe Valentine Printable

Bugs & Kisses Valentine Printable

Your Pudding Me In A Great Mood Valentine Printable

Doh You Want To Be My Valentine Printable

RAWR Dinosaur Valentine Printable

Cutie Valentine Printable + How To Make Valentines with PicMonkey

4 Tips For Cold and Flu Prevention + a Free Bathroom Printable

We’re sharing our tips on cold and flu prevention alongside a cute printable for the bathroom today with help from our sponsor, Vicks. 

4 Tips For Cold and Flu Prevention

With three kids, two of which are in school, we’re constantly bringing home one thing or another. So it’s about time I say enough is enough! I’ve declared a war on germs and am not about to succumb to the latest illness that’s going around our community.
2With these tips from notable Manhattan-based physician Dr. Peterson, we’re able to reduce the germs we’re in contact with. Making these small adjustments to our daily lives can help us reduce the chance of cold or flu running rampant through our homes. Because there’s no fun in a sick house. Especially if my husband finally gets it. Which inevitably always happens these days.

My grandma would reach for the Vicks VapoRubTM topical ointment – a topical cough medicine with medicated vapors – any time we were sick when I was growing up. It starts working quickly to relieve cough symptoms (for ages 2+). Now we turn on our humidifier when any of us starts to feel icky (we have one for every bedroom) and put in Vicks VapoPads® when needed. But sometimes it’s better to prevent illness instead of just taking care of the symptoms all the time.

4 Tips For Cold and Flu Prevention plus a Free Bathroom Printable

I made a few signs using PicMonkey (similar to how I made this Subway Art) in an effort to remind the kids of a our morning and evening routine to wash, wash, wash along with a few other essentials they need to be doing in the bathroom. Feel free to download them here

4 Tips For Cold and Flu Prevention

4 Tips For Cold and Flu Prevention - wash your hands

Wash Your Hands

Wash your hands with soap and water regularly, especially after touching dirty surfaces like doorknobs and keyboards. Thorough washing should take as long as singing “Happy Birthday” twice.

I’ve found that when washing hands with the kids, having each kid sing the song (or a different verse of the song) makes them remember to wash for the proper amount of time. You could even frame a copy of the song in your bathroom next to the sink to remind people to sing along (out loud or in their heads) while washing.

4 Tips For Cold and Flu Prevention - Don’t Touch Your Face

Don’t Touch Your Face

Don’t touch your eyes, nose or mouth. These are direct entry points for germs. Most adults touch their face about 16 times a day, and children do a lot more often, increasing the spread of germs.

It’s super hard to stop this but staying cautious of how often you do touch your face will help reduce the contact. I find myself reminding my kids quite often during the day since they’re obsessed with picking their face, touching their ears and nose, and sucking on their fingers. It’s even harder because one of our kids is quite fond of their thumb.

4 Tips For Cold and Flu Prevention - Keep common areas and surfaces clean

Keep Common Areas and Surfaces Clean

Germs live on surfaces and spread to humans through skin contact so anything that we touch frequently can be a threat. Use disinfectant wipes to wipe down your workspace daily, as well as your telephone, mouse, and keyboard. Make sure you regularly disinfect doorknobs and shared electronics like TV remotes. Also, wash your children’s toys after playtime. We even have a dirty bin for toys that we load into the dish washer after we unload the dishes from the night before.

Don’t forget about the kitchen! Kitchens happen to be the filthiest room in the house. Sponges, countertops and sinks have been shown to have 488 bacteria per square inch due to residue and foodstuffs that breed bacteria. Ugh! I shudder to think of it.

4-tips-for-cold-and-flu-prevention-turn-on-your-humidifier

Turn on your humidifier

Studies indicate flu viruses thrive in cold and dry places, making winter air an ideal breeding ground for the virus. By keeping humidity levels in your home between 40 and 60 percent you can reduce the survival of flu viruses on surfaces and in the air. It also helps my husband and son breathe better when in use.

The new Vicks Sweet Dreams Cool Mist Humidifier is the latest in an array of models that are designed to meet your family’s growing needs. The American Academy of Pediatricians recommends using a cool mist humidifier throughout the winter months to help relieve congestion and cough in children.
To help control your cough, you can try the Vicks Warm Mist Humidifier which releases a warm mist to help offer temporary relief from cough and congestion. You can also use it with Vicks VapoSteam® which creates a medicated steam with cough suppressant to relieve coughs for children ages 2 and older.

4-tips-for-cold-and-flu-prevention-with-vicks

Vicks VapoPads® can be used in conjunction with Vicks Humidifiers to provide soothing Menthol or Sleepytime Rosemary & Lavender scented vapors for up to eight hours of comfort. I have the Mini Filter Free humidifier and love using the Vicks VapoPads® with it, but the Vicks Sweet Dreams Humidifier is on the wish list!

4 Tips For Cold and Flu Prevention - wash and dry

How are you preventing colds and the flu from running rampant in your home? 

DIY Star Wars Rogue One Night Light

This post featuring a DIY Star Wars Rogue One Night Light is brought to you by Kleenex brand via Momtrends.

diy-star-wars-rogue-one-night-light

In just a few short weeks Rogue One: A Star Wars Story© TM Lucasfilm LTD will be coming to theaters everywhere and I’m pretty sure that my family may be looking forward to that more than Christmas this year. We’re huge Star Wars fans and have been for… well… ever! And it’s not just one or two of us, it’s the whole family. Including Grandpa. My dad may be the biggest Star Wars fan I know and he’s passed that down to his kids and grandkids. So as we wait patiently for the next story to come to life on the big screen, we’re biding our time with fun Star Wars themed crafts. 

In partnership with Lucasfilm LTD, Kleenex brand will launch limited edition boxes featuring Rogue One: A Star Wars Story designs, perfect for Jedis of all ages. They’ll hit store shelves this Fall. Once they do, you too can create your own Kleenex brand ft. Rogue One: A Star Wars Story designs night light. This DIY craft turns a Kleenex box with Rogue One: A Star Wars Story designs into a fun room accessory, simply by removing the tissues, poking small holes in the sides of the box (using a thumbtack) and inserting an electric tea light, creating a “night sky” in a dark room. So easy that my 7 year old son was able to complete this craft on his own! 

This craft, just like the Star Wars movies, brought my family together. Spending quality time together is an easy way to show you care. And we can take this idea outside of the home by showing others we care as well. We can all be heroes by banding together to combat indifference with gestures of care, like sharing a tissues from a Kleenex box featuring Rogue One: A Star Wars Story.

diy-star-wars-rogue-one-night-light-supplies-needed

DIY Star Wars Rogue One Night Light

What you’ll need: 

  • 1 empty Kleenex box with Rogue One: A Star Wars Story designs
  • 1 thumb tack
  • 1 electric tealight

diy-star-wars-rogue-one-night-light-poke-holes-in-box

What you do: 

1. Grab your Kleenex box and use the thumb tack to poke holes on all sides of the box. 

2. Turn on your tealight and drop into the empty Kleenex box

3. Enjoy the light show! 

diy-star-wars-rogue-one-night-light-add-tealight diy-star-wars-rogue-one-night-light-shine-on

You can find more great kids crafts by checking out my Pinterest boards! And for more fun with Kleenex, check out their boards too here

Do you have a caring moment to share with Kleenex? 

Disclaimer: Compensation was provided by Kleenex brand via Momtrends. The opinions expressed herein are those of the author and are not indicative of the opinions of Kleenex or Momtrends.

Find Kleenex on Facebook, Twitter, Pinterest, and Instagram

diy-star-wars-rogue-one-night-light-a-great-craft-for-kids

Thanksgiving Napkin Ring Placeholders

This shop featuring Thanksgiving napkin ring placeholders has been compensated by Collective Bias, Inc. and its advertiser. All opinions are mine alone. #HandsOnCrafty #CollectiveBias

thanksgiving-napkin-ring-placeholders-adding-sparkle-to-the-thanksgiving-table

While spring may be my favorite season, I love the fall for the way it brings friends and family together in thanksgiving. We celebrate the month of November by sharing what we’re thankful for and spending time around the table together. And every year for Thanksgiving, we head over to my mother in law’s house to share a meal. 

My mother in law loves creating a beautiful table scape and, after making these napkin rings a few years back, I’m in charge of the napkin rings and place holders. And my daughter loves helping out so I always try and find something a. that she can do and b. that’s easy and quick since we usually have to make at least 20 of them. 

thanksgiving-napkin-ring-placeholders-a-quick-and-easy-table-setting

Well this year my mother in law will be heading out to Boston to celebrate with my husband’s brother so we’re still trying to figure out what our plans are. But no matter where we go, we’ll be prepared with these awesome thanksgiving napkin ring placeholders that my daughter and I put together this past weekend. 

She was dying to get started and make them so we got a head start and prepped about 10 of these bad boys (no names yet on half of them). We’ll be ready for whatever house we end up at on Turkey Day.  

Thanksgiving Napkin Ring Placeholders

What you’ll need: 

  • Scotch® Expressions Brown Glitter Tape
  • Scotch® Expressions Green Glitter Tape
  • Scotch® Create Double-sided Tape
  • 1 piece 8.5 x 11″ card stock (solid or patterned color)
  • scissors
  • chalk marker in fall colors
  • fake fall leaves
  • cloth or disposable napkin

thanksgiving-napkin-ring-placeholders-materials-needed

What you do: 

1. Grab the Scotch® Expressions Green Glitter Tape and, with your paper in the portrait position, place a row of green tape about 1/2 inch up from the bottom of the paper. Repeat once more with a second row of green glitter tape directly above the first. 

2. Cut a straight line about 1/2 inch from the top of the second row of green glitter tape. This will be your napkin ring base. Repeat as many times as you need to in order to get the desired amount of napkin rings. 

thanksgiving-napkin-ring-placeholders-cut-tape thanksgiving-napkin-ring-placeholders-write-in-name

3. Grab the leaf and write the name of the person this napkin ring placeholder is for. 

4. Position the Scotch® Expressions Brown Glitter Tape in the middle of the two green tape lines. Place the leaf in the center of the paper and use the brown glitter tape to secure it. Leave a small tail at the end of the brown tape to secure the placeholder around the napkin. 

thanksgiving-napkin-ring-placeholders-secure-leaf-in-place-with-tape thanksgiving-napkin-ring-placeholders-wrap-napkin-ring-around-napkin

5. Wrap the napkin ring around the napkin and secure in place with tail of the brown glitter tape and reinforce with some Scotch® Create Double-sided Tape underneath the overlapping paper. 

Tada! You’re all set! 

thanksgiving-napkin-ring-placeholders-a-simple-way-to-add-sparkle-to-the-table

How do you celebrate Thanksgiving in your home? 

I was able to find all of the crafting goodies I needed, including the Scotch® Expressions Glitter Tape, in the craft aisle in Walmart. So easy to find everything in one place! With a perfect combination of versatility, function & fun, Scotch® Expressions Tapes turn everyday projects into simply inspired creations. I love how simple and easy it was to make these Thanksgiving napkin ring placeholders with my daughter and how fun and sparkly they ended up! How awesome is that? 

scotch-at-walmart


© A Crafty Spoonful - All Rights Reserved
It is OK to use one of my photos provided a link back and/or proper credit is given. It is NOT ok to copy and paste a whole post including instructions. Please do not remove watermarks or alter images in any way. Please contact me with any questions at danielle@acraftyspoonful.com

.